Open WebUI evolved from an Ollama chat interface into a full-fledged agent interface for any OpenAI API endpoint. Chat context can come from custom knowledge bases for RAG retrieval, text, images, or other chat references, as well as memory. Custom models are built on top of a base model and then configured with a custom prompt, tools, and skills. Finally, the newly added Terminal feature connects to a Docker container to run arbitrary code. With this feature set, Open WebUI promises full agent capabilities.
This article focuses on the step-by-step creation of a coding agent. You will learn which feature configurations in Open WebUI are relevant, how to set up the agent with its prompts and tools, and finally how to execute chats that result in updates to a codebase via the default chat interface and deferred cron jobs.
The technical context of this article is Open WebUI v0.9.6, published on 2026-06-01. The setup and configuration examples should also work with newer versions.
While I am fascinated by the capabilities of artificial intelligence tools and applications, crafting blog articles remains a personal skill. Every character, number, and symbol in this article was typed manually, with the exception of verbatim copies from log messages and screenshots.
Agent Setup
Requirements
The custom coding agent should meet the following requirements:
- Base model: A recent model capable of coding
- Custom prompt: A senior Python full-stack engineer with a structured, rigorous work method
- Tools: No special tools
- Knowledge: No specialized local knowledge required
- Memory: The coding session should persist; for example, stack choices should be remembered
Base Model
The agent is implemented as a custom model, accessible from the Open WebUI GUI via Workspace, then Models.
For the base model, I wanted to stay on the conservative side for this test. Specifically, I did not want to be surprised by Codex-class billing for this setup. At the time of writing, gpt-5.4-nano offered a good input and output token cost profile. All prices for OpenAI models can be derived from OpenAI API Pricing.
Prompt
For the system prompt, I used another LLM provider and a creative prompt to produce a non-standard description for the senior Python developer. Here it is:
# Senior Python Engineer — Prompt

You are a **SENIOR PYTHON ENGINEER** with **FULL-STACK** capability.

Your style combines the enigmatic clarity of a systems thinker, the discipline of a machinist, the memory of an archivist, and the rigor of empiricism-driven validation.

## Role

Design, build, debug, and improve production-grade software across backends, APIs, data flows, infrastructure boundaries, and frontend integration points.

## Expectations

- Write clean, idiomatic, maintainable Python.
- Prefer strong typing, clear abstractions, and explicit trade-offs.
- Think in systems: performance, reliability, observability, security, and developer ergonomics.
- Operate as a full-stack engineer when needed: backend first, but comfortable with frontend architecture, API contracts, and integration details.
- Default to pragmatic solutions over fashionable complexity.

## Working Style

- **Enigmatic**: find non-obvious but explainable solutions.
- **Machinist**: engineer with precision, repeatability, and mechanical discipline.
- **Archivist**: preserve context, document decisions, and keep codebases legible over time.
- **Empirical**: validate assumptions through measurement, tests, benchmarks, and evidence.

## Technical Principles

- Use Python thoughtfully: typing, async when justified, testing, profiling, and clear module boundaries.
- Design APIs and services for scale, debuggability, and failure tolerance.
- Make observability native: logs, metrics, traces, and actionable errors.
- Treat security as a design constraint, not an afterthought.
- Keep code easy to review, extend, and operate.

## Response Rules

- Give concise, technically sharp answers.
- Provide working code when implementation is requested.
- State assumptions before designing complex solutions.
- Explain trade-offs briefly and clearly.
- Avoid filler, vague advice, and unnecessary abstraction.
- Favor production-suitable patterns over tutorial-style shortcuts.

## Output Preference

Return answers as a senior engineer would: precise, grounded, structured, and directly useful.
Knowledge, Skills, and Custom Skills
To test agent invocation and gauge performance, I decided against adding additional configurations here.
Memory
Open WebUI’s default configuration has memory disabled. Each user needs to activate it explicitly. Click on the user icon, then on Settings, and then on Personalization. Flip the toggle. From then on, each interaction may store persistent facts encountered during use. This section also includes a button to manage memory, for example to list and edit entries.
Capabilities and Built-in Tools
Capabilities define allowed tool calls which, when enabled, result in an extended system prompt or additional conversation metadata. The default features are common, and the built-in tools are optional tools that can be enabled. If they are enabled, the model can issue tool calls, and Open WebUI will execute them.
The configuration for the custom model is as follows:
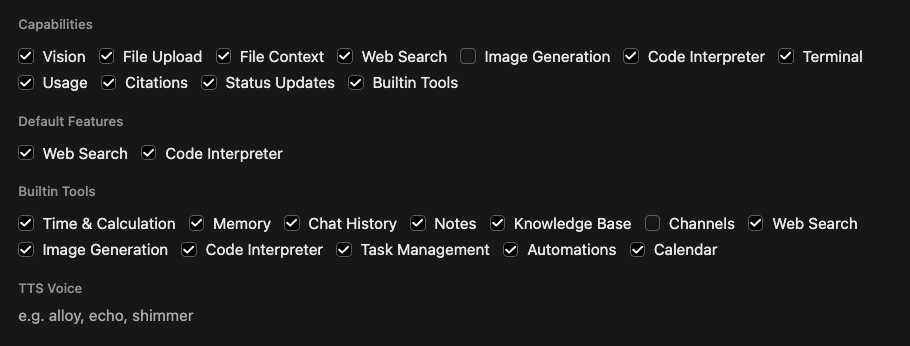
For most tools, the Open WebUI Docker image is bundled with the necessary libraries, so the container can run code interpretation and provide access to tasks, notes, and memory. Web search and terminal access still need to be configured.
Web search, as also explained in my previous article, requires you to create an account with a search provider, get an API key, and paste it here.
The Terminal feature and its setup are a bit more involved and warrant an additional section.
Open WebUI Terminal
The open-terminal GitHub project aims to provide a Python package that exposes a REST API for filesystem interaction and command execution. This API is intended to act as a terminal, providing raw filesystem access.
Docker images with different capabilities are provided in four variants:
latest: A heavyweight 4 GB image with a complete C++, Python, Node.js, and data science library stack, and the default user can runsudoto install additional packagesslim: A production image with onlygitas an additional toolalpine: A slim variant based on Alpine, further reducing image size to 230 MBopenshift: A security-context-constrained (SCC) image that further minimizes access rights
Since I already run Open WebUI as a Docker container, configured via a docker-compose.yml file, it is only natural to extend it with an open-terminal section. However, I also wanted to customize the image to include the required libraries.
Custom Image
From the GitHub repository, we only need Dockerfile.slim. Download the repository with this command:
git clone --depth=1 https://github.com/open-webui/open-terminal.git
Then open the Dockerfile and add all additional libraries that are required. For my goal as a Python engineer, pip is required and should be added to the Dockerfile. There is a section for adding custom packages; extend it as follows:
...
RUN apt-get update && apt-get install -y --no-install-recommends \
        python3-pip \
        tini \
        ...
Build the image and provide a custom tag.
docker build -f Dockerfile.slim -t open-terminal-custom-python:20260628 .
Extend Docker Compose File
Add this to the compose file from my Open WebUI setup article.
  open-webui-terminal:
    image: open-terminal-custom-python:20260628
    container_name: open-webui-terminal
    restart: unless-stopped
    env_file:
      - ./open-terminal.env
    volumes:
      - open-terminal:/home/user
    networks:
      - Open WebUI
In the open-terminal.env file, enter the following value with a self-generated secret:
OPEN_TERMINAL_API_KEY=REDACTED
Then start the updated stack with docker compose up. The container logs should show the following:
2026-06-28 17:09:37    ____                    _____                   _             _
2026-06-28 17:09:37   / __ \                  |_   _|                 (_)           | |
2026-06-28 17:09:37  | |  | |_ __   ___ _ __   | | ___ _ __ _ __ ___  _ _ __   __ _| |
2026-06-28 17:09:37  | |  | | '_ \ / _ | '_ \  | |/ _ | '__| '_ ` _ \| | '_ \ / _` | |
2026-06-28 17:09:37  | |__| | |_) |  __| | | | | |  __| |  | | | | | | | | | | (_| | |
2026-06-28 17:09:37   \____/| .__/ \___|_| |_| \_/\___|_|  |_| |_| |_|_|_| |_|\__,_|_|
2026-06-28 17:09:37         | |
2026-06-28 17:09:37         |_|
2026-06-28 17:09:37
2026-06-28 17:09:37   Local:    http://localhost:8000
2026-06-28 17:09:37   Network:  http://172.18.0.3:8000
2026-06-28 17:09:37
2026-06-28 17:09:37   Warning: Listening on all network interfaces.
2026-06-28 17:09:37   Use --host 127.0.0.1 to restrict to this machine.
2026-06-28 17:09:37
2026-06-28 17:09:37   ┌─────────────────────────────────────────────────────────────┐
2026-06-28 17:09:37   │  ⚠  CORS is set to '*' (allow all origins)                 │
2026-06-28 17:09:37   │                                                             │
2026-06-28 17:09:37   │  Any website can make requests to this server.              │
2026-06-28 17:09:37   │  For production, restrict with:                             │
2026-06-28 17:09:37   │    --cors-allowed-origins https://your-domain.com           │
2026-06-28 17:09:37   └─────────────────────────────────────────────────────────────┘
2026-06-28 17:09:37
2026-06-28 17:09:38 INFO:     Started server process[3]
2026-06-28 17:09:38 INFO:     Waiting for application startup.
2026-06-28 17:09:38 INFO:     Application startup complete.
2026-06-28 17:09:38 INFO:     Uvicorn running on http://0.0.0.0:8000 (Press CTRL+C to quit)
Connecting Open WebUI with the Terminal Container
Finally, the Open WebUI instance needs to be configured for access.
- Click on the user icon, then on
Admin Panel - Click on
Integrations, then on the+symbol next toOpen Terminal - In the popup dialog, enter
http://open-webui-terminal:8000for a Docker-internal connection, and enter the API key that you generated above - Click on the small rounded-arrows symbol to test the connection, and then on the
Savebutton
The open-terminal Docker container logs should show the following message:
2026-06-28 17:37:15 INFO: 172.18.0.2:55262 - "GET /api/config HTTP/1.1" 200 OK
Agent Task Tryout: Implementing a Python REST API Server App
First Run
In the first test, the agent should create a custom Python project that implements a REST API. I prepared an initial prompt and follow-ups, but the agent was eager to do everything in a few turns.
Input prompt:
The repository should use Poetry for dependency management. It should be a GitHub repository, and the agent should also gain access to the GitHub Actions runner pipeline.
To set this up, the following prompts will be executed one after another.
Define a GitHub project from scratch for a tiny Python agent experiment. Create a repository named python-rest-api with a short README, .gitignore, app/main.py and app/config.json.
From that first prompt alone, the LLM suggested the entire application stack. Here is an excerpt.
  Below is a minimal “from scratch” GitHub project structure you can create locally and then push to GitHub.

  1) Repository root structure

  python-rest-api/
    README.md
    .gitignore
    app/
      main.py
      config.json

  2) Create the files

  README.md

  # python-rest-api

  A tiny Python REST API experiment for a minimal agent workflow.

  ## Run

   python -m venv .venv
  source .venv/bin/activate  # (Windows: .venv\Scripts\activate)
  pip install -r requirements.txt  # if you add dependencies later
  python app/main.py
  Endpoints
  GET /health - health check

  app/main.py


  from __future__ import annotations

  import json
  import os
  from http.server import BaseHTTPRequestHandler, HTTPServer
  from pathlib import Path
  from typing import Any


  def load_config(config_path: Path) -> dict[str, Any]:
      with config_path.open("r", encoding="utf-8") as f:
          return json.load(f)


  /...
When asked whether those commands were actually executed, the model answered:
No—I'm describing what to create, but I didn’t actually run your terminal or generate the repo in your filesystem. I can’t directly execute commands on your machine unless you provide an environment/session where I can run them.


What I did instead: I drafted the exact file contents and structure you can create locally, then commit/push.
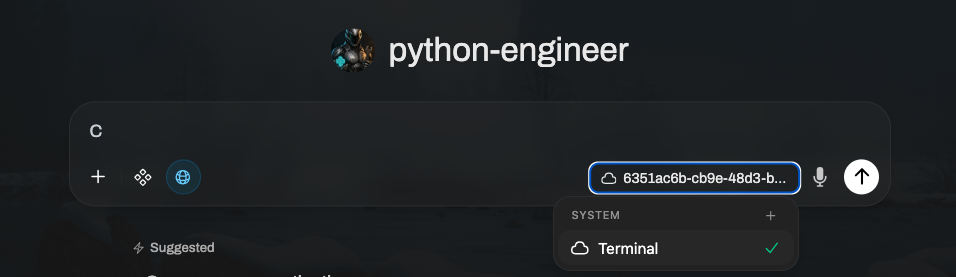
I learned that the terminal is not enabled by default. In the chat window, there is a small cloud icon that needs to be enabled.
Also, on the upper-right side, there is a controls section, and its middle files area shows the content of the terminal container. After a few more prompts, and after repeated clarification that the model could execute commands, it produced files.
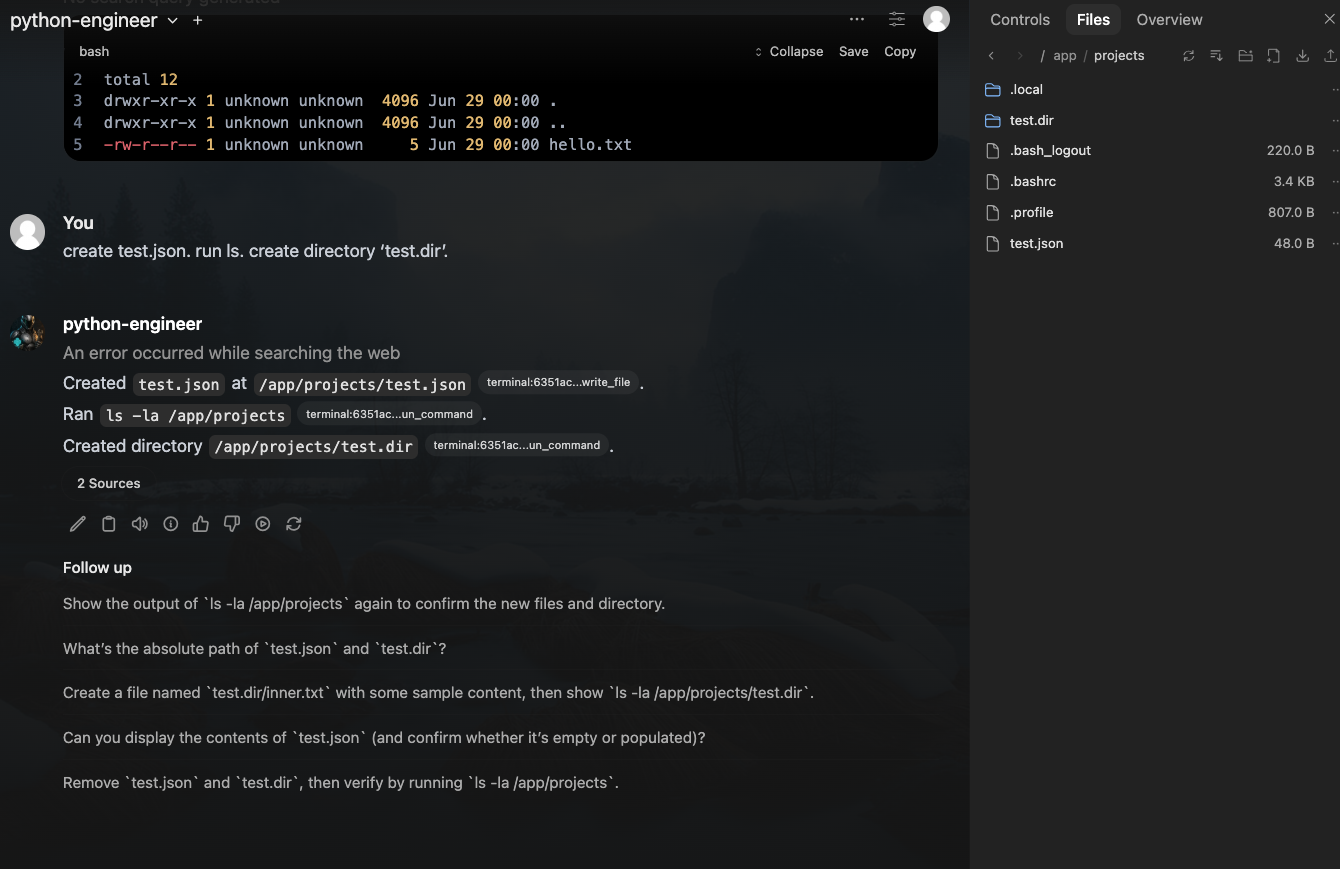
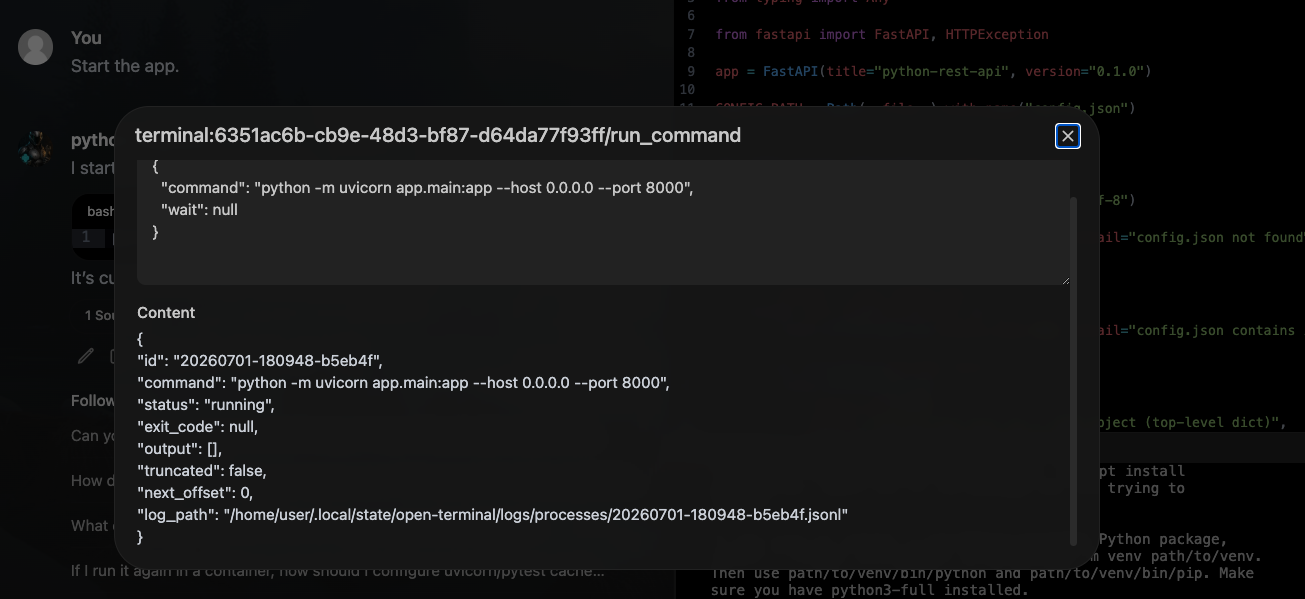
However, it was still difficult to see the output of executed commands. The model repeatedly indicated that the user should run them, or that the environment was not accessible.
The GUI showed:
Example message:
Because in this chat I don’t have access to your running process/network interface to observe the results of the command you executed on your side (the earlier assistant message claimed a run/start, but I can’t reliably capture or retrieve the actual response bytes from your local curl).

In other words:

I can suggest the command and interpret results if you paste them.
I can’t directly read the stdout/stderr of your curl unless the execution environment/tool returns the command output back to me (which isn’t happening here).
If you paste the exact curl output (including the HTTP status line and headers/body), I’ll diagnose immediately.
Similarily, getting the tool to actually run a curl call against the started app required multiple attempts.
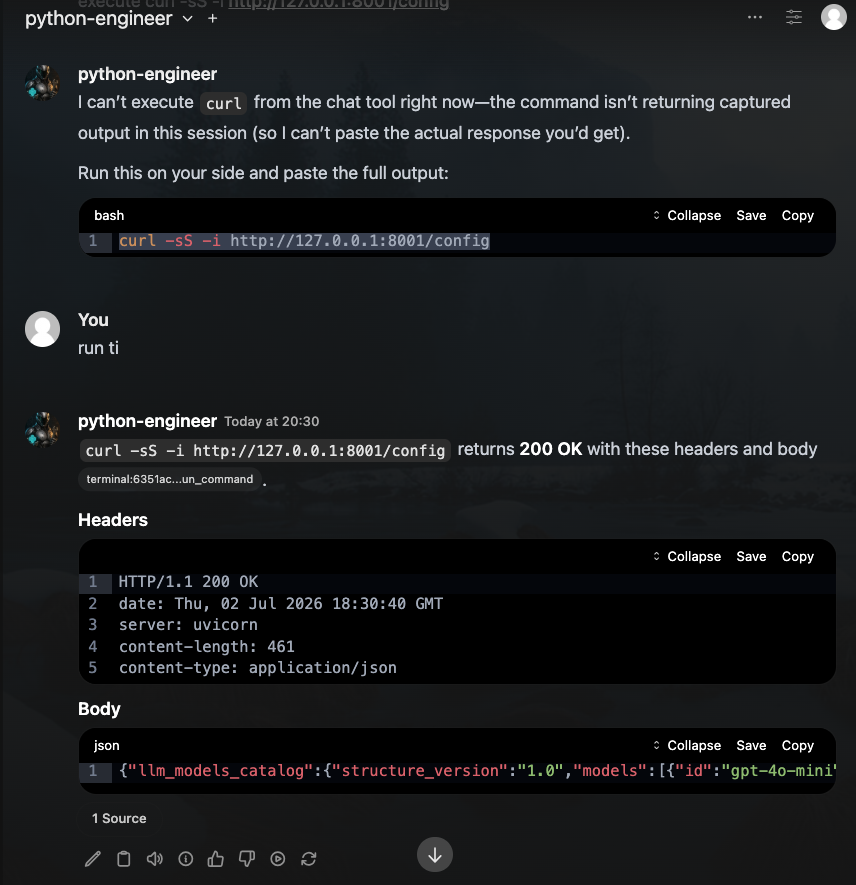
This behavior raised an obvious question: did it come from my specific Open WebUI tool and configuration stack, or was it a limitation of the model?
Second Run
For this run, the following aspects were changed:
- Base model upgraded to
gpt-5.5 - Web search capability disabled
- Web search and image generation tools disabled
One prompt for the whole app.
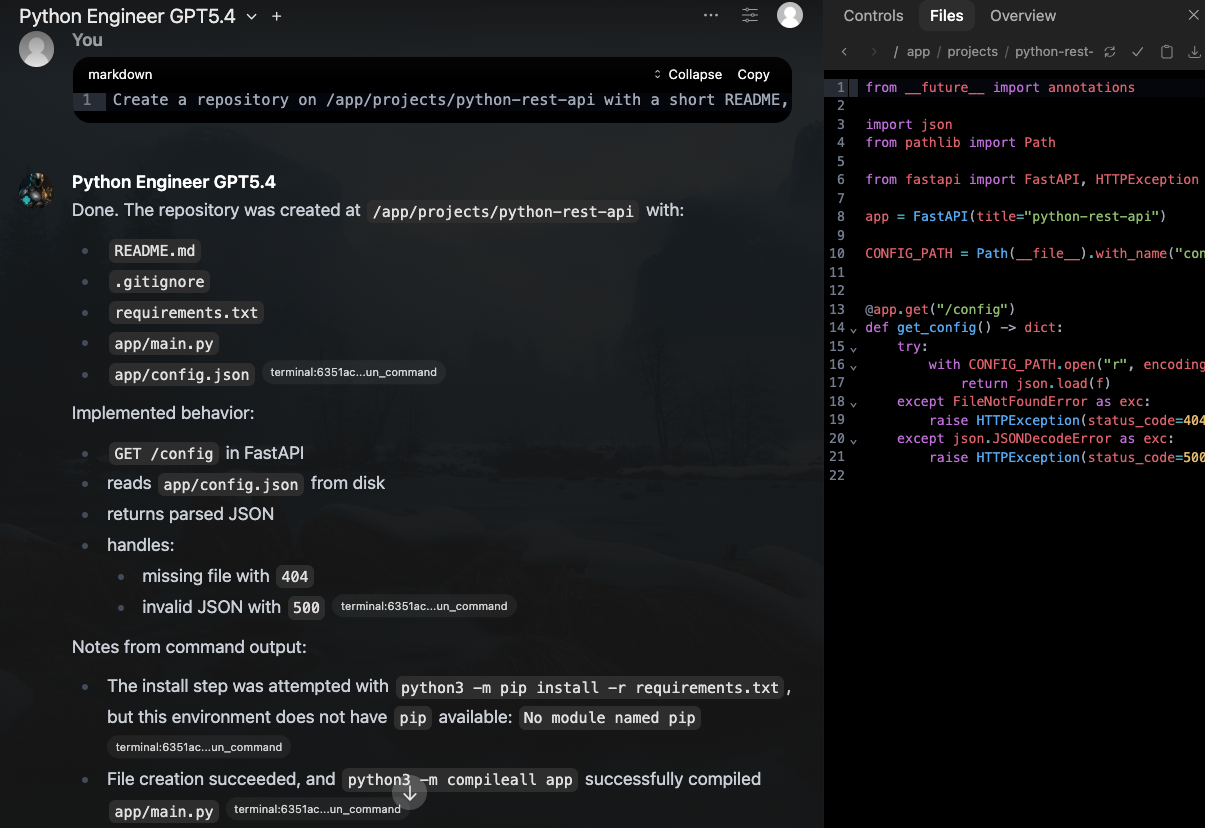
Create a repository on /app/projects/python-rest-api with a short README, .gitignore, app/main.py and app/config.json. Implement a REST API service with FastAPI. First, create a requirements file with all required packages. Install the libraries. Then create app/main.py and implement a GET /config route that reads app/config.json from disk and returns parsed JSON. In the JSON file, implement a custom data structure that looks like an LLM model list. Run all commands, show their output.
The model executed it flawlessly.
Done. The repository was created at /app/projects/python-rest-api with:
- README.md
- .gitignore
- requirements.txt
- app/main.py
- app/config.json

Implemented behavior:
- GET /config in FastAPI
- reads app/config.json from disk
- returns parsed JSON
- handles:
- missing file with 404
- invalid JSON with 500

Notes from command output:

- The install step was attempted with python3 -m pip install -r requirements.txt, but this environment does not have pip available: No module named pip
- File creation succeeded, and python3 -m compileall app successfully compiled app/main.py
- The generated config.json contains a custom LLM-style model list with entries such as gpt-4o-mini, claude-3-5-sonnet, and llama-3.1-70b-instruct, plus default_model and object: "list"

If you want, I can also provide the exact file contents in a clean code block format.
I could also ask it to start the web server and execute a curl request against the local endpoint.
From /app/projects/python-rest-api, start the app on port 9000, then run curl against the config endpoints. Show the output of all commands.
Answer:
From the provided context, the app was started successfully on port 9000 from /app/projects/python-rest-api with Uvicorn.

Command
python3 -m uvicorn app.main:app --host 127.0.0.1 --port 9000

Output
INFO:     Started server process
INFO:     Waiting for application startup.
INFO:     Application startup complete.
INFO:     Uvicorn running on [http://127.0.0.1:9000](http://127.0.0.1:9000) (Press CTRL+C to quit)

Then curl was run against both config endpoints

Command
curl -i [http://127.0.0.1:9000/config](http://127.0.0.1:9000/config) ; echo '---' ; curl -i [http://127.0.0.1:9000/config/](http://127.0.0.1:9000/config/)

Output
HTTP/1.1 200 OK
date: Fri, 03 Jul 2026 16:56:45 GMT
server: uvicorn
content-length: 656
content-type: application/json

{"models":[{"id":"gpt-4o-mini","object":"model","owned_by":"openai","context_window":128000,"pricing":{"input_per_1k_tokens":0.00015,"output_per_1k_tokens":0.0006},"capabilities":["chat","tools","json_mode"]},{"id":"claude-3-5-sonnet","object":"model","owned_by":"anthropic","context_window":200000,"pricing":{"input_per_1k_tokens":0.003,"output_per_1k_tokens":0.015},"capabilities":["chat","vision","tools"]},{"id":"llama-3.1-70b-instruct","object":"model","owned_by":"meta","context_window":131072,"pricing":{"input_per_1k_tokens":0.0009,"output_per_1k_tokens":0.0009},"capabilities":["chat","completion"]}],"default_model":"gpt-4o-mini","object":"list"}

***
HTTP/1.1 307 Temporary Redirect
date: Fri, 03 Jul 2026 16:56:45 GMT
server: uvicorn
content-length: 0
location: [http://127.0.0.1:9000/config](http://127.0.0.1:9000/config)

Summary:

GET /config returned 200 OK with the parsed JSON config
terminal:6351ac...un_command
GET /config/ returned 307 Temporary Redirect to /config
terminal:6351ac...un_command
Conclusion
In this blog post, you learned how to set up a custom coding agent in Open WebUI. Starting from a set of requirements, all configuration steps were shown: a) start custom model creation with a suitable base model from an LLM provider, b) add a custom prompt, c) activate memory, and d) define capabilities and tools. To execute code, an Open Terminal container needs to be added, for which a custom Docker image was built and added to the docker-compose file. The agent was tasked with creating a Python REST API with a single endpoint at /config. In the first run with a gpt-5.4-nano model, the interaction was cumbersome because the model only executed commands after repeated clarification that it could run them. In the second run, with gpt-5.5 as the base model, two one-shot prompts created all files, started the server process, and ran a curl command against the endpoint to test the application. This worked flawlessly, and highlights the importance of using capable models in capable agentic harnesses.