Nomad is a distributed job scheduler, orchestrator and monitor. Learn how to install and use it for provisioning your Docker containers.
In this article, I will introduce Hashicorp Nomad, a job scheduling system that can be used to start any application, either as system binaries or Docker container.
Nomad will be the central tool in my infrastrutcture to fulfill the following requirements of my infrastructure@home project:
- AM1: Applications can be deployed as binaries or docker container
- AM2: Applications can be deployed on specific nodes
- AM3: Applications can be deployed somewhere inside the cluster
- AM4: An interface in which I see the status of each application (health, resource consumption, endpoints)
What is Nomad?
In essence, Nomad is a distributed job scheduler and job monitor. Nomad is a single Go binary that runs on most architectures, including Linux, ARM and Windows. On each node of your cluster, you start Nomad Servers or Nomad clients. The server is the “brain” of the job scheduling. It has the complete data about all jobs, their allocation, their health status. In a cluster you provide three or five servers so that they replicate the state data to each other and provide automatic failover when one server goes down. Besides keeping state, the primary role of the server is to process incoming job definitions, check how to allocate them in the cluster, and then send this workload to the client. Nomad clients process job allocations: They start the service, monitor the startup phase, and if all goes well, will run the service. All data is streamed back to the servers. Furthermore, the clients collect metrics about the nodes and the jobs.
Nomad can be accessed via CLI, a REST-API or a Web UI. It provides many more features such as versioning job files, moving jobs between nodes, upgrade strategies and much more. In this article. I will only cover features that are relevant for our use cases.
Installing Nomad
The installation of Nomad follows the same steps as with Consul:
- Determine the correct Linux distribution and hardware
- Create nomad group, user and directories
- Download and link the nomad binary
- Copy configuration files
- Enable nomad with systemd
As before, I automated the installation completely with Ansible. The installation went smoothly. But I needed two evenings of getting Nomad to run because of a subtilty. Basically, I assumed that configuration for Nomad would be the same as for Consul: Point it to a directory and it will use all included configuration files. Well yes, no! You need to explicitly pass the configuration files:
>> /usr/local/bin/nomad agent -server -config /etc/nomad/nomad.conf.json
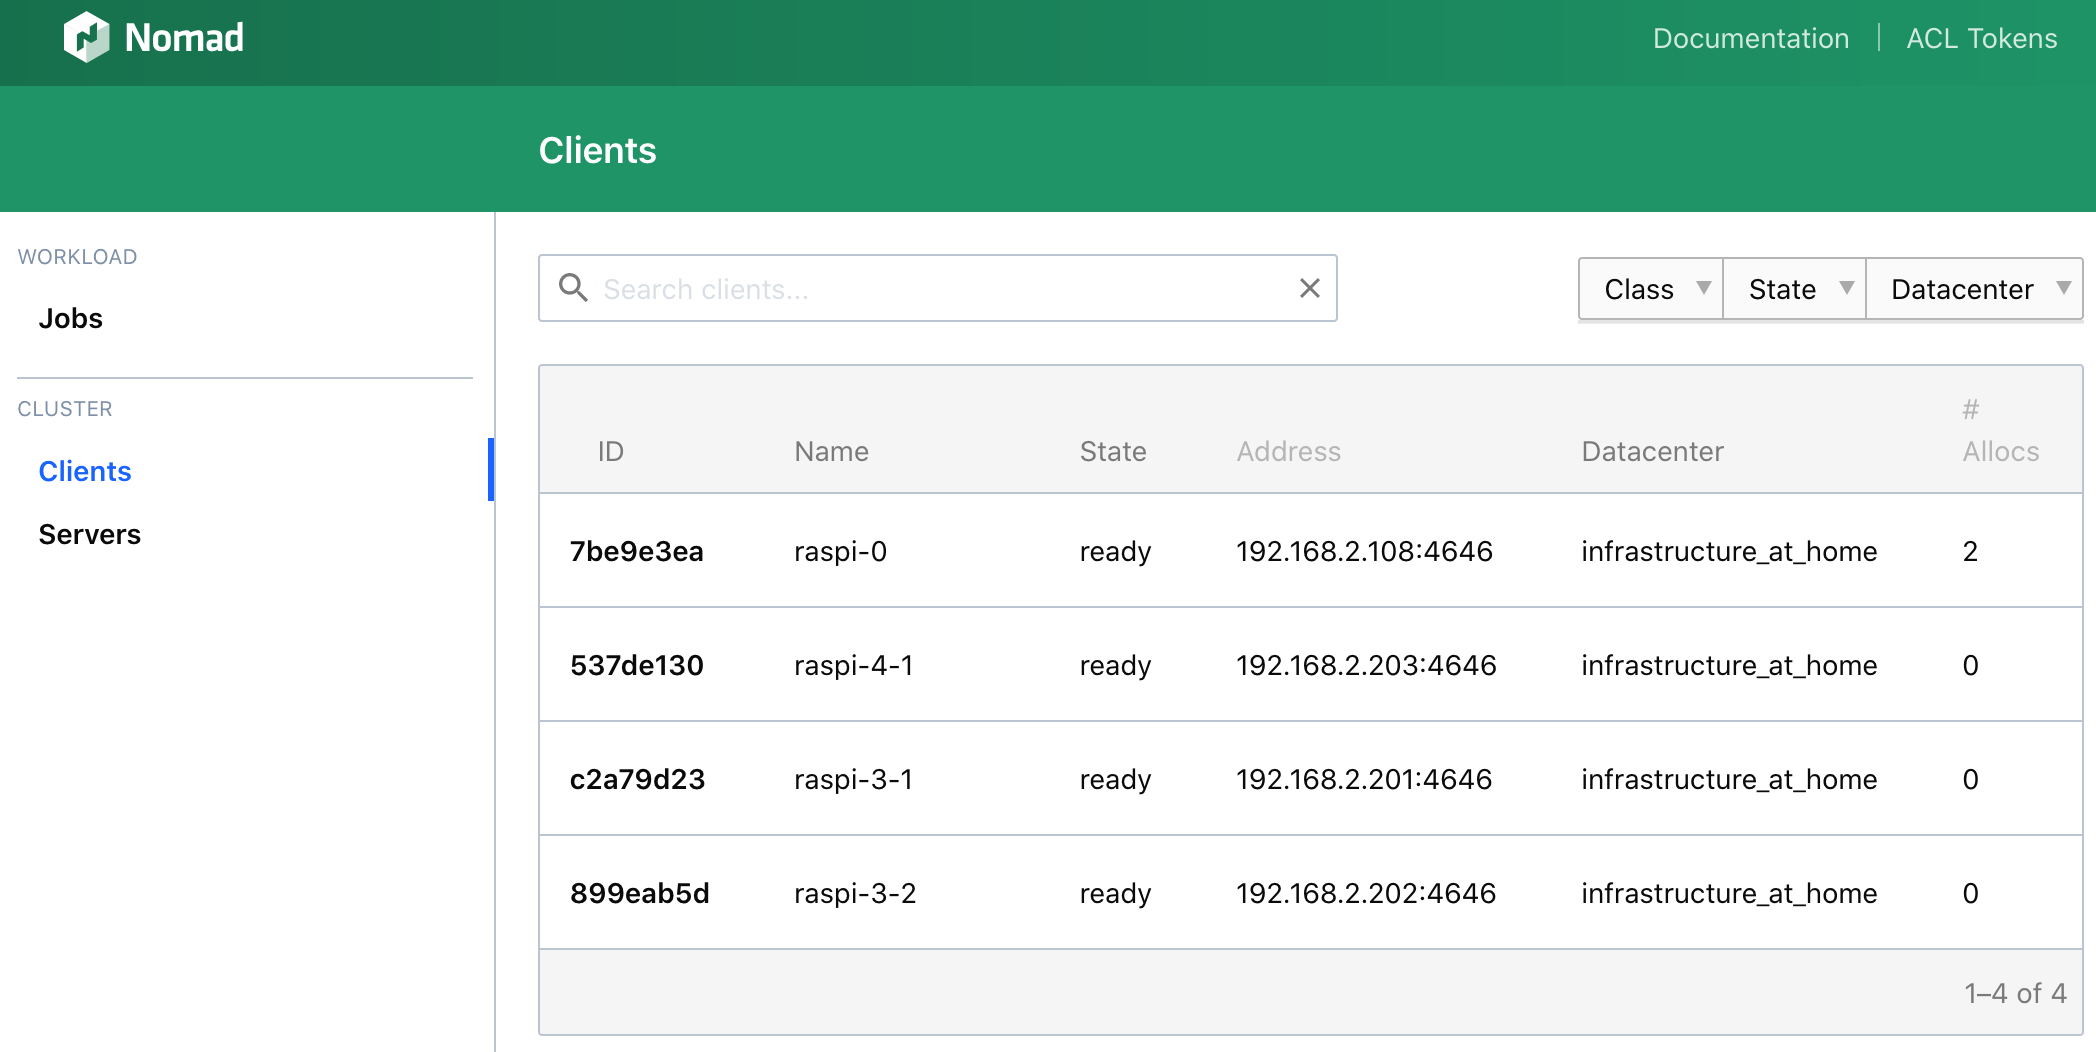
When its correctly installed on all nodes, you can see the status on the console.
>> nomad node status

ID        DC                      Name       Class   Drain  Eligibility  Status
7be9e3ea  infrastructure_at_home  raspi-0    <none>  false  eligible     ready
537de130  infrastructure_at_home  raspi-4-1  <none>  false  eligible     ready
899eab5d  infrastructure_at_home  raspi-3-2  <none>  false  eligible     ready
c2a79d23  infrastructure_at_home  raspi-3-1  <none>  false  eligible     ready
Or you can access the Web UI on localhost:4646.

All nodes are connected. Now we can start to write Jobs.
Nomad Jobs: Execute a Binary
The first job will execute a binary that starts a local web server. Jobs will be created as a job file which defines what to run, how much instances, what ports to open, the health-check of the application, and much more. Jobs can be defined in JSON or in Hashicorp Configuration Language, or short HCL, which is similar to JSON. I will use HCL as well because most of Nomads documentation uses this language.
Here is the job file:
job "example" {
  datacenters = ["infrastructure_at_home"],
  group "exec" {
    task "http_serve" {
      driver = "exec"
      artifact {
        source = "https://github.com/m3ng9i/ran/releases/download/v0.1.4/ran_linux_arm64.zip"
      }
      config {
        command = "ran_linux_arm64"
        args = [
          "-l",
          "--debug",
          "-p",
          "${NOMAD_PORT_http}"
        ]
      }
      resources {
        cpu = 200
        memory = 200
        network {
          port "http" {}
        }
      }
    }
  }
}
Lets explain the most important parts of the Job description:
- It is structured into
job,groupandtasksections- Job is the top-level name for running applications, think of the file name
- A group defines a set of related tasks that will be placed on the same node
- A task defines which the application: which type, its configuration, its network ports and more
- With
datacenteridentifies at which nomad cluster to run the program - Inside of
taskwe define the application specific- The
drivercan beexecRun command in a ShellJavaExecute a JAR FiledockerExecute a docker container
- The
- With
artifactwe express to download and unzip a file to the application job configprovides thecommandand additionalargsthat will be used to execute the application. Take special attention to the ${NOMAD_PORT_http} - this is the dynamic HTTP port that Nomad will assign to the running process.- Finally with
resourcesyou define the minimum required resources that a node needs to fulfill this task, and also how to assign ports, which is in this case dynamic
That’s a lot to cover! But all entries define important aspects of the jobs. I like to compare the readability of this definitions to Ansible: Its declarative syntax helps you to understand what the job will be doing.
Now, let’s continue and run this job. You should always run one command first: nomad job plan. This gives you an easy overview of what the Job will be doing.
>> nomad job plan example.nomad

Job: "example"
Task Group: "exec" (1 ignore)
  Task: "http_serve"

Scheduler dry-run:
- All tasks successfully allocated.
Ok, lets run it.
>> nomad job run example.

==> Monitoring evaluation "8eb3657a"
    Evaluation triggered by job "example"
    Evaluation within deployment: "f31e3269"
    Evaluation status changed: "pending" -> "complete"
==> Evaluation "8eb3657a" finished with status "complete"
You can see the Job status.
>> nomad status top

ID            = example
Name          = example
Submit Date   = 2020-03-09T19:25:38Z
Type          = service
Priority      = 50
Datacenters   = infrastructure_at_home
Namespace     = default
Status        = running
Periodic      = false
Parameterized = false

Summary
Task Group  Queued  Starting  Running  Failed  Complete  Lost
exec        0       0         1        2       1         0

Latest Deployment
ID          = f31e3269
Status      = successful
Description = Deployment completed successfully

Deployed
Task Group  Desired  Placed  Healthy  Unhealthy  Progress Deadline
exec 1        1       0        0          2020-03-09T19:35:38Z

Allocations
ID        Node ID   Task Group  Version  Desired  Status    Created     Modified
21d08737  4b393cb6  exec        4        run      running   7m49s ago   7m35s ago
Similar information is also shown in the Web UI.
Once the deployment is complete, you can access the webserver and see the files of the local dir.

Running a Docker Job
A job file to start a Docker container looks similar, but has other options:
- The
driverisdocker - inside
config, you specify theimagethat will be loaded, and provide aport_mapto specify which exposed ports of the Docker container will be exposed by the job. The declarationhttp = 80means that the exposed port 80 will be bound to the variablehttp - In the
resources.networkpart we map the exposedhttpport from the Docker container to static port 80
job "example2" {
  datacenters = ["infrastructure_at_home"],
  group "webserver" {
    count = 3,
    task "nginx" {
      driver = "docker",
      config {
        image = "nginx:1.17.9"

        port_map {
          http = 80
        }
      }
      resources {
        cpu = 200,
        memory = 200,
        network {
          port "http" {
            static = 80
           }
        }
      }
    }
  }
}

Controlling Application Allocation
The default behavior of Nomad is to place as many services as possible on the same node - in order to reduce network latency. However, there are cases where you want to target specific nodes, for example nodes which have more performant resources. Or you want to spread the spread the application to different nodes.
Nomad offers the two options to control where the application will be placed.
The first option is affinity. It defines a set of characteristics that the node should have. Nodes which have this characteristics will be choose primarily. You can select from a rich set of node variables, including CPU arch, kernel version, OS name, and Nomad specific environment variables.
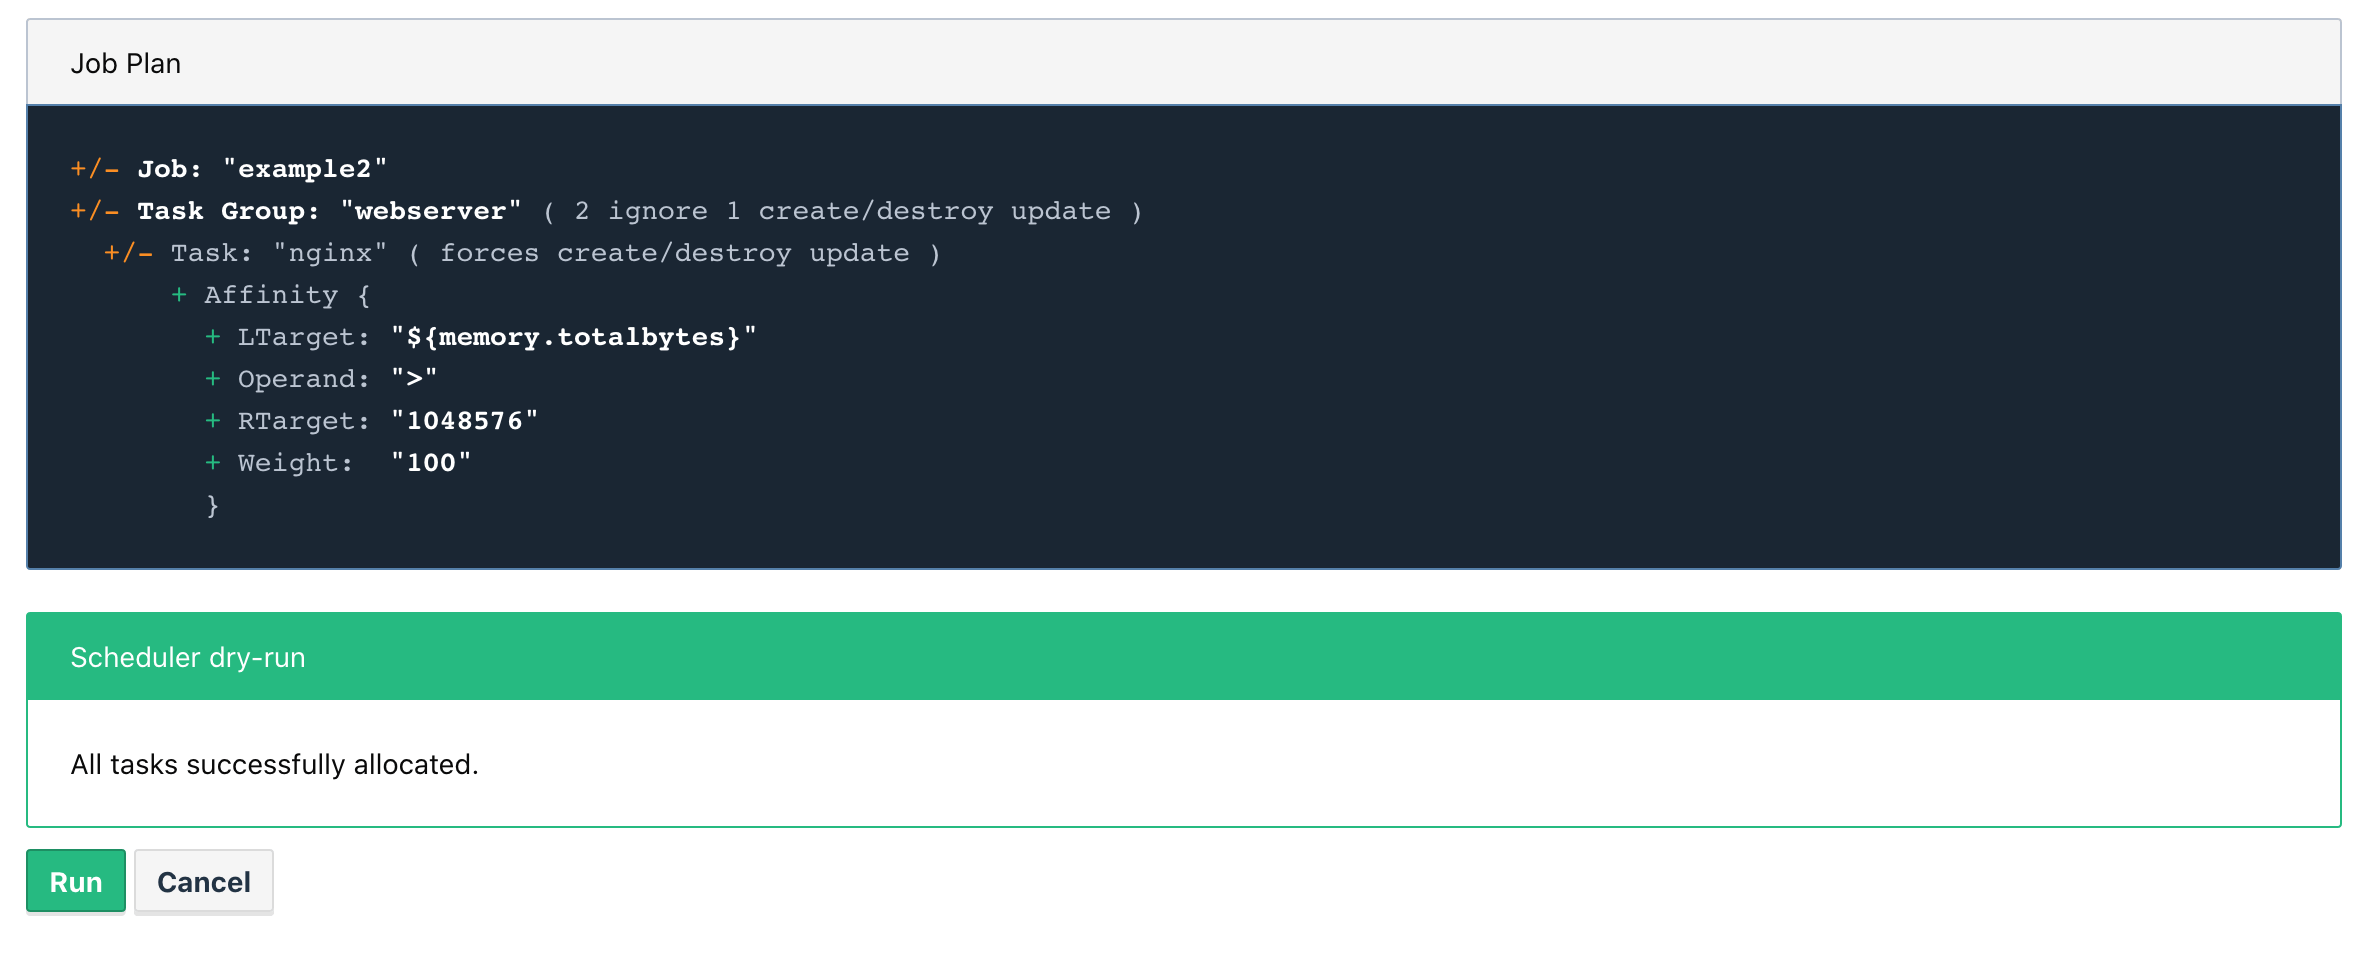
For example, if we want the Nginx webservers only to be run in Raspberry Pi which have more than 1GB of memory, we can add the following code:
job "example2" {
  group "webserver" {
    count = 2
    task "nginx" {
      affinity {
        attribute = "${attr.memory.totalbytes}"
        operator = ">"
        value = "1048576"
        weight = 100
      }
      ...
    }
  }
}
When we plan this job, we can see that this task will destroy one Nginx that was running on raspi-3-1 (which only has 1GB) and will put this instance instead on raspi-4-2.
The second option is to use spread. Normally, Nomad tries to allocate as many tasks as possible on the same node. With spread you can modify this behavior and express that tasks should be run on different computers.
Conclusion
In this article, I explained how Nomad is the central tool for application management in my infrastructure@home project. Nomads job scheduler can run any binary or docker container dynamically allocated to nodes. We saw one example for executing a simple HTTP server binary, and we saw another example for deploying several Nginx webserver. You can control the allocation with the affinity or spread attributes. In the next article, I will explain how applications can be discovered.