Terraform is an infrastructure-as-code tool that helps you to manage different resources declaratively. Providers that offer an API for resource managing can be used out of the box, for example for the Hetzner cloud as shown in my last article. When using AWS, this is different: You need to install and configure and AWS cli tool which will then be used by Terraform to create and manage the resources.
This article is a complete introduction to AWS with Terraform. You will learn the installation steps, configuration, and see how to create an S3 bucket and upload objects to it.
The technical context for this article is Terraform v1.4.6, AWS CLI v2.8.2 and Terraform AWS provider v4.33, but it is applicable to newer versions as well.
AWS Prerequisites
To work with AWS, you need a fully registered account, the correct tool installed, and a valid technical user account that is used during the resource creation. Also, bear in mind that working with AWS will incur fees depending on which resources you create. Therefore, be prepared to spend some money when you follow this tutorial.
AWS Account
Go to the AWS startpage and start the onboarding process. During registration, you need to provide credit card information and a telephone number that will be used for the 2-factor authentication.
AWS CLI Tool
The AWS cli is a binary file that you can just download and copy to your executables’ path. Just follow the official installation instructions. For an installation on Linux, execute these commands:
$> curl -O "https://awscli.amazonaws.com/awscli-exe-linux-x86_64.zip"
$> unzip awscli-exe-linux-x86_64.zip
$> sudo ./aws/install

installer: Package name is AWS Command Line Interface
installer: Installing at base path /
installer: The install was successful.

$> aws --version

aws-cli/2.8.2 Python/3.9.11
AWS IAM Admin User
An IAM user is a technical user account that is given detailed permissions to create, read or update different types of resource on AWS. We will create an admin user with full access rights, and with this create further fine-granular scoped users that can only access specific AWS resources
Follow these steps:
- Log into the AWS managment console
- Click on “Users”, then the button “Create User”
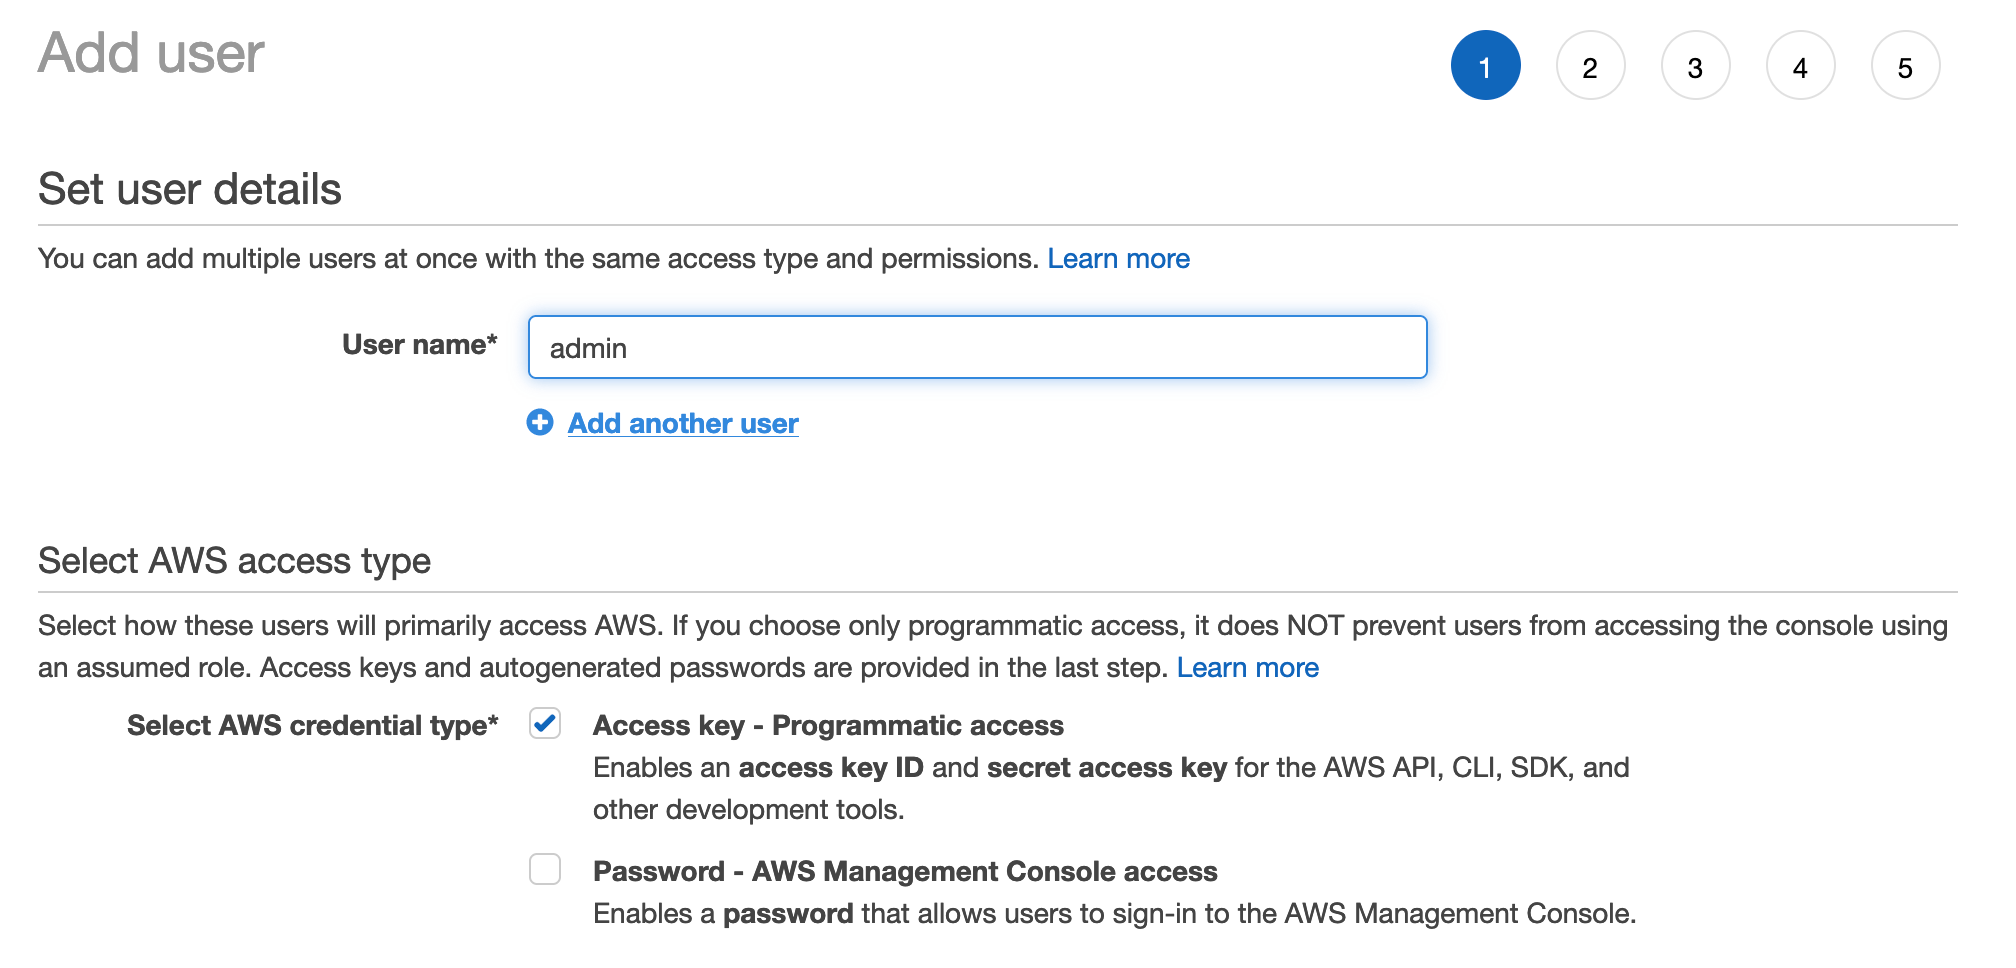
- Give the user the access right “AmazonFullAccess”
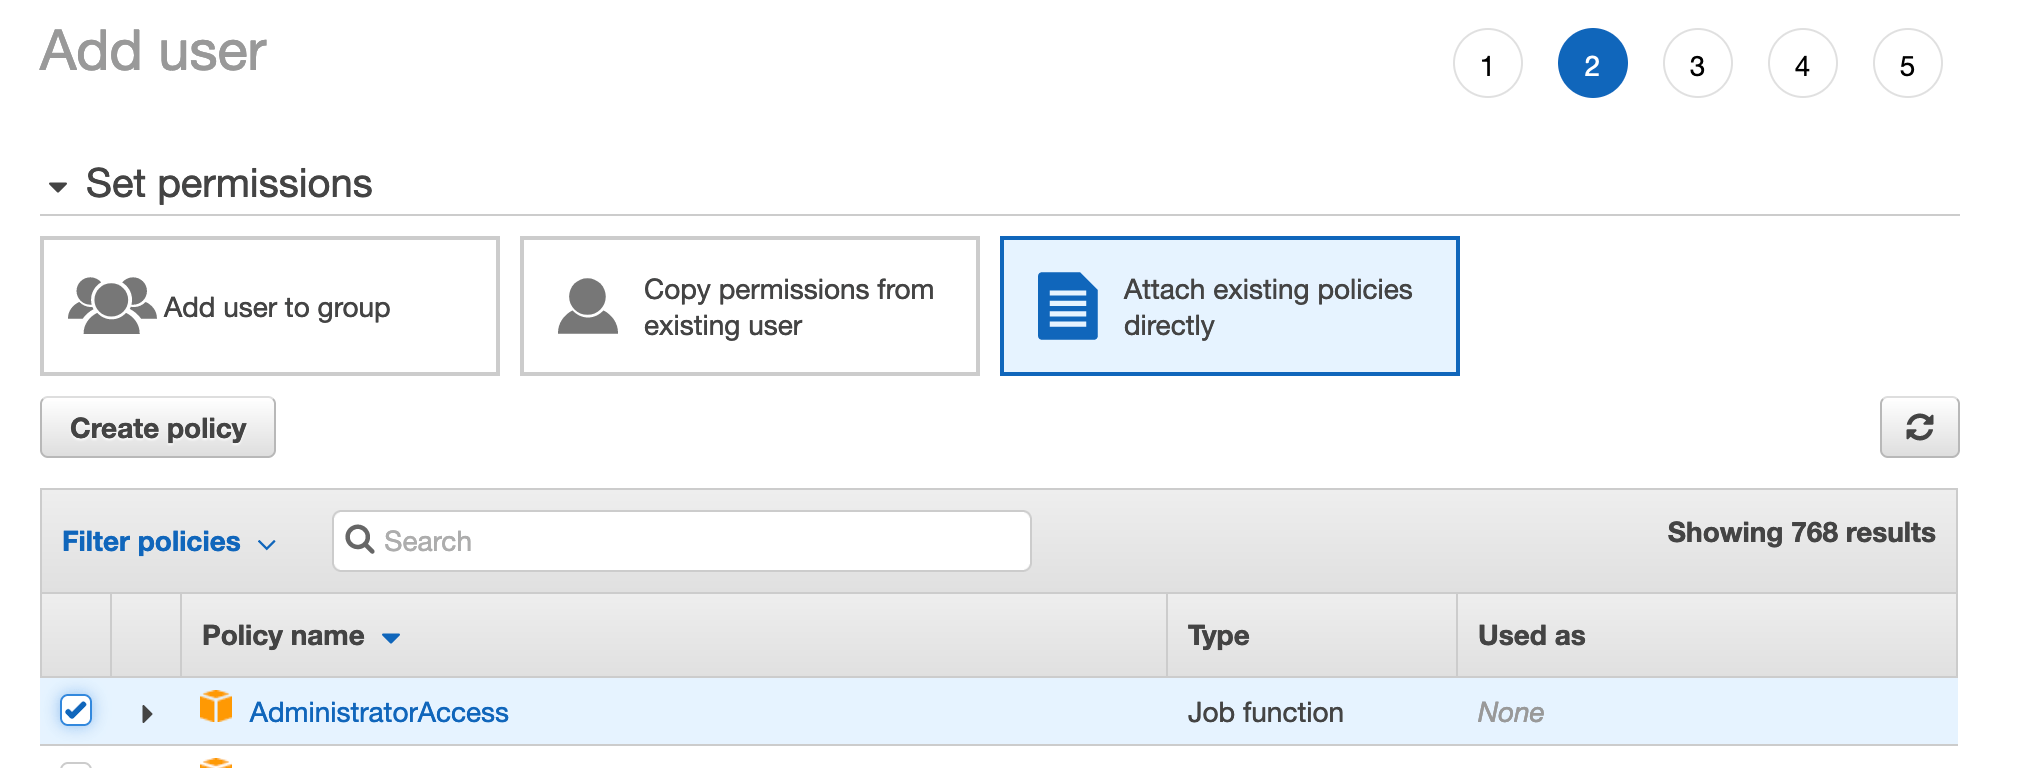
- On the final page, you will see the access key id and the secret access key, these two variables are required when working with terraform.
Be careful to keep the secrets secret on your machine. With this final step completed, all requirements are fulfilled. Lets start using Terraform.
Finally, To work with the AWS cli, you need to execute the command aws login which will then store the required access credentials in ~/.aws/credentials. Alternatively you can export these secrets in your shell as export AWS_ACCESS_KEY_ID= +++ ; export AWS_SECRET_ACCESS_KEY= +++.
Terraform Configuration
Now we are ready to continue the setup with Terraform. First, we create the provider config.
terraform {
  required_providers {
    aws = {
      source  = "hashicorp/aws"
      version = "~> 4.33.0"
    }
  }
}

provider "aws" {
  region     = "eu-central-1"
}

provider "aws" {
  region     = "us-east-1"
  alias      = "us"
}
Run terraform init once in this project.
$> terraform init

Initializing the backend...

Initializing provider plugins...
- Finding hashicorp/aws versions matching "~> 4.33.0"...
- Installing hashicorp/aws v4.33.0...
- Installed hashicorp/aws v4.33.0 (signed by HashiCorp)

# ..

Terraform has been successfully initialized!
Create an S3 Bucket User
We will use Terraform to create a dedicated user that just has access rights to create an S3 bucket. The relevant configuration is this:
resource "aws_iam_user" "terraform" {
name = "terraform"
path = "/"
tags = {
"purpose" = "terraform"
}
tags_all = {
"purpose" = "terraform"
}
}
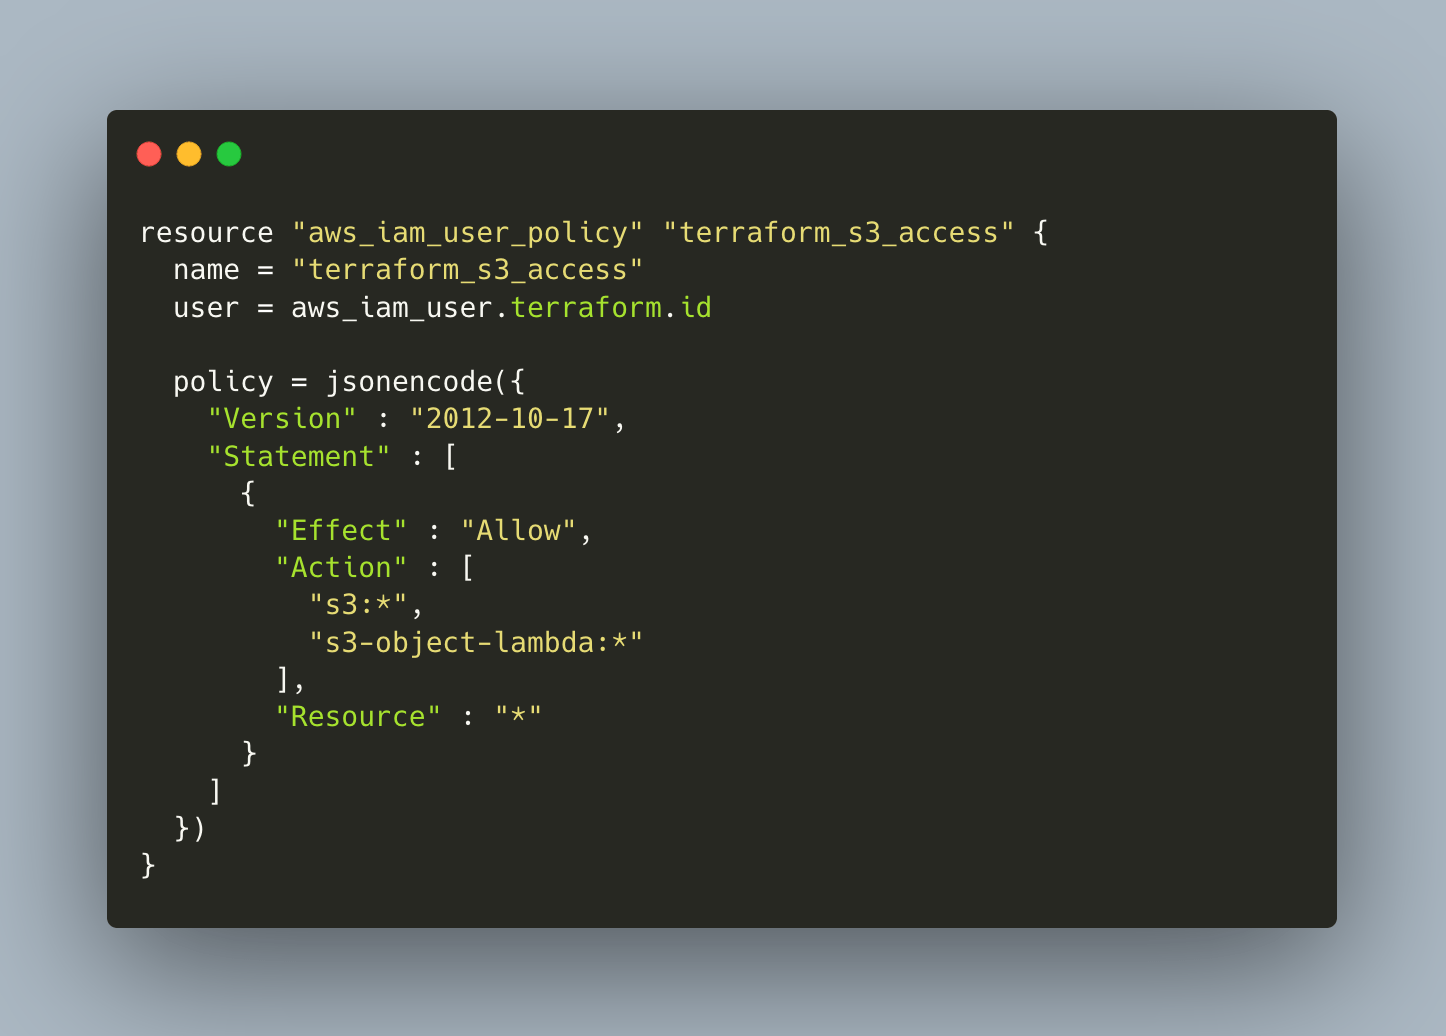
resource "aws_iam_user_policy" "terraform_s3_access" {
name = "terraform_s3_access"
user = aws_iam_user.terraform.id
policy = jsonencode({
"Version" : "2012-10-17",
"Statement" : [
{
"Effect" : "Allow",
"Action" : [
"s3:*",
"s3-object-lambda:*"
],
"Resource" : "*"
}
]
})
}
From the IAM user, we extract its id and the secret key as output variables with the following resource:
resource "aws_iam_access_key" "terraform" {
  user = aws_iam_user.terraform.id
}

output "terraform_iam_key" {
  value = aws_iam_access_key.terraform.id
}

output "terraform_iam_secret" {
  value = aws_iam_access_key.terraform.secret
  sensitive = true
}
When the resources have been created, we can define the AWS access credentials as environment variables so that they will be used from now on.
Use terraform apply to create the user:
Terraform will perform the following actions:
  # aws_iam_user.terraform will be created
  # aws_iam_user_policy.terraform_s3_access will be created

  Enter a value: yes

aws_iam_user.terraform: Creating...
aws_iam_user.terraform: Creation complete after 1s [id=terraform]
aws_iam_user_policy.terraform_s3_access: Creating...
aws_iam_user_policy.terraform_s3_access: Creation complete after 1s [id=terraform:terraform_s3_access]
Once the IAM user is created, export the required environment variables so that new resources will be created with this user:
export AWS_ACCESS_KEY_ID=${$(terraform output terraform_iam_key)}
export AWS_SECRET_ACCESS_KEY=${$(terraform output terraform_iam_secret)}
Create an S3 Bucket
AWS S3 buckets are global unique entities, so you need to find a name that does not exist yet. To make this easy, we will use a Terraform built-in resource called random_pet which will just create a random pet name.
The complete resource definition is this:
resource "aws_s3_bucket" "test-bucket" {
  bucket = "test-bucket-${random_pet.bucket_name.id}"
}

resource "random_pet" "bucket_name" { }
Create the resource:
terraform apply

aws_iam_user.terraform: Refreshing state... [id=terraform]
aws_iam_user_policy.terraform_s3_access: Refreshing state... [id=terraform:terraform_s3_access]
Terraform will perform the following actions:

  # aws_s3_bucket.test-bucket will be created
  + resource "aws_s3_bucket" "test-bucket" {
      + acceleration_status         = (known after apply)
      + acl                         = (known after apply)
      + arn                         = (known after apply)
      + bucket                      = (known after apply)

  #...

  # random_pet.bucket_name will be created
  + resource "random_pet" "bucket_name" {
      + id        = (known after apply)
      + length    = 2
      + separator = "-"
    }

Plan: 2 to add, 0 to change, 0 to destroy.

Do you want to perform these actions?
The bucket resource is a complexly structured object. Once created, look at it with terraform show:
# aws_s3_bucket.test-bucket:
resource "aws_s3_bucket" "test-bucket" {
    arn                         = "arn:aws:s3:::test-bucket-sunny-ray"
    bucket                      = "test-bucket-sunny-ray"
    bucket_domain_name          = "test-bucket-sunny-ray.s3.amazonaws.com"
    bucket_regional_domain_name = "test-bucket-sunny-ray.s3.eu-central-1.amazonaws.com"
    force_destroy               = false
    hosted_zone_id              = "Z21DNDUVLTQW6Q"
    id                          = "test-bucket-sunny-ray"
    object_lock_enabled         = false
    region                      = "eu-central-1"
    request_payer               = "BucketOwner"
    tags_all                    = {}

    grant {
        id          = "4a678af5306cd2450b9c11bf8aa39685fc4ee991e5f55bbddb8749a609a34ee8"
        permissions = [
            "FULL_CONTROL",
        ]
        type        = "CanonicalUser"
    }

    versioning {
        enabled    = false
        mfa_delete = false
    }
}
Making the Bucket Accessible
In its default state, the bucket is not accessible. If you make an HTTP request with curl to the bucket’s regional domain name, you will get the following XML document specifying the access error:
curl test-bucket-sunny-ray.s3.eu-central-1.amazonaws.com/index.html
<?xml version="1.0" encoding="UTF-8"?>
<Error>
  <Code>AccessDenied</Code>
  <Message>Access Denied</Message>
  <RequestId>REH5D0H02M8DVY16</RequestId>
  <HostId>b3XBqKWrE8XcXiQNmZx+6cV43XGyIqkJLgXjoYL2NQf0JzVmlLS7YGTl/DntuqvigXtFWOVINtU=</HostId>
</Error>
We need to define an access policy first:
resource "aws_s3_bucket_policy" "allow_public_access" {
  bucket = aws_s3_bucket.test-bucket.id
  policy = data.aws_iam_policy_document.allow_public_access.json
}

data "aws_iam_policy_document" "allow_public_access" {
  statement {
    sid = "PublicReadGetObject"
    effect = "Allow"
    actions = ["s3:GetObject"]
    resources = [aws_s3_bucket.test-bucket.arn]
  }
}
Put an Object Into the Bucket
An AWS S3 bucket can contain any number of objects. For simplicity I will just upload the following HTML file:
<!-- index.html -->
<!DOCTYPE html>
<html lang="en">
  <head>
    <meta charset="UTF-8">
    <meta name="viewport" content="width=device-width, initial-scale=1.0">
    <meta http-equiv="X-UA-Compatible" content="ie=edge">
    <title>AWS S3 Bucket HTML File</title>
  </head>
  <body>
    <main>
        <h1>Hello World!</h1>
    </main>
  </body>
</html>
The Terraform resource description is simple, you need to provide the bucket name, give the object an unique key, and reference the source file:
resource "aws_s3_object" "hello_world_html" {
  bucket = aws_s3_bucket.test-bucket.bucket
  key    = "index.html"
  source = "src/index.html"
  etag = filemd5("src/index.html")
}
Then we upload the file …
terraform apply

Terraform will perform the following actions:

  # aws_s3_object.hello_world_html will be created
  + resource "aws_s3_object" "hello_world_html" {
      + acl                    = "private"
      + bucket                 = "test-bucket-fancy-catfish"
      + bucket_key_enabled     = (known after apply)
      + content_type           = (known after apply)
      + etag                   = "d002020803f03b76bc1a0f2fdeaefd2e"
      + force_destroy          = false
      + id                     = (known after apply)
      + key                    = "index.html"
      + kms_key_id             = (known after apply)
      + server_side_encryption = (known after apply)
      + source                 = "src/index.html"
      + storage_class          = (known after apply)
      + tags_all               = (known after apply)
      + version_id             = (known after apply)
    }
… and can access it with curl:
curl test-bucket-sunny-ray.s3.eu-central-1.amazonaws.com/index.html

<!-- index.html -->
<!DOCTYPE html>
<html lang="en">
#...
Conclusion
Terraform is a universal infrastructure management language. When working with AWS, you need to have a fully registered account and install the AWS cli locally. Then, Terraform uses the cli and its stored access credentials to create AWS resources. This article showed you how to create an AWS bucket and upload objects to it. The particular steps are a) create and AWS account, b) install the AWS cli and authenticate with the AWS API, c) create an IAM user, d) create a Terraform project and define the providers, e) Create a specific IAM user that can only manage S3 bucket resources, f) create the bucket and an access policy, g) upload bucket objects. Overall, using Terraform to manage AWS resources provides all the benefits of versioned and declarative infrastructure as code.