In my recent articles about ROS and my project RADU, I showed how to launch a custom robot model in Gazebo and exposing its joints via special control nodes. These nodes accept commands to change their efforts, velocity, or position. However, the nodes are not translating the commands per-se and move your robot, you still need to write the code that interfaces with Gazebo.
Gazebo plugins come bundled with a typical ROS installation. Plugins support several actuators, such as the differential drive or skid drive, and sensors, such as cameras, depth cameras and IMUs. The plugins communicate via controller nodes internally, and you do not need to expose them. Instead, they publish relevant topics such as the /cmd_vel to send linear and angular movement commands to your robot, or /odom which represents your robot’s position since the simulation started.
This article is a hands-on workshop on Gazebo plugins. You will learn how plugins function, and we will see how to use the diff-drive plugin in ROS2 to control a 4-wheeled robot.
Gazebo Plugins
During my robot project, I checked several other robot projects from the community. I was puzzled why some projects did not spawn any controller nodes, but still the above-mentioned topics /cmd_vel and /odom were published. My assumption was that the plugins for these robots would start the controllers automatically. Checking the official Gazebo documentation, we can find this paragraph:
Previous versions of Gazebo utilized controllers. These behaved in much the same way as plugins but were statically compiled into Gazebo. Plugins are more flexible and allow users to pick and choose what functionality to include in their simulations.
Source: official Gazebo documentation.
A plugin is a C++ library following conventions as outlined in the plugin development guide. The plugins inherits from a base class - like sensor, system, visual or world - and expose the Load function. Here is an example from the plugin development guide.
#include <gazebo/gazebo.hh>

namespace gazebo
{
  class WorldPluginTutorial : public WorldPlugin {
    public: WorldPluginTutorial() : WorldPlugin() {
      printf("Hello World!\n");
    }

    public: void Load(physics::WorldPtr _world, sdf::ElementPtr _sdf) { }
  };

  GZ_REGISTER_WORLD_PLUGIN(WorldPluginTutorial)
}
Once compiled, the plugin needs to be loaded via the robot’s URDF model.
<?xml version="1.0"?>
<sdf version="1.4">
  <world name="default">
    <plugin name="hello_world" filename="libhello_world.so"/>
  </world>
</sdf>
When using a pre-made plugin, we just need to add it to the URDF model.
ROS2 Plugins
Since the inception of ROS2, plugins have been steadily converted. The status page shows that individual plugins for e.g. cameras were combined into one package. Taking this as a reference, we can select and incorporate the plugins of our choice to make them workable with our prototype.
We want to control how the robot moves. Four different steering principles are supported by plugins: differential drive, skid drive, Ackerman drive, and tri-wheel. My RADU robot is a 4-wheel vehicle and can be controlled as a skid-drive. Therefore, we will use the ros_diff_drive plugin.
Using the diff-drive Plugin
To use the plugin in addition to your robots’ physical model is much less complex then adding the controller nodes manually. In fact, you just need to add a single <plugin> tag!
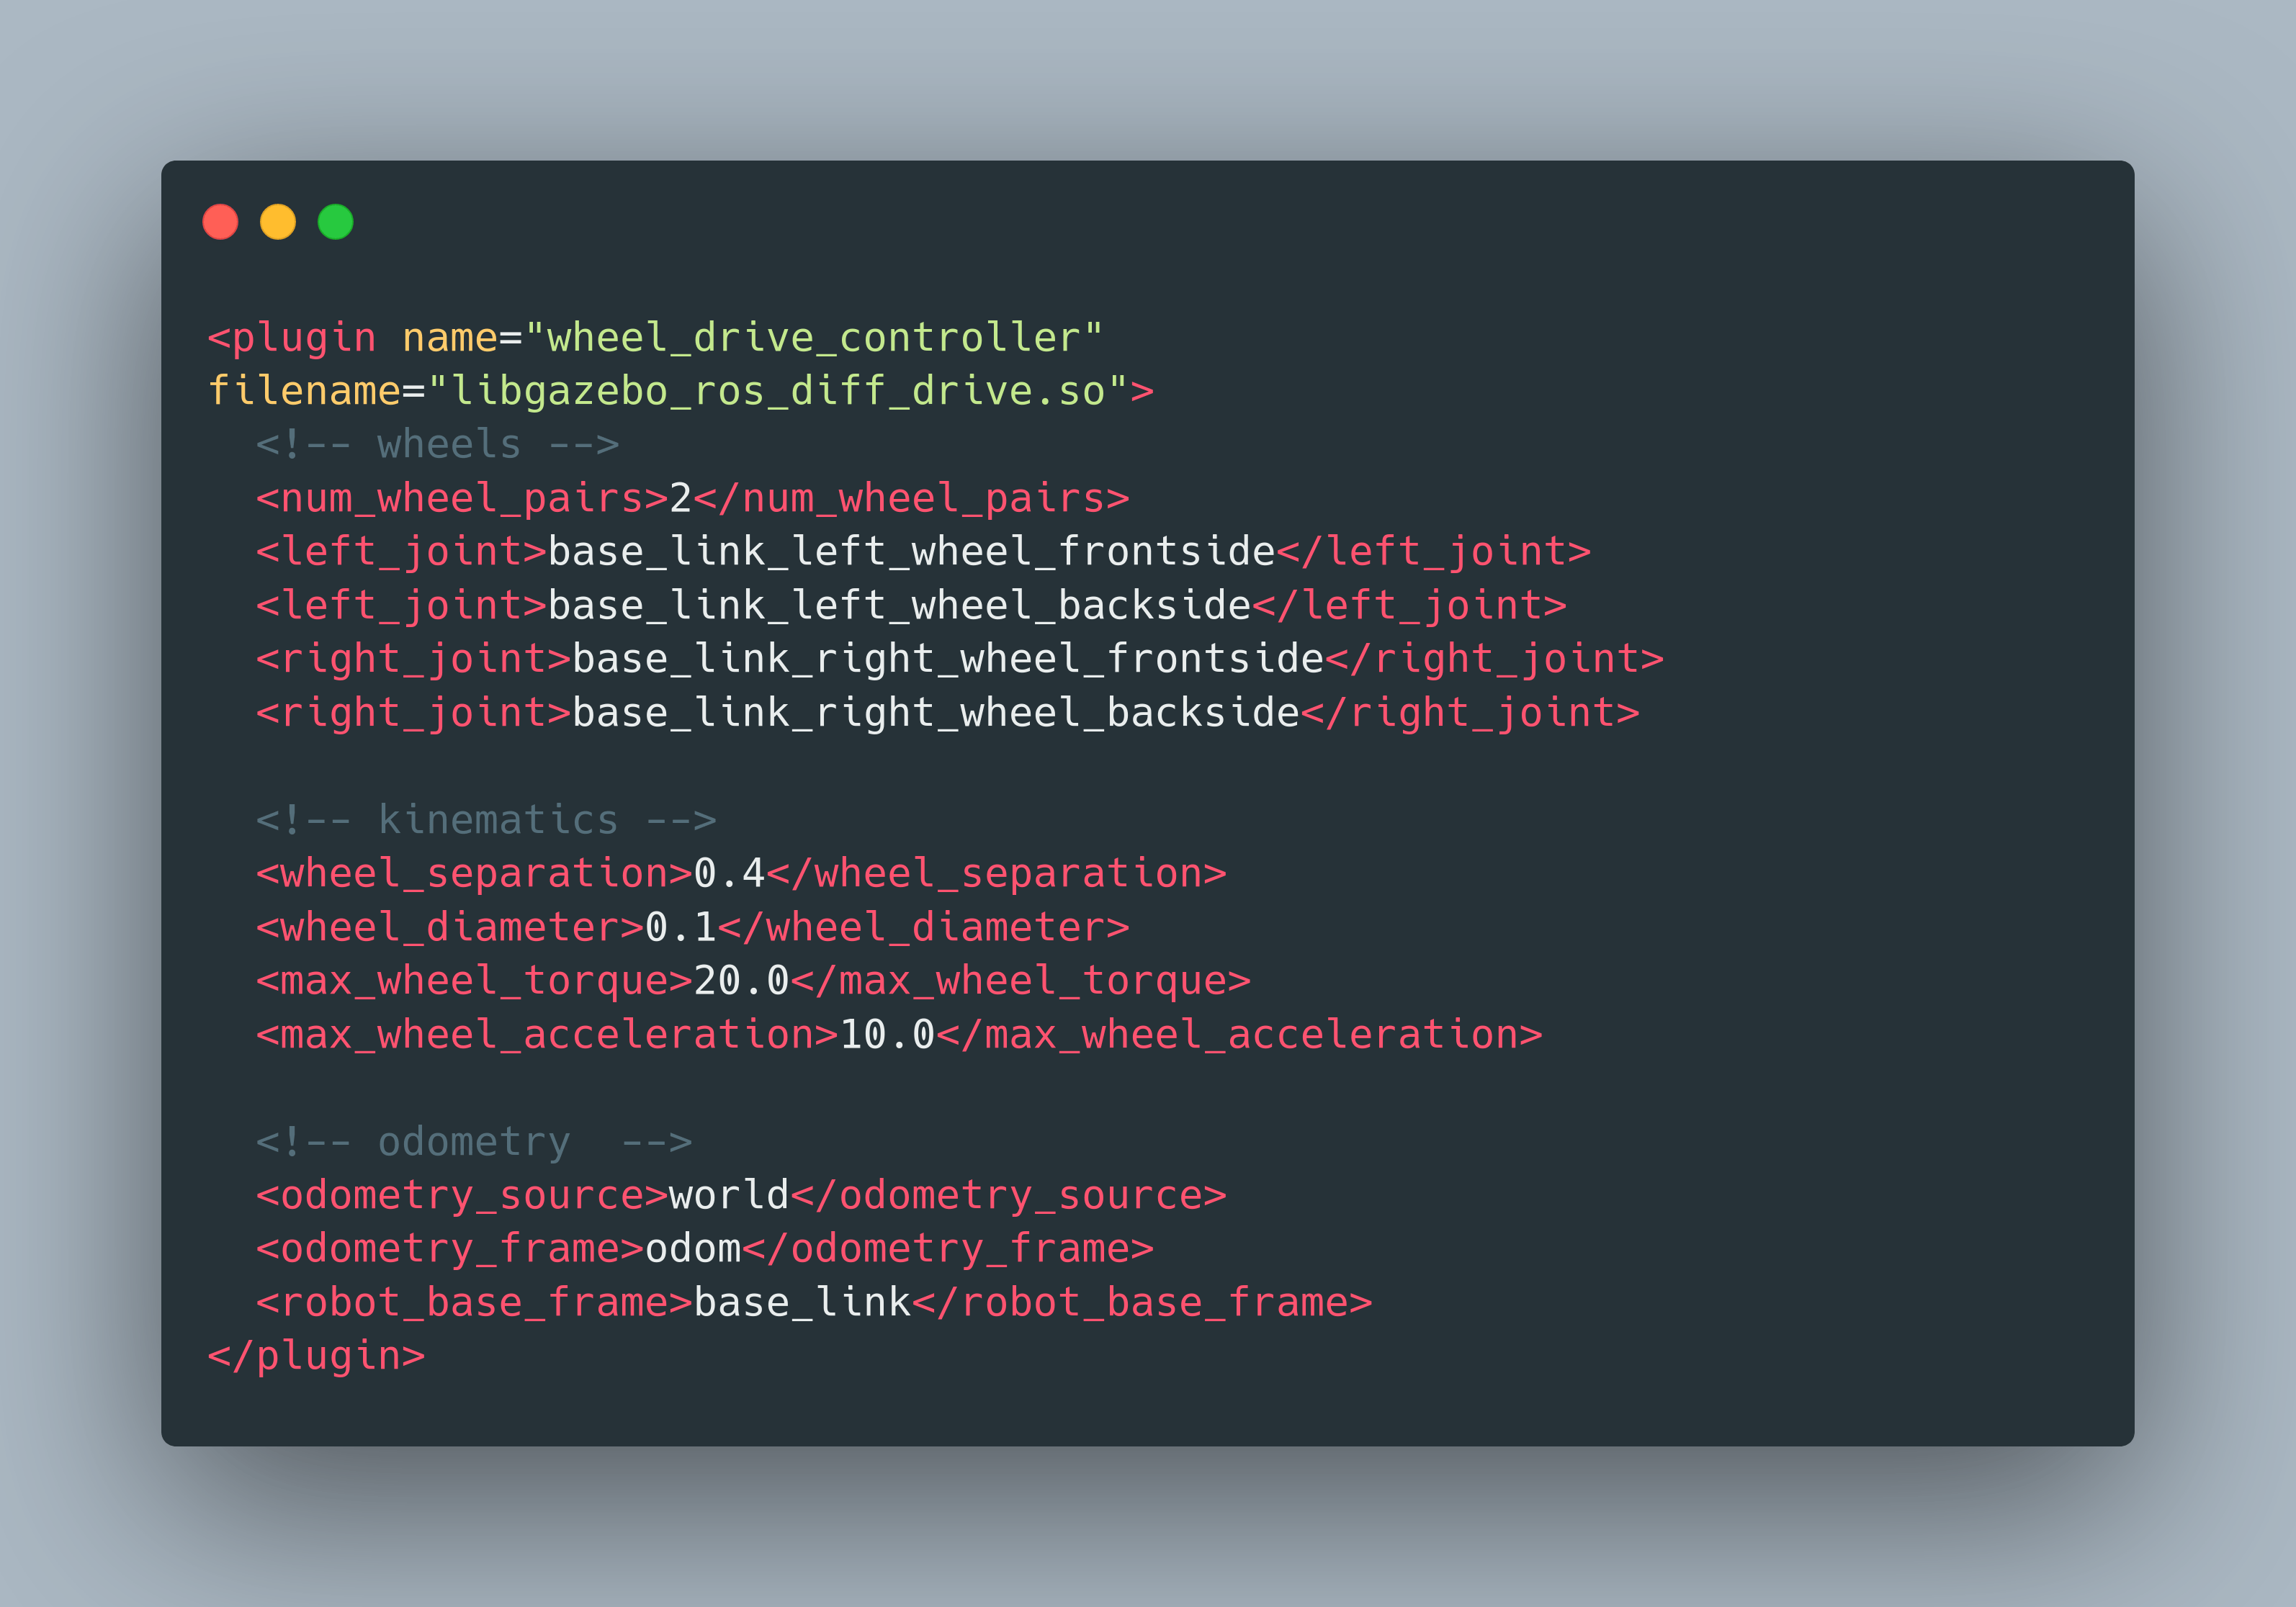
Here is the complete example:
<plugin name="wheel_drive_controller" filename="libgazebo_ros_diff_drive.so">

  <!-- wheels -->
  <num_wheel_pairs>2</num_wheel_pairs>
  <left_joint>base_link_left_wheel_frontside</left_joint>
  <left_joint>base_link_left_wheel_backside</left_joint>
  <right_joint>base_link_right_wheel_frontside</right_joint>
  <right_joint>base_link_right_wheel_backside</right_joint>

  <!-- kinematics -->
  <wheel_separation>0.4</wheel_separation>
  <wheel_diameter>0.1</wheel_diameter>
  <max_wheel_torque>20.0</max_wheel_torque>
  <max_wheel_acceleration>10.0</max_wheel_acceleration>

  <!-- odometry  -->
  <odometry_source>world</odometry_source>
  <odometry_frame>odom</odometry_frame>
  <robot_base_frame>base_link</robot_base_frame>

  <!-- topic & re remappings -->
  <ros>
    <namespace>/</namespace>
    <argument>/cmd_vel:=cmd_vel</argument>
    <argument>/odom:=odom</argument>
  </ros>

  <publish_odom>true</publish_odom>
  <publish_odom_tf>true</publish_odom_tf>
  <update_rate>100.0</update_rate>
</plugin>
The declaration consists of 4 configuration blocks. Tags in each block should be self-explanatory, so I will only briefly explain them.
- Wheel: Specify the number of wheels, and then reference which joints are considered for the right, and which joints are referenced for the left side of steering
- Kinematics: Additional physical configuration of the wheels: separation along the y-axis, diameter, torque and acceleration
- Odometry: If you publish odometry information, you need to specify its source and frame as well as the base frame
- Topics: This block configures which topics you want to publish and at which namespace/name, and how fast they are updated.
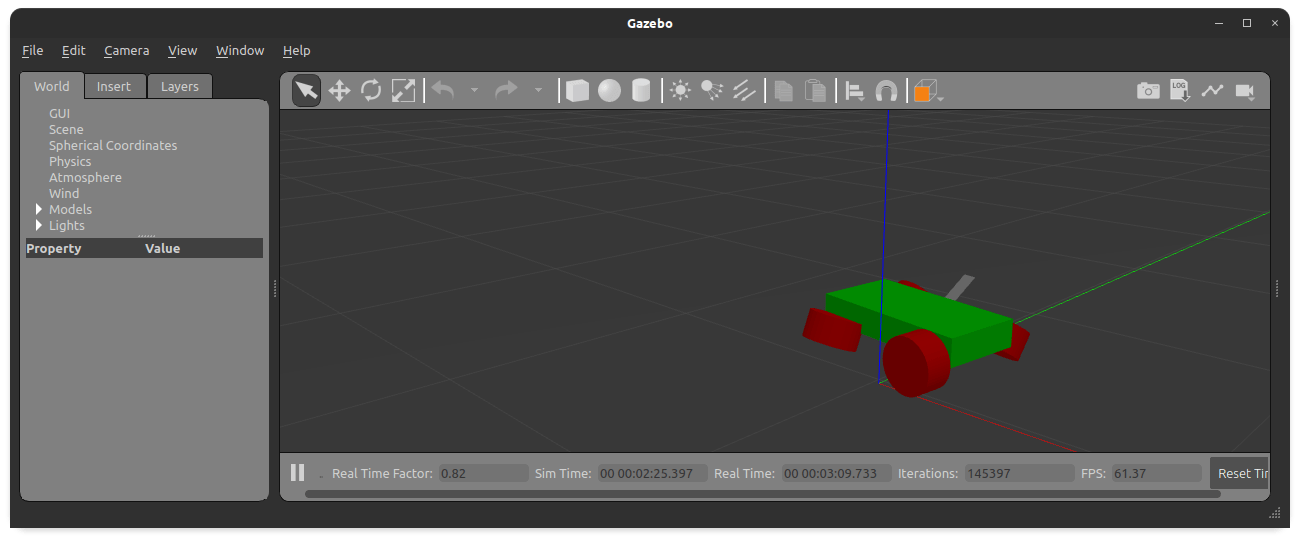
Starting Gazebo & Controlling the Robot
Once the plugin is available in your robot description, we can start Gazebo and the requires Nodes. We need to start three nodes explicitly - Gazebo, Joint State Controller, and the Robot State publisher - and then spawn the robot. The last step creates an additional controller node for the plugin.
Here is the launch file:
#!/usr/bin/python3
# -*- coding: utf-8 -*-
import os

from ament_index_python.packages import get_package_share_directory
from launch import LaunchDescription
from launch.actions import DeclareLaunchArgument
from launch.actions import IncludeLaunchDescription
from launch.launch_description_sources import PythonLaunchDescriptionSource
from launch_ros.actions import Node

from time import sleep
import xacro

package_name = 'radu_bot'
world_file = 'living_room3.sdf'

def generate_launch_description():

    pkg_gazebo_ros = get_package_share_directory('gazebo_ros')
    pkg_radu_simulation = get_package_share_directory(package_name)
    rviz_config_path = os.path.join(pkg_radu_simulation, 'config/urdf_config.rviz')

    robot_description_path =  os.path.join(
        pkg_radu_simulation,
        "urdf",
        "gazebo.xacro",
    )

    robot_description = {"robot_description": xacro.process_file(robot_description_path).toxml()}

    print("MODEL %s" % robot_description['robot_description'])

    sleep(3)

    joint_state_publisher_node = Node(
        package='joint_state_publisher',
        executable='joint_state_publisher',
        name='joint_state_publisher'
    )

    robot_state_publisher_node = Node(
        package="robot_state_publisher",
        executable="robot_state_publisher",
        output="both",
        parameters=[robot_description],
    )

    gazebo_node = IncludeLaunchDescription(
        PythonLaunchDescriptionSource(
            os.path.join(pkg_gazebo_ros, 'launch', 'gazebo.launch.py'),
        )
    )

    robot_spawner = Node(
            package='gazebo_ros',
            executable='spawn_entity.py',
            name='urdf_spawner',
            output='screen',
            arguments=["-topic", "/robot_description", "-entity", "radu_bot", "-x", "-3.0", "-y", "-1.5"])

    print("STARTING ALL NODES")

    sleep(3)

    world_arg = DeclareLaunchArgument(
          'world',
          default_value=[os.path.join(pkg_radu_simulation, 'worlds', world_file), ''],
          description='SDF world file')

    no_sim_time = DeclareLaunchArgument(
            'use_sim_time',
            default_value='false',
            description='Use simulation (Gazebo) clock if true')

    return LaunchDescription([
        world_arg,
        no_sim_time,
        joint_state_publisher_node,
        robot_state_publisher_node,
        gazebo_node,
        robot_spawner
    ])
Launch it with ros2 launch radu_bot control.launch.py, and then we can see the available nodes:
$> ros2 node list
/gazebo
/joint_state_publisher
/robot_state_publisher
/wheel_drive_controller
The last node, wheel_drive_controller, is subscribed to the topic cmd_vel with which we can control the robot.
$> ros2 node info /wheel_drive_controller
/wheel_drive_controller
  Subscribers:
    /clock: rosgraph_msgs/msg/Clock
    /cmd_vel: geometry_msgs/msg/Twist
    /parameter_events: rcl_interfaces/msg/ParameterEvent
  Publishers:
    /odom: nav_msgs/msg/Odometry
    /parameter_events: rcl_interfaces/msg/ParameterEvent
    /rosout: rcl_interfaces/msg/Log
    /tf: tf2_msgs/msg/TFMessage
  Service Servers:
    /wheel_drive_controller/describe_parameters: rcl_interfaces/srv/DescribeParameters
    /wheel_drive_controller/get_parameter_types: rcl_interfaces/srv/GetParameterTypes
    /wheel_drive_controller/get_parameters: rcl_interfaces/srv/GetParameters
    /wheel_drive_controller/list_parameters: rcl_interfaces/srv/ListParameters
    /wheel_drive_controller/set_parameters: rcl_interfaces/srv/SetParameters
    /wheel_drive_controller/set_parameters_atomically: rcl_interfaces/srv/SetParametersAtomically
  Service Clients:

  Action Servers:

  Action Clients:
To control the robot, we run the teleop_twist_keyboard command, which translates directional keyboard presses into /cmd_vel messages.
$> ros2 run teleop_twist_keyboard teleop_twist_keyboard --ros-args --remap cmd_vel:=/cmd_vel

This node takes keypresses from the keyboard and publishes them
as Twist messages. It works best with a US keyboard layout.
---------------------------
Moving around:
   u    i    o
   j    k    l
   m    ,    .
But when moving the robot, it behaved strange: The wheels were rotating along the y-axis!
To fix this, we need to add explicit <axis> and <limit> tag to the joint.
<xacro:macro name="wheel_joint" params="name parent child xyz ">
  <joint name="${name}" type="continuous">
    <parent link="${parent}" />
    <child link="${child}" />
    <origin xyz="${xyz}" rpy="1.570796 0 0"/>
    <axis rpy="0 0 0" xyz="0 0 1"/>
    <limit effort="1" velocity="1"/>
    <joint_properties damping="1.0" friction="1.0"/>
  </joint>
</xacro:macro>
Then the robot moved smoothly.
Conclusion
A long development journey comes to an end: Finally, the RADU robot simulation in Gazebo is modeled correctly and can move in a simulated world. To achieve this goal, we needed to learn about three distinct topics. First, which additional physical properties are needed for a Gazebo-compatible URDF model. Second, that we need additional control nodes in our ROS system that expose a robot’s joints for effort, velocity or position manipulation and have these nodes translate cmd_vel commands for changes in the simulation. Third, plugins take the heavy lifting of the second part and only required a correctly configured specification and starting of addition join state/robot state joins. Building on this foundation, the robot can now be equipped with an image camera and a depth camera for simulation in Gazebo.