The Raspberry Pico is a new microcontroller launched in February 2021. The community was excited about this new board, and several people started amazing projects. I grabbed two boards early on, and while still working on my Arduino based robot, did the usual blinking led and potentiometer tutorials.
The Pico captured me, I wanted more than just run demos. So, I decided to start library development for a shift register and a temperature sensor. When developing a library, I want to have tests for several reasons. First, I like to use TDD and start with writing a test that will cover a n new feature before its implementation. Second, once you have a substantial test suite, it helps you to keep the library in a working shape when you refactor its code base.
In this article, I will show how install and use the unit testing framework cmocka. We will see the basic boilerplate code and an example for testing a Raspberry Pico program.
Installation
Grab the CMocka source from the official cmocka mirror. Then, extract the tar, compile and install. The steps in a nutshell:
wget https://cmocka.org/files/1.1/cmocka-1.1.5.tar.xz
tar xvf cmocka-1.1.5.tar.xz
cd cmocka-1.1.5
mkdir build
cd build
cmake ..
make
The make step should show this output:
Scanning dependencies of target cmocka
[  4%] Building C object src/CMakeFiles/cmocka.dir/cmocka.c.o
[  9%] Linking C shared library libcmocka.so
[  9%] Built target cmocka
Scanning dependencies of target assert_macro_test
[ 13%] Building C object example/CMakeFiles/assert_macro_test.dir/assert_macro.c.o
...
[ 95%] Building C object example/mock/uptime/CMakeFiles/uptime.dir/uptime.c.o
[100%] Linking C executable uptime
[100%] Built target uptime
If all goes well, you can install the compiled libraries in your system.
sudo make install

[  9%] Built target cmocka
...
[100%] Built target uptime
Install the project...
-- Install configuration: ""
-- Installing: /usr/local/lib/pkgconfig/cmocka.pc
-- Installing: /usr/local/lib/cmake/cmocka/cmocka-config.cmake
-- Installing: /usr/local/lib/cmake/cmocka/cmocka-config-version.cmake
-- Installing: /usr/local/include/cmocka.h
-- Installing: /usr/local/include/cmocka_pbc.h
-- Installing: /usr/local/lib/libcmocka.so.0.7.0
-- Installing: /usr/local/lib/libcmocka.so.0
-- Installing: /usr/local/lib/libcmocka.so
The files will be installed at /usr/local/lib.
Unit Test Example
Let’s write a very basic unit test example.
/*
* ---------------------------------------
* Copyright (c) Sebastian Günther 2021  |
*                                       |
* devcon@admantium.com                  |
*                                       |
* SPDX-License-Identifier: BSD-3-Clause |
* ---------------------------------------
*/
#include <stdarg.h>
#include <stddef.h>
#include <setjmp.h>
#include <cmocka.h>

static void test_integers(void** state) {
  assert_int_equal(1,1);
}

int main(int argc, char* argv[]) {
  const struct CMUnitTest tests[] = {
    cmocka_unit_test(test_integers),
  };

  return cmocka_run_group_tests(tests, NULL, NULL);
}
The important things here:
- Always include all four libraries:
<stdarg.h>, <stddef.h>, <setjmp.h>, <cmocka.h> - Define test cases as functions that receive an argument
void** state - The test functions include different type of assert statements, shown here is
assert_int_equalsee the official documentation for the full list of asserts. - In the
mainfunction, add all defined test functions to the structCMUnitTest tests[]
Running Tests
To invoke that test on the CLI, you will need to add CMocka installation path to the environment variable export LD_LIBRARY_PATH.
export LD_LIBRARY_PATH=/usr/local/lib:${LD_LIBRARY_PATH}
Then, run your compiler and link to the CMocka library. I’m using clang in the following example.
clang -std=c18 -l cmocka simple.test.c -o tests.bin
Finally, you can run the test, and see formatted output that shows which tests were successful.
$> ./test.bin

[==========] Running 1 test(s).
[ RUN      ] test_integers
[       OK ] test_integers
[==========] 1 test(s) run.
[  PASSED  ] 1 test(s).
Testing a Pico Program
Now that we have setup the testing framework, let’s use it to write tests for our Pico programs. At the time of writing this article, I was developing a library for working with shift registers. The library exposes a struct object that defines the pin layout, and several functions for setting bits or a bitmask to the shift register. I will not cover the entire library, but just highlight two test cases that show the essential how-to. Go to Github to see the entire rp2040-shift-register-74HC595 library.
ShiftRegister Struct: Definition and Testing
The shift register is controlled by three input pins:
- Serial (SER): Set a single bit, low or high
- Serial Clock (SRCLK): Send a clock signal that will write the active SER bit to the shift register
- Register Clock (RCLK): Send a clock signal to copy the contents of the shift register into the storage register
These pins are defined in the following struct object.
typedef struct ShiftRegister
{
  u_int8_t SERIAL_PIN;
  u_int8_t SHIFT_REGISTER_CLOCK_PIN;
  u_int8_t STORAGE_REGISTER_CLOCK_PIN;
} ShiftRegister;
The first test is about initializing a shift register and see that it’s defined pined are correctly defined inside the struct. We will use the familiar assert_int_equal test.
void test_shift_register_config(void **state)
{
  ShiftRegister reg = {14, 11, 12};
  assert_int_equal(reg.SERIAL_PIN, 14);
  assert_int_equal(reg.SHIFT_REGISTER_CLOCK_PIN, 11);
  assert_int_equal(reg.STORAGE_REGISTER_CLOCK_PIN, 12);
}
Running the tests gives this output:
Runing Tests
[==========] Running 1 test(s).
[ RUN ] test_shift_register_config
[ OK ] test_shift_register_config
[==========] 1 test(s) run.
[ PASSED ] 1 test(s).
Writing a single bit
The most basic function is to write a single bit into the shift register. To keep track of this, the register object holds two state variables: The serial_pin_state and the shift_register_state. If a new bit is written with the write_bit function, the state will be updated accordingly.
To implement this, we first add the state variables to the ShiftRegister.
typedef u_int8_t bitmask;

typedef struct ShiftRegister;
{
  bool serial_pin_state;
  u_int8_t shift_register_state;
} ShiftRegister;
Then, we implement the write_bit function. This function sets the serial_pin_state to the given bit. If this bit is a 1, shift_register_state will shift right and add a 1, if the bit is a 0, it will just shift right.
bool write_bit(ShiftRegister *reg, bool b,)
{
  reg->serial_pin_state = b;
  (b) ? (reg->register_state += 0b10) : (reg->register_state <<= 0b01);
  return b;
}
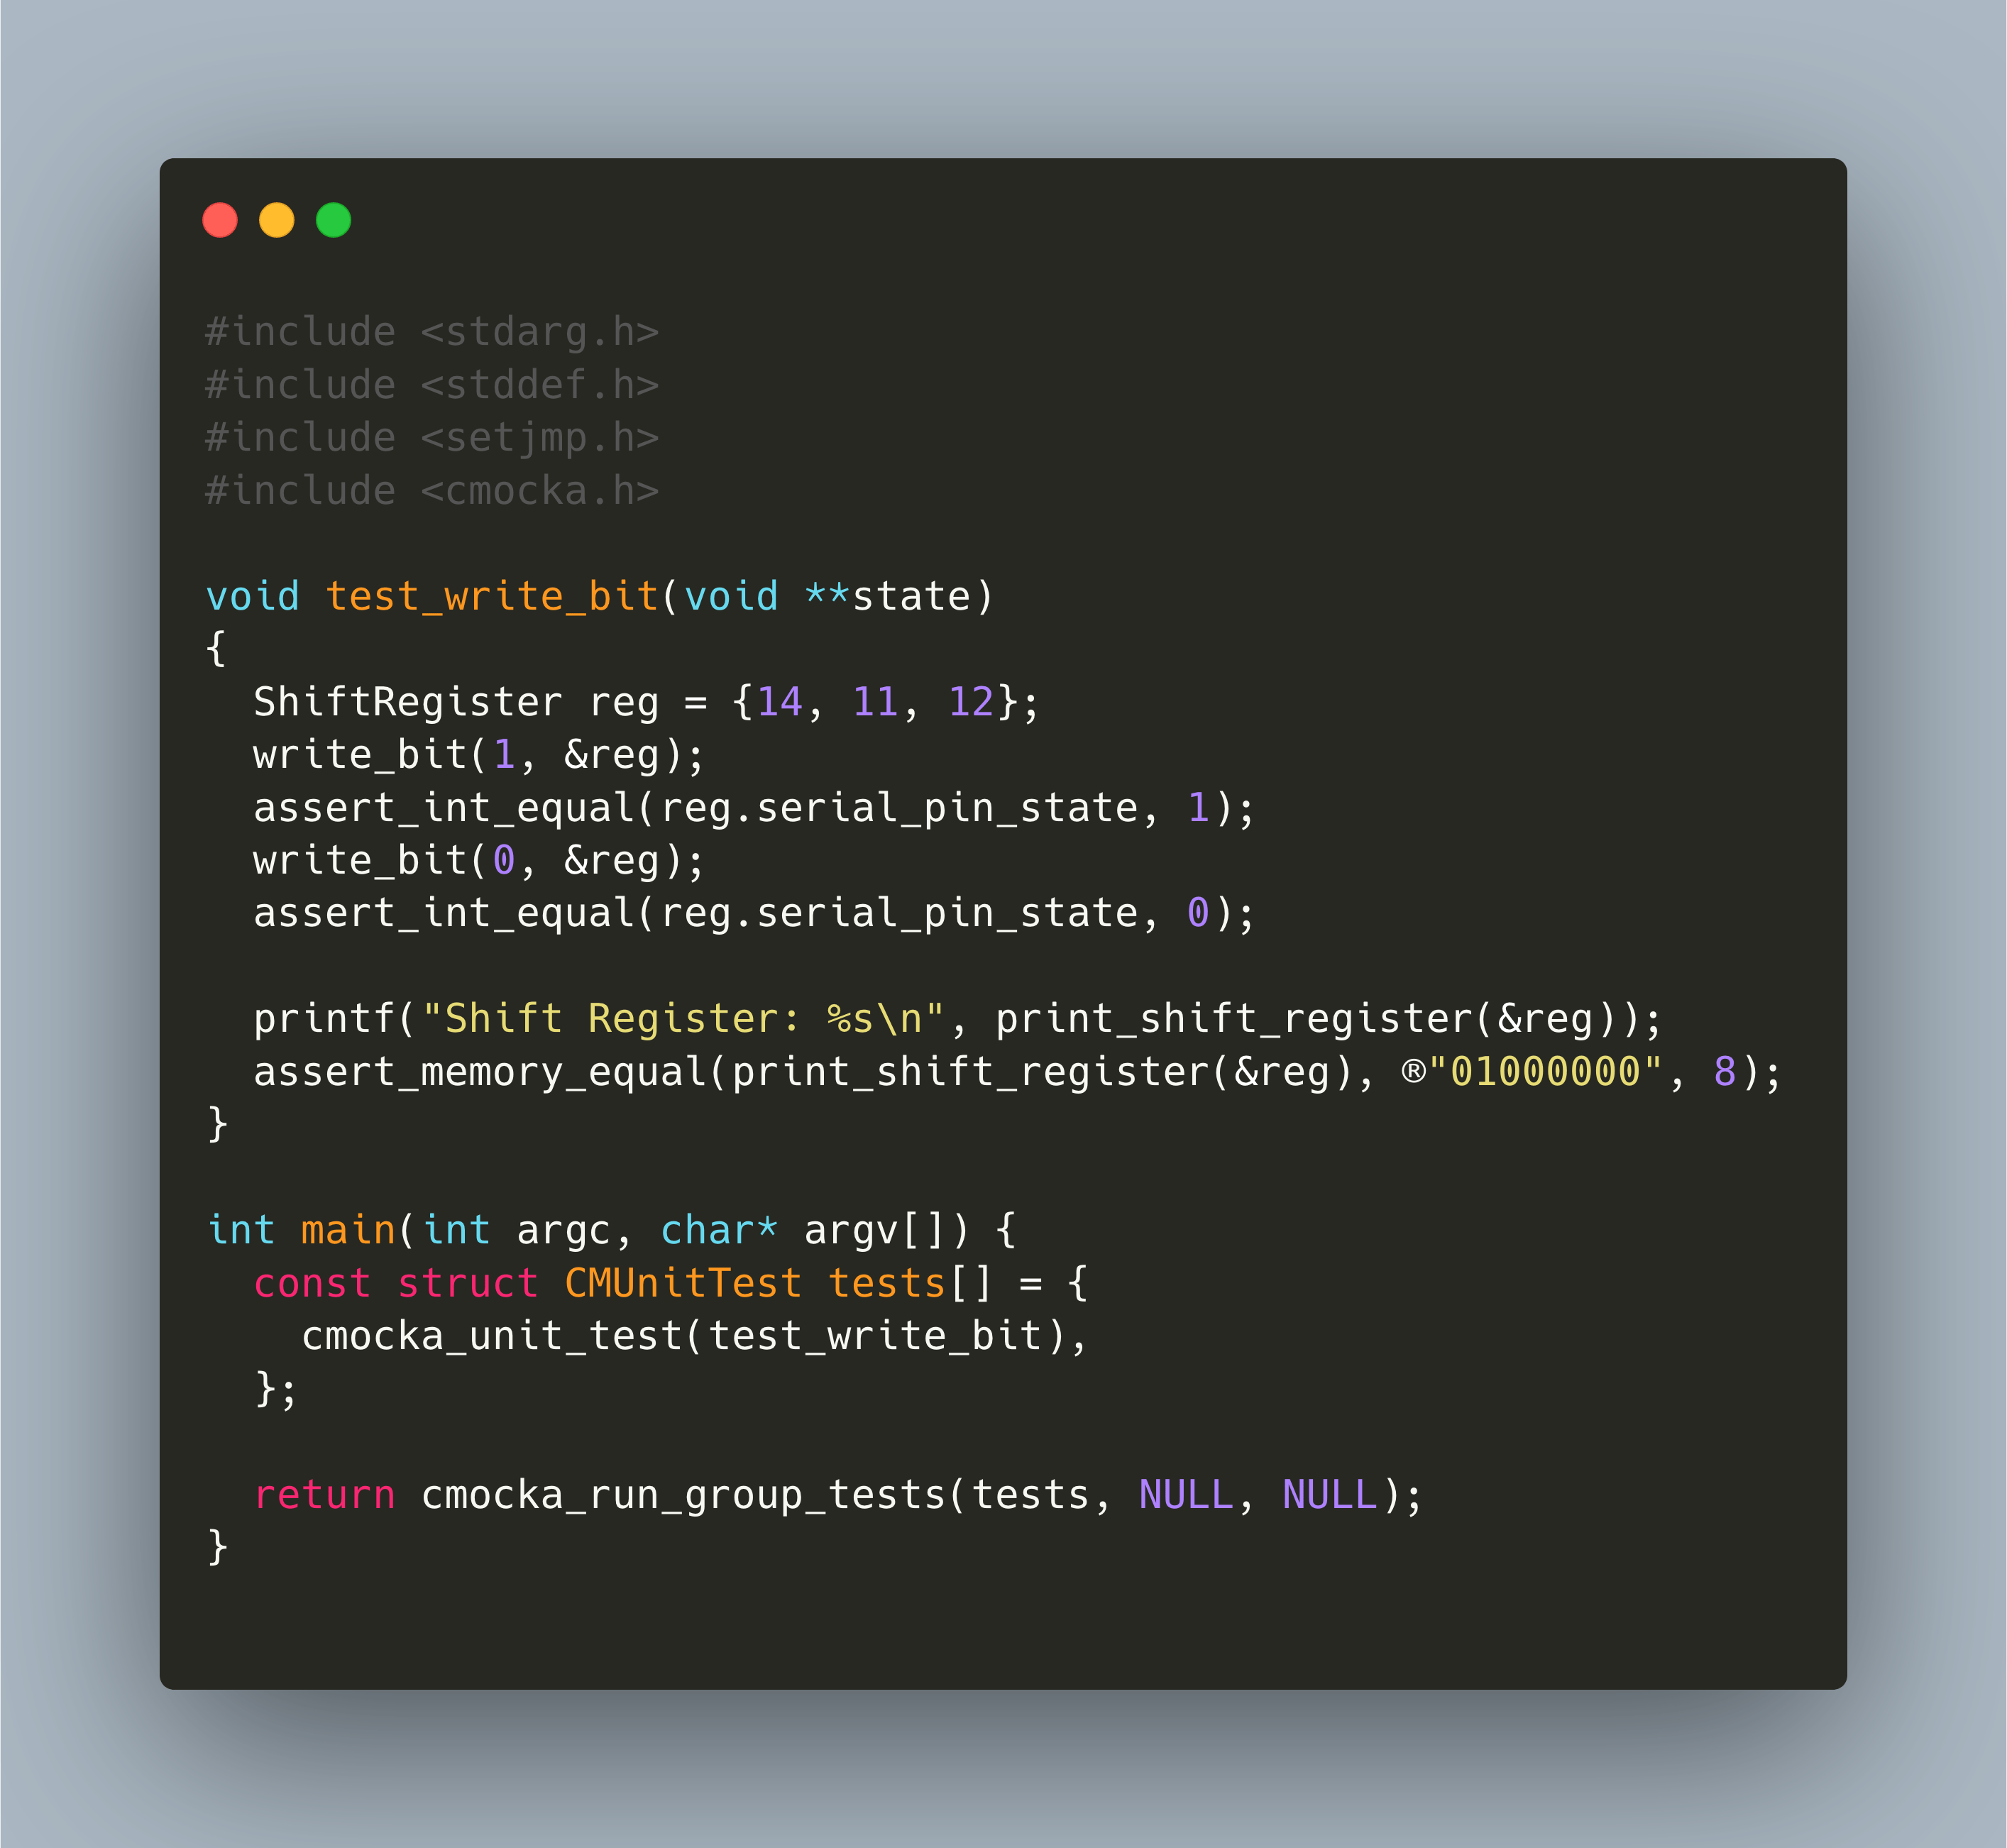
For testing, we will write two bits: 1 followed by 0. After each step, we test the pin_state is set correctly. Finally, we test that the resulting bitmask is correct. To receive the bitmask representation of the shift register, the method print_shift_register is called, and its compared to a string object. The test method uses assert_memory_equal, a convenient test method to test that any types are equal.
void test_write_bit(void **state)
{
ShiftRegister reg = {14, 11, 12};
write_bit(1, ®);
assert_int_equal(reg.serial_pin_state, 1);
write_bit(0, ®);
assert_int_equal(reg.serial_pin_state, 0);
printf("Shift Register: %s\n", print_shift_register(®));
assert_memory_equal(print_shift_register(®), ®"01000000", 8);
}
All tests are passed:
Running Tests
[==========] Running 2 test(s).
[ RUN ] test_shift_register_config
[ OK ] test_shift_register_config
[ RUN ] test_write_bit
Shift Register: 01000000
[ OK ] test_write_bit
[==========] 2 test(s) run.
[ PASSED ] 2 test(s).
Conclusion
This article introduced the CMocka unit testing framework for C programs. I showed how to compile, install and use it. Then, two examples were shown. The first example showed the necessary boilerplate code that you need to run a CMocka test. The 2nd example showed how to use CMocka for testing Pico code, but with a grain of salt: At the time of writing, I had no experience how to test that the hardware signals were transmitted from the Pico. In a future article about library design, I will cover this issue and detail how to test both the library function “as-is” and the hardware side. In my opinion, unit-testing helps you to write better code: By writing a test before the implementation, you structure the feature upfront, and when you have a substantial test suite, you can better maintain and refactor your code.