
The Raspberry Pico is a new microcontroller launched in February 2021. The community was excited about this new board, and several people started amazing projects. I grabbed two boards early on, and while still working on my Arduino based robot, did the usual blinking led and potentiometer tutorials. For simplicity, I used the MicroPython SDK, which is set up in minutes and gives you an interactive Python shell directly on the Pico.
After some more time, I considered the idea to use a Raspberry Pi Pico in my self-made robot projects. For this, I need to evaluate the Pico more thoroughly. The first step is to get the C SDK running. However, the originally documented method in the Starting Guide PDF requires several steps, a complex toolchain, and manual editing of CMake files.
There is a much simple way: You can work with the Pico via the trusted Platform IO Visual Studio Code plugin. This environment gives you an almost Arduino-like experience: Connect the Pico, build, upload, run and connect to the serial monitor with just two button clicks!
This article shows you how to simplify Pico development with the great Platform IO project wizio-pico. The setup instructions are tested on an Ubuntu Linux 20.04.
Prerequisites
Before you start to add the PlatformIO project, you need have the following things installed:
- Visual Studio Code
- Git
Run the following commands:
apt install git
snap install --classic code
Wizio Pico Setup
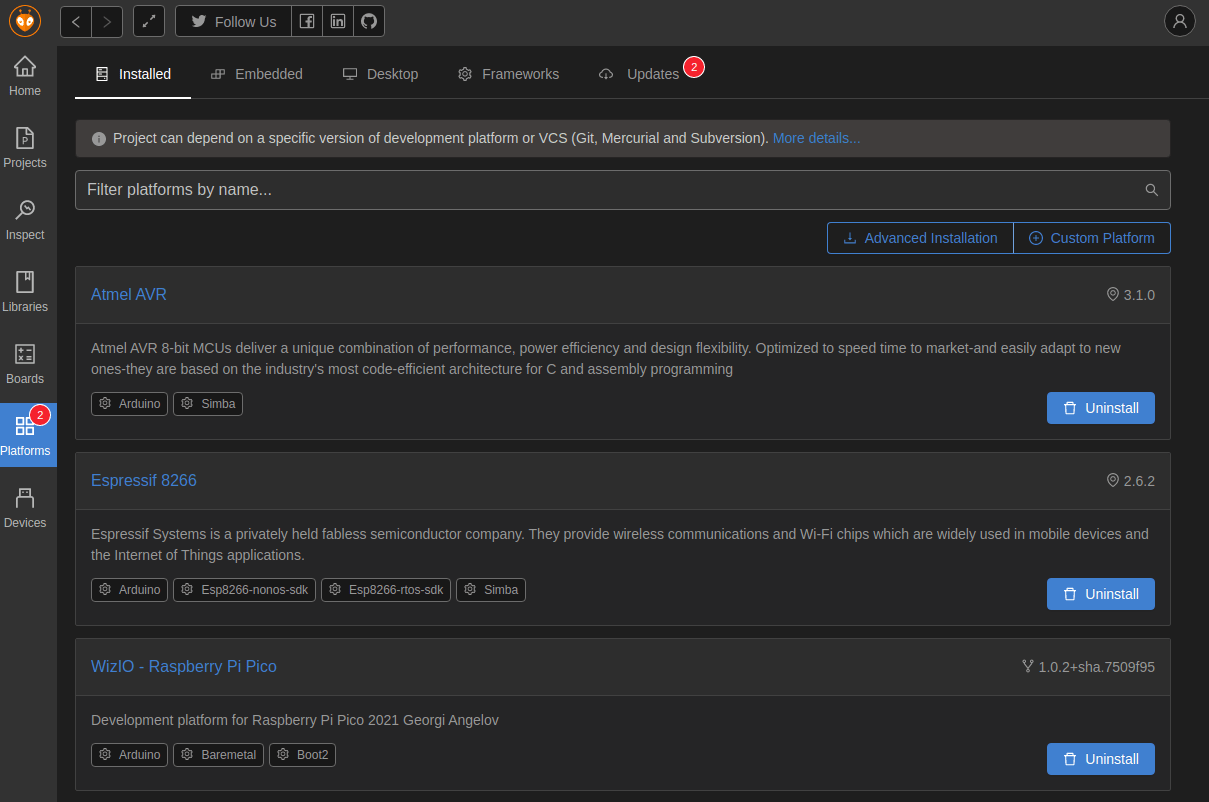
Open visual studio code. Click on the PlatformIO home symbol, then on Platforms and Advanced Installation.
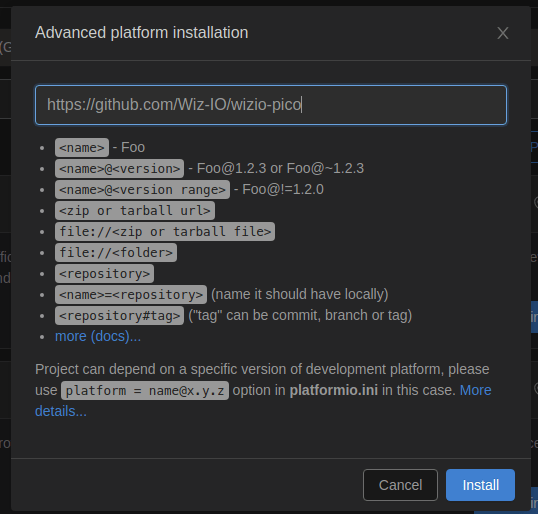
In the next dialog, paste the URL https://github.com/Wiz-IO/wizio-pico and click on Install.
After about 1-2 minutes, you should see the following success message:
Platform has been successfully installed
Platform Manager: Installing git+https://github.com/Wiz-IO/wizio-pico
git version 2.25.1
Platform Manager: wizio-pico @ 1.0.2+sha.7509f95 has been installed!
Tool Manager: Installing git+https://github.com/Wiz-IO/framework-wizio-pico.git
git version 2.25.1
Tool Manager: framework-wizio-pico @ 1.0.2+sha.9df3291 has been installed!
Tool Manager: Installing toolchain-gccarmnoneeabi @ =1.70201.0
Tool Manager: Warning! More than one package has been found by toolchain-gccarmnoneeabi @ =1.70201.0 requirements:
- platformio/toolchain-gccarmnoneeabi @ 1.50401.210106
- maxgerhardt/toolchain-gccarmnoneeabi @ 1.40903.0
Tool Manager: Please specify detailed REQUIREMENTS using package owner and version (showed above) to avoid name conflicts
Tool Manager: toolchain-gccarmnoneeabi @ 1.70201.0 has been installed!
Tool Manager: Installing git+https://github.com/Wiz-IO/tool-wizio-pico.git
git version 2.25.1
Tool Manager: tool-wizio-pico @ 1.0.0+sha.76bba42 has been installed!
The platform 'https://github.com/Wiz-IO/wizio-pico' has been successfully installed!
The rest of the packages will be installed later depending on your build environment.
********************************************************************************
There is a new version 5.1.1 of PlatformIO available.
Please upgrade it via `PlatformIO IDE Menu: Upgrade PlatformIO`.
Changes: https://docs.platformio.org/en/latest/history.html
********************************************************************************
The environment is successfully installed, and you can start working on your projects.
Create a Pico Project
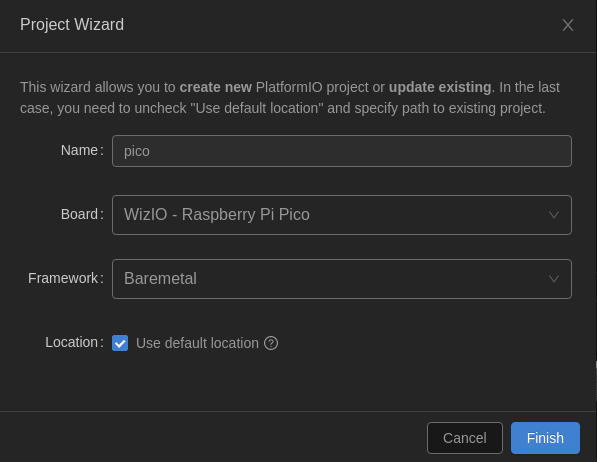
Go the PlatformIO home screen, then click on Projects and Create New Projects. In the opening dialog, choose the board type WizIO - Raspberry Pi Pico and the framework Baremetal (this is the official C SDK).
This creates a project with the following directory structure.
.
├── include
│   ├── pico
│   │   └── config_autogen.h
│   └── README
├── lib
│   └── README
├── platformio.ini
├── README.md
├── src
│   └── main.c
└── test
    └── README
The file main.c needs to contain a void main() function that serves as the entry point to your program. You can split up your program into multiple files, or work within on file.
Blinking LED Example
In main.c, enter the following code.
#include <stdio.h>
#include <stdbool.h>
#include "pico/stdlib.h"

int LED_BUILTIN = 25;
int LED_GREEN = 15;

void setup() {
    stdio_init_all();

    gpio_init(LED_BUILTIN);
    gpio_set_dir(LED_BUILTIN, GPIO_OUT);

    gpio_init(LED_GREEN);
    gpio_set_dir(LED_GREEN, GPIO_OUT);
}

void blink() {
    gpio_put(LED_BUILTIN, 1);
    gpio_put(LED_GREEN, 1);
    sleep_ms(750);

    gpio_put(LED_BUILTIN, 0);
    gpio_put(LED_GREEN, 0);
    sleep_ms(1050);
}

int main() {
    setup();

    printf("Hello World\n");

    while (true) {
        printf(".");
        blink();
    }

    return 0;
}
Then we need to edit the file plattform.ini. You need to figure out two directories: the directory where the Pico is mounted in mass storage mode, and the directory to where the Pico is mounted when it runs as USB-over-serial device.
Edit the file as follows:
[env:raspberry-pi-pico]
platform = wizio-pico
board = raspberry-pi-pico
framework = baremetal

upload_port  = /media/devcon/RPI-RP2/   ; directory for mass-storage
monitor_port  = /dev/ttyACM0            ; directory for usb-over-serial
monitor_speed = 115200
board_build.bynary_type = copy_to_ram
build_flags =
        -D PICO_STDIO_USB              ; enable stdio over USB
build_unflags  = -D PICO_STDIO_UART
Only one thing is remaining: Click on the upload arrow symbol to start compilation & uploading. The output will look as follows:
Processing raspberry-pi-pico (platform: wizio-pico; board: raspberry-pi-pico; framework: baremetal)
---------------------------------------------------------------------------------------------------------------------------------------------------------------------------------------------------------------------------------------------
Verbose mode can be enabled via `-v, --verbose` option
<<<<<<<<<<<< WIZIO - RASPBERRY PI PICO 2021 Georgi Angelov >>>>>>>>>>>>
CONFIGURATION: https://docs.platformio.org/page/boards/wizio-pico/raspberry-pi-pico.html
PLATFORM: WizIO - Raspberry Pi Pico (1.0.2+sha.7509f95) > WizIO - Raspberry Pi Pico
HARDWARE: RP2040 48MHz, 256KB RAM, 2MB Flash
DEBUG: Current (UF2-MSD) On-board (UF2-MSD, picoprobe-OpenOCD)
PACKAGES:
 - framework-wizio-pico 1.0.2+sha.9df3291
 - tool-wizio-pico 1.0.0+sha.76bba42
 - toolchain-gccarmnoneeabi 1.70201.0 (7.2.1)

SDK RASPBERRYPI PI PICO RP2040 ( PICO - SDK110 )
  - OPTIMIZATION : -Os
  - HEAP         : 2048
  - STACK        : 2048
  - BOOT         : w25q080
  - BINARY TYPE  : default [ memmap_default.ld   0x10000000 ]

LDF: Library Dependency Finder -> http://bit.ly/configure-pio-ldf
LDF Modes: Finder ~ chain, Compatibility ~ soft
Found 4 compatible libraries
Scanning dependencies...
No dependencies
Building in release mode
DONE
Checking size .pio/build/raspberry-pi-pico/APPLICATION.elf
Advanced Memory Usage is available via "PlatformIO Home > Project Inspect"
RAM:   [          ]   4.8% (used 12520 bytes from 262144 bytes)
Flash: [          ]   1.8% (used 37148 bytes from 2097152 bytes)
Configuring upload protocol...
AVAILABLE: UF2-MSD
CURRENT: upload_protocol = UF2-MSD
Uploading...
  Converting to UF2
  Start address: 0x10000000
  FamilyID: 0xe48bff56
  Output size: 81408 bytes
  Wrote 81408 bytes to /home/devcon/Documents/PlatformIO/Projects/pico/.pio/build/raspberry-pi-pico/APPLICATION.uf2
==================== [SUCCESS] Took 2.06 seconds ====================
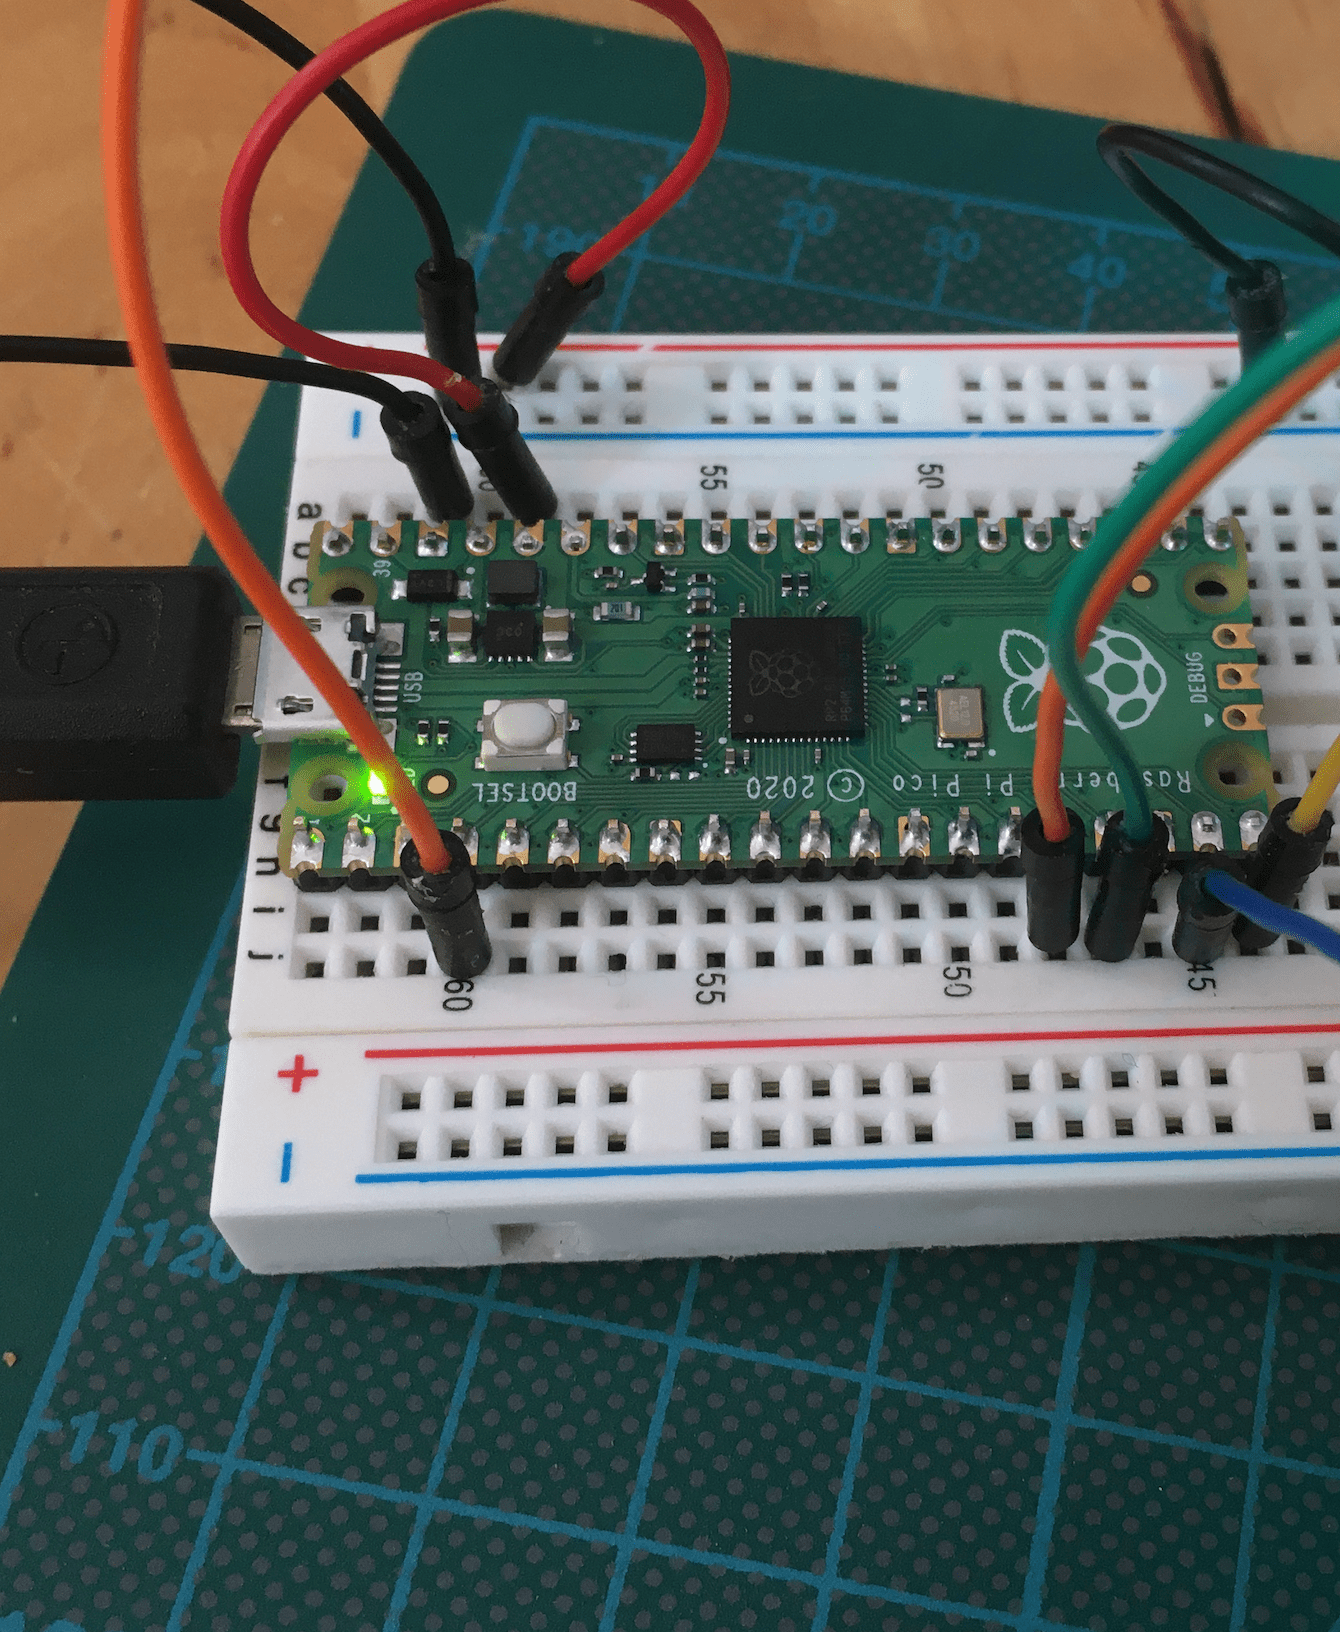
Now your board should start blinking:
Great! With only one click you start the build process and upload the code, exactly like you are working with an Arduino. You can also connect to the serial port and see the output.
Conclusion
Getting the Raspberry Pico C SDK up and running with its complex toolchain can be simplified greatly. Thanks to the great wizio-pico project, you can setup a PlatformIO Visual Studio Code IDE in minutes and develop your Pico project with the full power of the C SDK. No need to add project dependencies to CMake files, no manual drag and drop of UF2 files to start your program. It almost feels like programming for an Arduino. And if you have a background in Arduino, you might feel delighted that you can use Arduino C to program your Pico.
Wouldn’t it be cool to also start a debugging session for your Pico program? But you need two Pico’s for that, correct? No, there is another very convenient way: One-Click debug launch from within VS Code and only using one Pico. Read about this setup in my next article.
Now, two more convenience functions are missing: A rest button, and the option to debug your Pico code. These aspects will be covered in the next articles.