Large Language Models are vast neural networks trained on billions of text token. They can work with natural language in a never-before-seen way, reflecting a context to give precise answers.
In my ongoing series about designing a question-answer system with the help of LLMs, I identified several approaches. One general aspect thereby is to enhance an LLMs capability to work on new, unforeseen data not included in its original pre-training. Instruction fine-tuning is a specific form that improves how concrete tasks are solved, and by fine-tuning with instruction data sets, an LLM should get better at general question-answering too.
To test this hypothesis, this article gives a hands-on practical example for training and evaluating an LLMs. In the first section, the selected datasets and libraries are explained. The second section details the fine tuning, and the third section shows how to evaluate the base model and the fine-tuned model. All source code is published as free available Kaggle notebooks.
The technical context of this article is Python v3.11 and several, version-pined libraries including torch, transformers, bitsandbytes and peft. The instructions could work with newer versions too.
Part 1: Instruction Fine-Tuning Setup
Following my last article about the instruction fine-tuning landscape, this article is based on the following considerations:
- Dataset selection: The dataset should contain instructions and be available in a text format
- Model: An open-source model with 7B parameters
- Quantization: To load a model with 7B parameter or more, 8-bit or 4-bit quantization needs to be applied so that it fits into consumer-grade hardware
- Fine-Tuning: Apply a suitable PEFT method such as QLORA to reduce the number of overall trainable parameters, and use an unsupervised training method that can consume the dataset as is
- Evaluation: Compute the LLMs score for a broad range of instruction tasks
This leads to the following concrete choices:
- Model: LLaAM2 7B, loaded as NousResearch/Llama-2-7b-hf
- Dataset: Alpaca instructions, 52K exampled generated with GPT3.5, loaded as /tatsu-lab/alpaca
- Fine-Tuning Library: A combination of transformers and peft for quantized model loading, and trl for the supervised fine-tuning training
- Evaluation Library & Dataset: The default dataset from instruct-eval
For the working environment of fine-tuning and evaluation, Kaggle Jupyter notebooks are used. They provide in its free-tier 2 CPUs, 30GB RAM and 2x16GB GPUs, which is enough processing power for a 7B model. See the following log output about the hardware capabilities:
# CPU
model name : Intel(R) Xeon(R) CPU @ 2.00GHz
cpu MHz  : 2000.142
cpu cores : 2
# RAM
MemTotal:       32880784 kB
# OS
Linux 1eee7598fa47 5.15.133+ #1 SMP Tue Dec 19 13:14:11 UTC 2023 x86_64 x86_64 x86_64 GNU/Linux
# GPU
Sun Mar 24 16:19:06 2024
+---------------------------------------------------------------------------------------+
| NVIDIA-SMI 535.129.03             Driver Version: 535.129.03   CUDA Version: 12.2     |
|-----------------------------------------+----------------------+----------------------+
| GPU  Name                 Persistence-M | Bus-Id        Disp.A | Volatile Uncorr. ECC |
| Fan  Temp   Perf          Pwr:Usage/Cap |         Memory-Usage | GPU-Util  Compute M. |
|                                         |                      |               MIG M. |
|=========================================+======================+======================|
|   0  Tesla T4                       Off | 00000000:00:04.0 Off |                    0 |
| N/A   40C    P8               9W /  70W |      0MiB / 15360MiB |      0%      Default |
|                                         |                      |                  N/A |
+-----------------------------------------+----------------------+----------------------+
|   1  Tesla T4                       Off | 00000000:00:05.0 Off |                    0 |
| N/A   41C    P8               9W /  70W |      0MiB / 15360MiB |      0%      Default |
|                                         |                      |                  N/A |
+-----------------------------------------+----------------------+----------------------+

+---------------------------------------------------------------------------------------+
| Processes:                                                                            |
|  GPU   GI   CI        PID   Type   Process name                            GPU Memory |
|        ID   ID                                                             Usage      |
|=======================================================================================|
|  No running processes found                                                           |
+---------------------------------------------------------------------------------------+
| ID | GPU | MEM |
------------------
|  0 |  0% |  0% |
|  1 |  0% |  0% |
With the full source code contained in the notebooks, the following sections highlight the essential nuts-and-bolts steps of training. After the final and working example, I sometimes add a noteworthy observation about an error or other aspects that I tried.
Part 2: Instruction Fine-Tuning
The complete notebook can be accessed here: Instruction Fine-Tuning LLaMA 2
Required Libraries
To get the workbook running flawlessly, I re-learned the wise practice of version pinning libraries.
# Transformers installation
! pip install -U transformers==4.30 tensorflow==2.15 accelerate peft bitsandbytes trl einops datasets fsspec  #fix https://stackoverflow.com/questions/76924239/accelerate-and-bitsandbytes-is-needed-to-install-but-i-did
At the time of writing this article in March 2024, these versions prevent a crucial error in Kaggle notebooks in which the datasets and the model could not be loaded correctly.
Dataset
Build on top of the HuggingFace ecosystem, training data loading and utilization is delightfully simple:
from datasets import load_dataset

dataset = load_dataset("tatsu-lab/alpaca", split="train")
Here is an entry from this dataset:
{
  'instruction': 'What are the three primary colors?',
  'input': '',
  'output': 'The three primary colors are red, blue, and yellow.', 'text': 'Below is an instruction that describes a task. Write a response that appropriately completes the request.\n\n### Instruction:\nWhat are the three primary colors?\n\n### Response:\nThe three primary colors are red, blue, and yellow.'
}
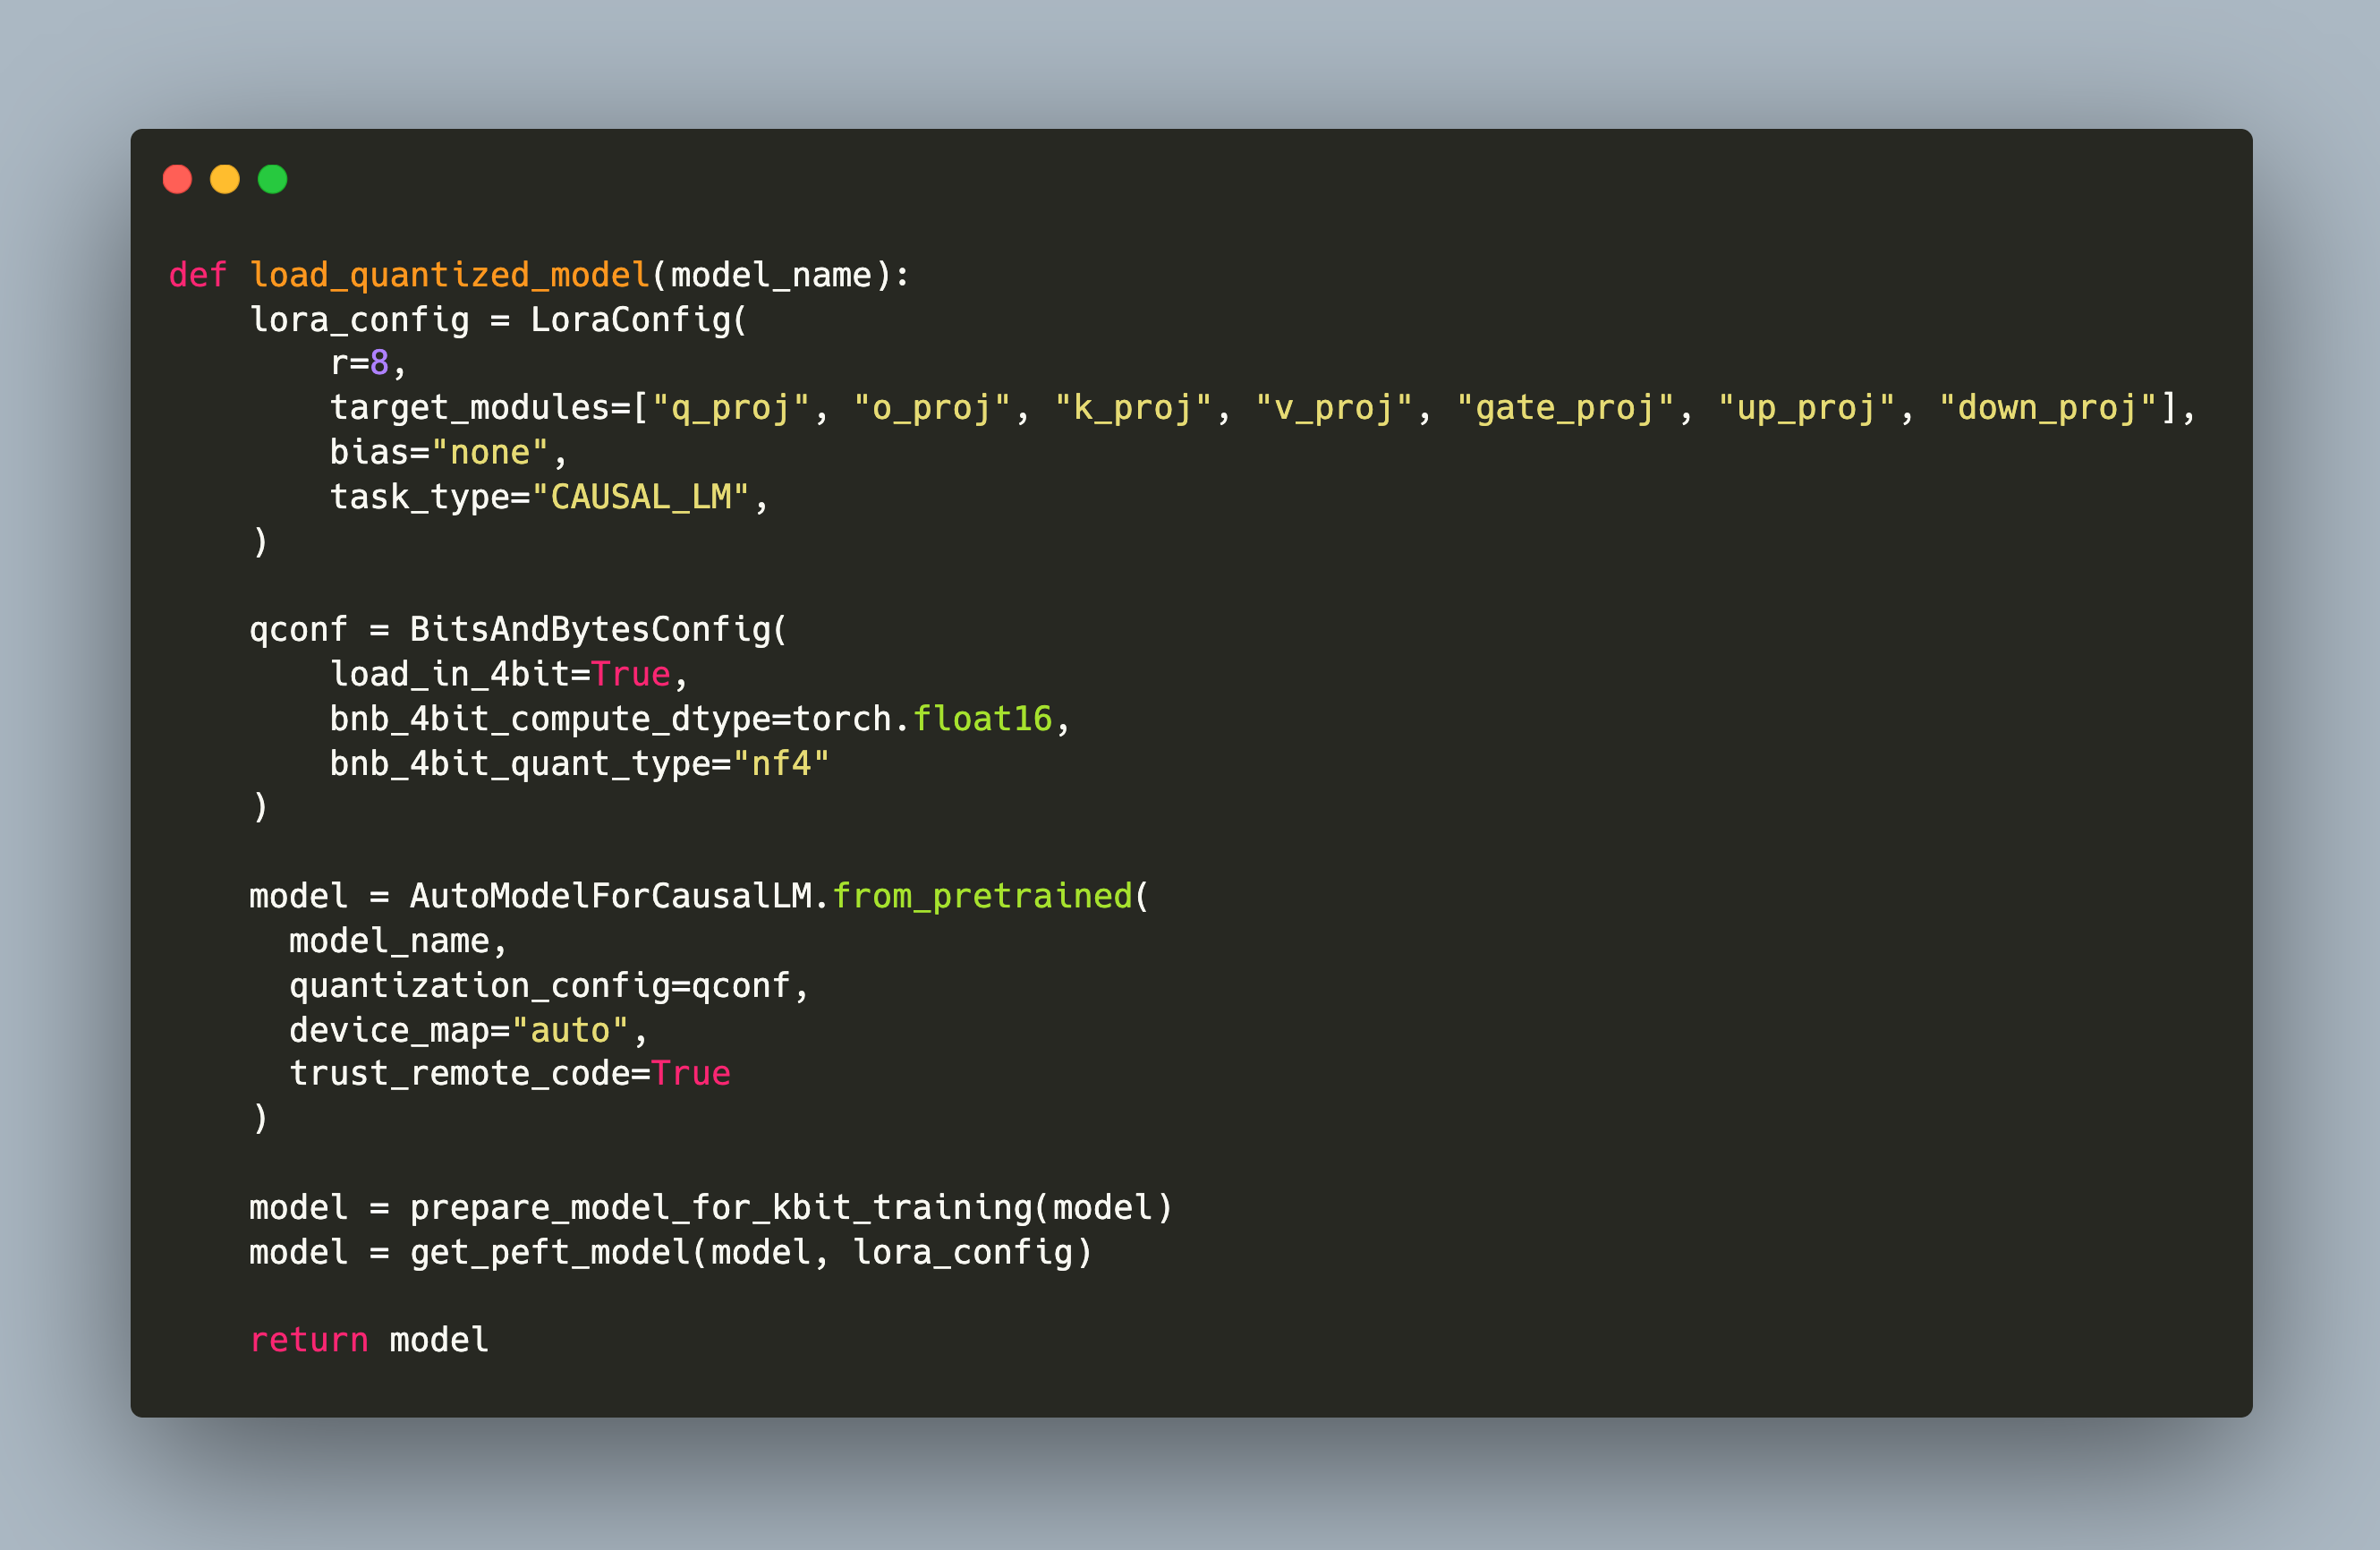
Quantized Model
Getting the quantized model to load and be ready for fine-tuning took some time. At the end, I found two ways.
The first using the uses the default AutoModel classes and the load_in_8bit flag.
def load_8bit_model(model_name):
    model = AutoModelForCausalLM.from_pretrained(model_name, load_in_8bit=True)

    return model
The second method follows the recommendations from the blog post Finetune LLMs on your own consumer hardware and combines a BitsAndBytesConfig for quantizing and LORA for injecting adapters into the model that are used for training.
def load_quantized_model(model_name):
    lora_config = LoraConfig(
        r=8,
        target_modules=["q_proj", "o_proj", "k_proj", "v_proj", "gate_proj", "up_proj", "down_proj"],
        bias="none",
        task_type="CAUSAL_LM",
    )

    qconf = BitsAndBytesConfig(
        load_in_4bit=True,
        bnb_4bit_compute_dtype=torch.float16,
        bnb_4bit_quant_type="nf4"
    )

    model = AutoModelForCausalLM.from_pretrained(
      model_name,
      quantization_config=qconf,
      device_map="auto",
      trust_remote_code=True
    )
    model = prepare_model_for_kbit_training(model)
    model = get_peft_model(model, lora_config)

    return model
From my experience, using example codes from other sources and even the official documentation only matches a combination of version-pinned libraries specifically from the time when the source was written.
Trainer Configuration
A trainer instance can be configured with a staggering amount of hyperparameters. I opted to follow default values from the official documentation.
training_args = TrainingArguments(
    output_dir="./llama-7b-qlora-instruct",
    per_device_train_batch_size=1,
    gradient_accumulation_steps=1,
    optim="paged_adamw_8bit",
    num_train_epochs = 5,
    save_steps=10,
    logging_steps=10,
    learning_rate=2e-4,
    max_grad_norm=0.4,
    max_steps=400,
    warmup_ratio=0.03,
    lr_scheduler_type="cosine",
    gradient_checkpointing=True,
    push_to_hub=False,
    report_to='tensorboard',
    load_best_model_at_end=True,
    evaluation_strategy="steps"
)
Then, defining a tokenizer and providing the model is required to start the training process.
trainer = SFTTrainer(
    model=model,
    train_dataset=dataset,
    peft_config=lora_config,
    dataset_text_field="text",
    max_seq_length=4096,
    tokenizer=tokenizer,
    args=training_args
)

trainer.train()
trainer.model.save_pretrained(os.path.join(output_dir, "final_checkpoint"))
In reflecting this code, one can see how fast the HuggingFace ecosystem evolves. The trl trainer was initially released in January 2023, and only one year later, it can completely replace the built-in trainer abstraction.
Training Run
With the provided QLORA and 4-bit configuration, 20M parameter need to be trained:
***** Running training *****
  Num examples = 52,002
  Num Epochs = 1
  Instantaneous batch size per device = 2
  Total train batch size (w. parallel, distributed & accumulation) = 4
  Gradient Accumulation steps = 2
  Total optimization steps = 100
  Number of trainable parameters = 19,988,480
The run progress is determined by the number of batch sizes, and the duration with the number of max steps.
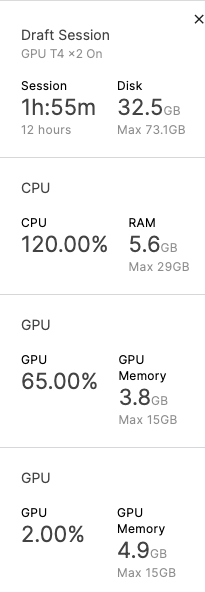
Trying different configurations, I could see that 1000 steps and batch size of 4 resulted in over 11h training time:
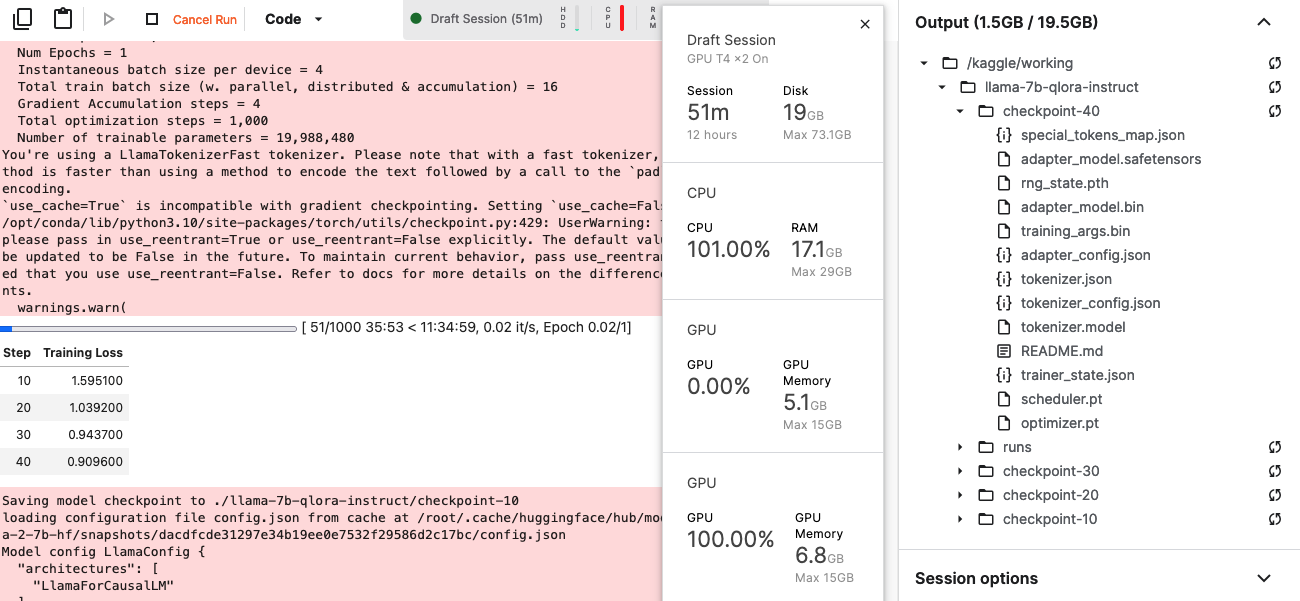
And with a batch size of 1 and 100 steps, training is finished after 20 minutes.
Since the validation loss of all steps are shown, you can manually pick the best model after the training finished (or you stopped it because n no further improvement occurred). The fine-tuned model is contained in the specified checkpoint folder. This needs to be put into a ZIP file, like shown here:
!zip -r file.zip "/kaggle/working/llama-7b-qlora-instruct/checkpoint-80"
And with this, the model training is finished.
Part 3: Model Evaluation
The complete notebook can be accessed here: - Instruct Eval a LLaMA2 Base Model
Setup instruct-eval
The most challenging and time-consuming part was to get a working Python3.8 binary available inside the notebook.
Performing an internet search about “downgrading Python version in Kaggle” shows a plethora of methods from 2024 back to 2018. The solution that worked for me is to create a dedicated conda environment…
!conda create -n instruct-eval -y \
  && source /opt/conda/bin/activate instruct-eval \
  && conda install python=3.8 -y \
  && python --version
… and explicitly activate this environment for any subsequent command.
!source /opt/conda/bin/activate instruct-eval \
 && python --version \
With this, the setup of instruct-eval follows the explanations of its GitHub repository.
!git clone --depth=1 https://github.com/declare-lab/instruct-eval.git

!source /opt/conda/bin/activate instruct-eval \
 && python --version \
 && cd instruct-eval \
 && pip install -r requirements.txt \
 && pip install -U transformers tensorflow accelerate peft bitsandbytes trl einops datasets fsspec

!mkdir -p instruct-eval/data
!wget https://people.eecs.berkeley.edu/~hendrycks/data.tar -O data/mmlu.tar
!tar -xf data/mmlu.tar -C data
!mv data/data instruct-eval/data
!mv instruct-eval/data/data instruct-eval/data/mmlu
!ls -la instruct-eval/data
After either downloading the base model from HuggingFace or loading the fine-tuned model from a checkpoint, the evaluation is started with these instructions:
!source /opt/conda/bin/activate instruct-eval \
 && python --version \
 && cd instruct-eval  \
 && pip install scikit-learn \
 && python main.py mmlu --model_name causal --model_path $MODEL_NAME --load_8bit
Base Model
The base model run took about 6h time.
Average accuracy 0.401 - astronomy
  5%|██▏                                      | 3/57 [07:42<2:19:50, 155.38s/it]/opt/conda/envs/instruct-eval/lib/python3.8/site-packages/transformers/generation/configuration_utils.py:410: UserWarning: `do_sample` is set to `False`. However, `temperature` is set to `0.9` -- this flag is only used in sample-based generation modes. You should set `do_sample=True` or unset `temperature`.
  warnings.warn(
/opt/conda/envs/instruct-eval/lib/python3.8/site-packages/transformers/generation/configuration_utils.py:415: UserWarning: `do_sample` is set to `False`. However, `top_p` is set to `0.6` -- this flag is only used in sample-based generation modes. You should set `do_sample=True` or unset `top_p`.
  warnings.warn(
Average accuracy 0.500 - business_ethics
  7%|██▉       | 4/57 [09:35<2:02:24, 138.57s/it]/opt/conda/envs/instruct-eval/lib/python3.8/site-packages/transformers
The GPU utilization is clearly visible.
After about 5 hours, the result was ready:
Average accuracy 0.684 - world_religions
100%|████████████████████████████████████████| 57/57 [5:06:22<00:00, 322.50s/it]
Average accuracy 0.302 - math
Average accuracy 0.485 - health
Average accuracy 0.350 - physics
Average accuracy 0.613 - business
Average accuracy 0.493 - biology
Average accuracy 0.360 - chemistry
Average accuracy 0.439 - computer science
Average accuracy 0.423 - economics
Average accuracy 0.490 - engineering
Average accuracy 0.402 - philosophy
Average accuracy 0.536 - other
Average accuracy 0.562 - history
Average accuracy 0.510 - geography
Average accuracy 0.574 - politics
Average accuracy 0.525 - psychology
Average accuracy 0.584 - culture
Average accuracy 0.390 - law
Average accuracy 0.374 - STEM
Average accuracy 0.429 - humanities
Average accuracy 0.516 - social sciences
Average accuracy 0.520 - other (business, health, misc.)
Average accuracy: 0.458
{'mmlu': 45.76}
mmlu: 45.76
Evaluating the Fine-Tuned Model
The complete model can be accessed here: Instruct Eval a LLaMA2 Fine-Tuned Model
The only difference for running the evaluation on the fine-tuned model is about provisioning the model files. To my surprise, there is no UI feature to just upload a file. Instead, you need to provide input data, such as datasets or models, either via loading them from another webpage or by connection other Kaggle resources with your project.
I opted for the latter and created the fine-tuned model by following the GUI workflow:
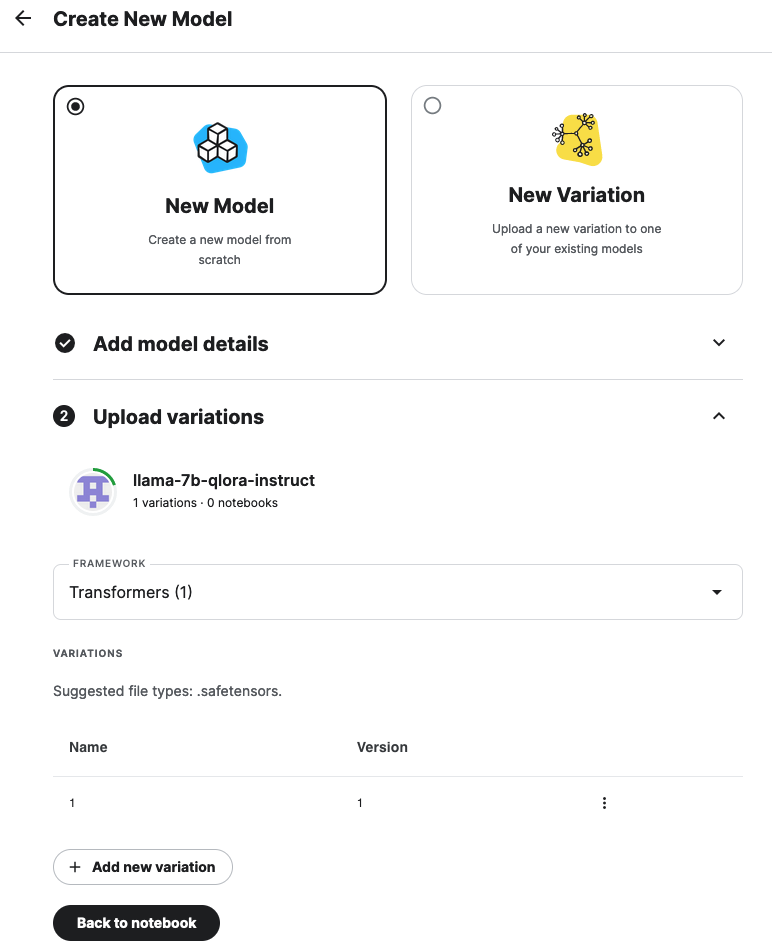
Then in the target notebook, on the right side, click on + Add Input and follow the instructions. Uploaded files are put into /kaggle/input and can be accessed from there.
With this, the fine-tuned model can be loaded with the following script:
import torch
import peft
from peft import AutoPeftModelForCausalLM

model_dir = "/kaggle/input/llama-7b-qlora-instruct/transformers/1/1/kaggle/working/llama-7b-qlora-instruct/checkpoint-80"

model = AutoPeftModelForCausalLM.from_pretrained(model_dir, torch_dtype=torch.float16)
The fine-tuned model ran for the same amount of time. Here are the log files:
{'data_dir': 'data/mmlu', 'ntrain': 5, 'kwargs': {'model_name': 'causal', 'model_path': '/kaggle/input/llama-7b-qlora-instruct/transformers/1/1/kaggle/working/llama-7b-qlora-instruct/checkpoint-80', 'load_8bit': True}, 'args': Namespace(data_dir='data/mmlu', kwargs={'model_name': 'causal', 'model_path': '/kaggle/input/llama-7b-qlora-instruct/transformers/1/1/kaggle/working/llama-7b-qlora-instruct/checkpoint-80', 'load_8bit': True}, ntrain=5), 'model': CausalModel(model_path='/kaggle/input/llama-7b-qlora-instruct/transformers/1/1/kaggle/working/llama-7b-qlora-instruct/checkpoint-80', max_input_length=2048, max_output_length=2, model=None, tokenizer=None, lora_path='', device='cuda', load_8bit=True)}
  0%|                                                    | 0/57 [00:00<?, ?it/s]The `load_in_4bit` and `load_in_8bit` arguments are deprecated and will be removed in the future versions. Please, pass a `BitsAndBytesConfig` object in `quantization_config` argument instead.

Loading checkpoint shards:   0%|                          | 0/2 [00:00<?, ?it/s]
Loading checkpoint shards:  50%|█████████         | 1/2 [00:40<00:40, 40.99s/it]
Loading checkpoint shards: 100%|██████████████████| 2/2 [00:56<00:00, 28.21s/it]
...
Average accuracy 0.320 - abstract_algebra
  2%|▋                                        | 1/57 [02:31<2:21:11, 151.28s/it]/opt/conda/envs/instruct-eval/lib/python3.8/site-packages/
And the final benchmark results are these:
Average accuracy 0.684 - world_religions
100%|████████████████████████████████████████| 57/57 [4:53:43<00:00, 309.19s/it]
Average accuracy 0.288 - math
Average accuracy 0.468 - health
Average accuracy 0.355 - physics
Average accuracy 0.616 - business
Average accuracy 0.471 - biology
Average accuracy 0.323 - chemistry
Average accuracy 0.427 - computer science
Average accuracy 0.395 - economics
Average accuracy 0.434 - engineering
Average accuracy 0.400 - philosophy
Average accuracy 0.535 - other
Average accuracy 0.570 - history
Average accuracy 0.515 - geography
Average accuracy 0.560 - politics
Average accuracy 0.514 - psychology
Average accuracy 0.578 - culture
Average accuracy 0.395 - law
Average accuracy 0.359 - STEM
Average accuracy 0.432 - humanities
Average accuracy 0.502 - social sciences
Average accuracy 0.512 - other (business, health, misc.)
Average accuracy: 0.450
{'mmlu': 45.01}
mmlu: 45.01
Conclusion
This article showed how to instruct fine-tune a LLaMA2 model and evaluate it with the instruct-eval benchmark. Using free-tier Kaggle notebooks, this process consumes about 15h of GPU time. All notebooks are freely accessible, the results can be reproduced. The development journey exposed important knowledge: On one hand, about the libraries such as transformers, bitsandbytes and peft. And on the other, how to work with Kaagle and similar cloud resources. The most important best-practice is to use version-pinning: Without it, the fast-evolving libraries may change their API, making your code unexcutable. The second tip is how to properly manage different Python versions by leveraging the conda build system and explicitly chain all bash commands together. In the end however, the instruction-fine tuned model performed marginally worse than the base model. But given the vast space of dataset, the door to future evaluations are open.