
Lighthouse is a service to scan webpages and see how good they score on terms of SEO, performance and best practices. You can use the scanner here: https://lighthouse.admantium.com/.
Currently lighthouse consists of three microservices: A frontend that delivers static HTML, an API to request new scans and query job status, and several workers that perform the actual web page scan. During refactoring the application into true microservices, I recognized that scaling the app is about scaling the workers. And as for now, I just provide a fixed number of workers, and each can only process up to 3 scans at the same time.
In this article, I explore and implement the concept of a serverless function. In a nutshell, serverless means that you implement and deploy a function with a standardized HTTP interface somewhere in the cloud, and the framework takes care of availability and scaling of this particular function. There are many serverless platform or providers available. The platform of my choice is OpenFaas. I will use OpenFaaS because it runs natively on Kubernetes, can be deployed easily, does not restrict the used programming language and uses (customizable) Docker images for function execution.
In this article, I will start with a short introduction to OpenFaaS. I will only cover core concepts, read my OpenFaas Deep Dive to get even more familiar. Then I will explain how the current worker node in my lighthouse functions. And then we will modify this microservice step-by-step to a serverless function.
Note: The lighthouse service is discontinued since 2024-05-18.
OpenFaaS Core Concepts
OpenFaaS provides a powerful command line utility to build, push, and deploy serverless applications. Users start by choosing a template for their functions. Templates consist of a special Docker image with a built-in health check functions as well as programming language specific software packages. When you choose a template, you can either get a base image, for example the NodeJS template, or a specialized template for an HTTP framework in this language, for example Express. The difference: The base image will just expose one function, and will just return HTTP status codes 200 and 400. The specialized framework allows you full HTTP methods, different endpoints and status codes.
When you choose a template, three artifacts will be generated for you. First, a project folder with a handler file in which you put your function code. Second, for the template you a choose, template folder with the Dockerfile and language-specific file. And third, a configuration file that links your function to the template.
Once the template is initialized, you simply add function code to the handler file and then use the OpenFaaS cli to build, push and deploy your function. Your function can be viewed in an UI. In the UI, you can invoke your function, and see usage statics etc.
Worker Microservice
The worker microservice is developed with NodeJS. It is based on Hapi, a framework that provides similar abstractions than Express. Hapi comes with a rich set of easy to apply plugins for query parameter parsing, validity checks, logging and even automatic health check endpoints. You can read more about Hapi in my earlier article.
The microservice provides just one endpoint: GET /api/scan. Requests are passed to scanner.run. The scan function returns a HTTP status code and a message that is returned to the caller. Here is a short excerpt of the HTTP endpoint:
const hapi = require('@hapi/hapi');

async function init() {
  const server = hapi.server({
    port: 8080,
    host: "0.0.0.0",
  });

  server.route({
      method: 'GET',
      path: '/api/scan',
    },
    handler: async (request, h) => {
      request.log('REQUEST /scan');

      const scan = await scanner.run(request.query.url, server);

      return h.response(scan.msg).header('Access-Control-Allow-Origin', '*').code(scan.code);
    }
  });

  // 40 lines of HAPI configuration code

  await server.start();
  server.log('info', { msg: 'BOOTING lighthouse-scanner v0.2.1' });
}

init();
The scanner.run function provide the core logic. First, it keeps track of the number of concurrent scans. At any time, a maximum number of 3 scans is allowed. If more are requested, an error will be thrown. Second, it converts the URL to a domain name, and executes a ping check to see if this domain exits. Third, if all is well, a lighthouse scan is executed and the result returned. Here is again an excerpt of the function.
const max_jobs = 3;
let counter = 0;

function response(msg, code, uuid) {
  return { msg, code, uuid };
}

exports.scanner = {
  run: async (url) => {
    if (!(counter < max_jobs)) {
      return response('Scanner request denied, all workers exhausted, please try again', 429, '');
    }

    const domain = url.replace(/http(s?):\/\//, '');

    try {
      ping(domain);
    } catch (e) {
      if (e.failed && e.stderr !== '') {
        const msg = e.stderr ? e.stderr : 'could not resolve address';
        return response(msg, 404, '');
      }
    }

    try {
      const result = await scan(`http://${domain}`));
      return response(result, 200);
    } catch (e) {
      const errDetails = { stderr: e.stderr, reason: e.shortMessage };
      return response(errDetails, 400);
    }
  }
};
Worker Serverless Function
Now we will rewrite this microservice as a serverless function.
The first step is to select a suitable template. I like to work with complete HTTP methods and status codes, so we will use a template based on the express framework. Download the template with faas-cli template store pull node10-express-service.
Second, we initialize a new project. When we execute faas-cli new --lang node10-express-service lighthouse, the resulting files are:
lighthouse.yml
lighthouse
├── handler.js
└── package.json
To get our serverless function running, we need to do four steps.
Step 1: Add Function Code and Libraries
This is a rather obvious step. You need to take your core function and provide a small HTTP wrapper around it. The complete microservice core logic in lighthouse could be reduced to an almost 1:1 copy of the scanner.run function and 9 lines of additional code for the endpoint. The final result looks like this.
"use strict"
async function scan(req) {
    //Same as scanner.run
}

module.exports = async (config) => {
    const app = config.app;

    app.get('/scan', async (req, res) => {
        const r = await scan(req);
        res.status(r.code);
        res.send(r.msg);
    })
}
This was surprising. All the HAPI configuration code is not needed, and the simplicity of defining HTTP endpoints based on Express speaks for itself.
If your function needs additional libraries, you can add them to the provided package manager. For NodeJS, that is the package.json file, and you add them as usual with npm install.
Step 2: Customize Dockerfile (optional)
Your templates Dockerfile resides at templates/TEMPLATE_NAME/Dockerfile. Take a look at it, and add any additional software package you might need. In my case, that is the iputils package to execute ping system calls.
FROM node:12.13.0-alpine as ship

# Additional tools
RUN apk update
RUN apk --no-cache add ca-certificates iputils

# ...
Step 3: Build and Push your Image
In this step, you use the OpenFaaS command line utility again. An important prerequisite: You need to have access to a Docker registry. I prefer to use a private registry, but you can also use Dockerhub. Read the OpenFaaS Documentation about setup a private Docker registry.
First, configure registry and image name in the OpenFaaS config file. Here is the content of lighthouse.yml.
version: 1.0
provider:
  name: openfaas
  gateway: https://functions.admantium.com
functions:
  lighthouse:
    lang: node10-express-service
    handler: ./lighthouse
    image: docker.admantium.com/lighthouse-openfaas:latest
Then, execute faas-cli build -f lighthouse.yml and fs push -f lighthouse.yml.
Step 4: Deploy
The final step is a simple command: faas-cli deploy -f lighthouse.yml. When you use a private registry, you need to add the name of the registry secret as follows: faas-cli deploy -f lighthouse.yml --secret dockerfaas.
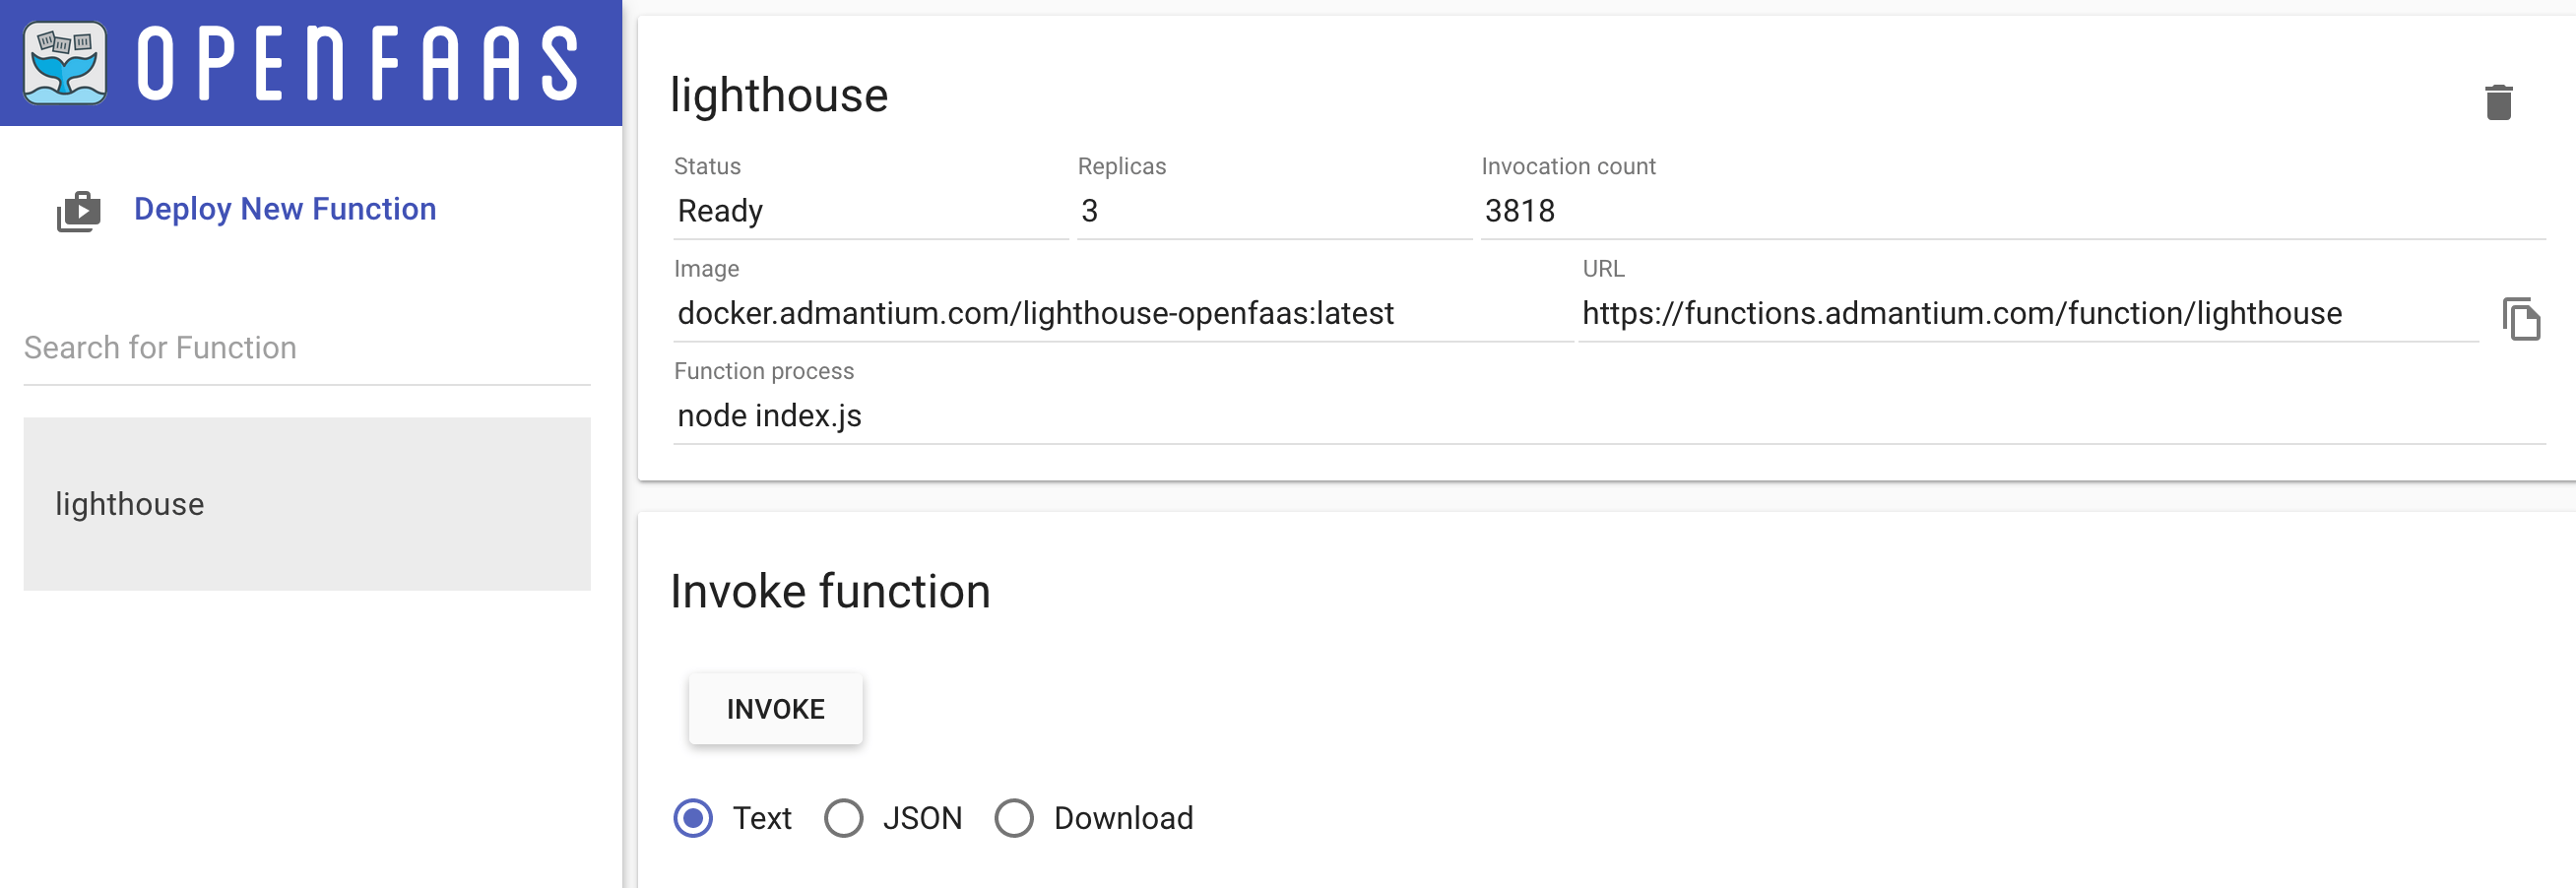
Head over to the UI to see your function.
All done - your microservice is now serverless, and OpenFaaS takes care about your functions availability.
Conclusion
With OpenFaaS, you can create lean serverless functions that are accessible with standardized HTTP endpoints. Supported by a comprehensive and complete command line utility, you select a template, initialize a project, build, push and deploy your function. OpenFaaS is about choice: A huge number of programming languages and frameworks are supported, and the Dockerfile that runs your function can be customized.
In this article, I showed the essential steps to rewrite a NodeJS microservice to a serverless function. In essence, you can copy your existing function, and add a lean HTTP handler around it. Then you optionally customize the Dockerfile. And finally, you are using the OpenFaaS command line utilities for building, pushing and deploying the application.
This was my first practical application of a serverless function. As a developer, I like the simplicity of creating and deploying a function. However, I spend a lot of time learning about the templates and learning how to redesign my function with OpenFaaS. Part of this difficulty is actually an OpenFaaS strength: The many options you have, including customizing the Docker image. There are many concepts of OpenFaaS that I did not use yet: Event driven communication between functions, and particular auto scaling. I’m looking forward to explore these concepts as well.