There are several options to roll your own Kubernetes cluster. In addition to provisioning on managed infrastructure, you can also create a managed cluster that is integrated with a particular cloud environment, enabling you to use other services and concepts from the cloud environment.
This article is a hands-on tutorial to setup the Kubernetes platform Elastic Kubernetes Service (EKS) on AWS. Step-by-step, you will learn how to download the required binaries, get the AWS authorization, draft a EKS configuration, and the cluster installation procedure. You will also see how to access the cluster with both kubectl and SSH and learn how to perform a cluster update.
Part 1: Prerequisites
To follow this tutorial, you need to have a fully registered and activated AWS account. This account also needs to have complete access rights for managing theses required resources: AWS instances, VPC, IAM user.
You also need a dedicated computer to install the required binaries and perform the installation steps, and you will also connect from this machine to the cluster, either by using kubectl or SSH. This machine is called the EKS controller in the remainder of this article.
Finally, resource creation and utilization generate costs - be sure you are willing to pay for this experience! In a three-day period, I paid $30. You can keep a good overview about all costs with the cost dashboard - but only after they incurred.
Part 2: Tool Installation
The first task is to install all the necessary binary tools on the EKS controller.
kubectl
The binary for interacting with a Kubernetes cluster. It can be installed from your package manager, or you can just grab the binary suitable for your architecture.
To install version 1.24.0 On a Linux host, execute these commands:
cd ~
curl -LO https://dl.k8s.io/release/v1.24.0/bin/linux/amd64/kubectl
chmod +x kubectl
mkdir -p ~/.local/bin
mv ./kubectl ~/.local/bin/kubectl
eksctl
This CLI tool creates and manages the Kubernetes cluster. It’s provided by Amazon as a binary file. Go to its Github releases page and grab the binary for your OS.
For a Linux host, execute these commands:
curl --silent --location "https://github.com/weaveworks/eksctl/releases/latest/download/eksctl_$(uname -s)_amd64.tar.gz" | tar xz -C /tmp
chmod +x /tmp/eksctl
mkdir -p ~/.local/bin
mv /tmp/eksctl ~/.local/bin/eksctl
Part 3: Cluster Configuration
The cluster creation is a one-time command. The cluster itself is either preconfigured, or can be customized by flags or a config file. Configuration options are extensive - see the full configuration file documentation for all options. In this tutorial, I’m following the preconfigured path, using mostly default settings.
To get started, we need to define the following things:
- Name: The name of the cluster
- Region: The AWS availability region in which you want to deploy the cluster
- Kubernetes version: Check the supported EKS versions and ensure that you have a compatible
kubectlversion installed - Node number: How many worker nodes the cluster should have
- AWS instance (optionally): The instance type of the nodes, see the AWS documentation. If you do not provide a setting, the default instance type
m5.large?will be used. - Node type: In EKS, K8S Workloads can run either as container on the ECS instances, which means container in VMs, or as containers on bare-metal server with Amazon Fargate.
In addition to these, you need to provide your AWS credentials, for example as the environment variables AWS_ACCESS_KEY_ID and AWS_SECRET_ACCESS_KEY.
Part 4: Cluster Installation
First Try: Console
My first try to install a cluster was to pass all options as flags. This was the command:
eksctl create cluster \
  --region=eu-central-1 \
  --version=1.23 \
  --nodes=2 \
  --fargate
Log output:
2022-11-05 12:37:51 [ℹ]  eksctl version 0.117.0
2022-11-05 12:37:51 [ℹ]  using region eu-central-1
2022-11-05 12:37:51 [ℹ]  setting availability zones to [eu-central-1a eu-central-1b eu-central-1c]
2022-11-05 12:37:51 [ℹ]  subnets for eu-central-1a - public:192.168.0.0/19 private:192.168.96.0/19
2022-11-05 12:37:51 [ℹ]  subnets for eu-central-1b - public:192.168.32.0/19 private:192.168.128.0/19
2022-11-05 12:37:51 [ℹ]  subnets for eu-central-1c - public:192.168.64.0/19 private:192.168.160.0/19
2022-11-05 12:37:51 [ℹ]  nodegroup "ng-83b22df4" will use "" [AmazonLinux2/1.23]
2022-11-05 12:37:51 [ℹ]  using Kubernetes version 1.23
2022-11-05 12:37:51 [ℹ]  creating EKS cluster "scrumptious-hideout-1667648262" in "eu-central-1" region with managed nodes
2022-11-05 12:37:51 [ℹ]  will create 2 separate CloudFormation stacks for cluster itself and the initial managed nodegroup
2022-11-05 12:37:51 [ℹ]  if you encounter any issues, check CloudFormation console or try 'eksctl utils describe-stacks --region=eu-central-1 --cluster=scrumptious-hideout-1667648262'
2022-11-05 12:37:51 [ℹ]  Kubernetes API endpoint access will use default of {publicAccess=true, privateAccess=false} for cluster "scrumptious-hideout-1667648262" in "eu-central-1"
2022-11-05 12:37:51 [ℹ]  CloudWatch logging will not be enabled for cluster "scrumptious-hideout-1667648262" in "eu-central-1"
2022-11-05 12:37:51 [ℹ]  you can enable it with 'eksctl utils update-cluster-logging --enable-types={SPECIFY-YOUR-LOG-TYPES-HERE (e.g. all)} --region=eu-central-1 --cluster=scrumptious-hideout-1667648262'
2022-11-05 12:37:51 [ℹ]
2 sequential tasks: { create cluster control plane "scrumptious-hideout-1667648262",
    2 sequential sub-tasks: {
        wait for control plane to become ready,
        create managed nodegroup "ng-83b22df4",
    }
}
2022-11-05 12:37:51 [ℹ]  building cluster stack "eksctl-scrumptious-hideout-1667648262-cluster"
2022-11-05 12:37:52 [ℹ]  deploying stack "eksctl-scrumptious-hideout-1667648262-cluster"
My first attempt was not successful. The eksctl command was stuck with the deploying stack message as shown above. So, I ran the command again, but gave a dedicated name to the cluster:
eksctl create cluster \
  --name=staging \
  --region=eu-central-1 \
  --version=1.23 \
  --nodes=2 \
  --fargate
This resulted in the same message. And running it again showed an error that the cluster is available, but I could not access it. What’s happing here? Logging into the AWS management console, I saw that several security groups, VPS, network interfaces and elastic IPs of the cluster name were created, but no instances. Hmm.
The deletion of all these resources was a cumbersome, manual process, which can only be achieved in this order: First, detach all network interfaces, then delete the elastic IPS, then delete the network interfaces, and finally delete the VPCs.
Second Try: Config File
The second try was to use a config file. You can either use a bare-bones configuration file, e.g. from the eksctl.io documentation, or create one with the command eksctl --dry-run. I used the latter and then customized the resulting file.
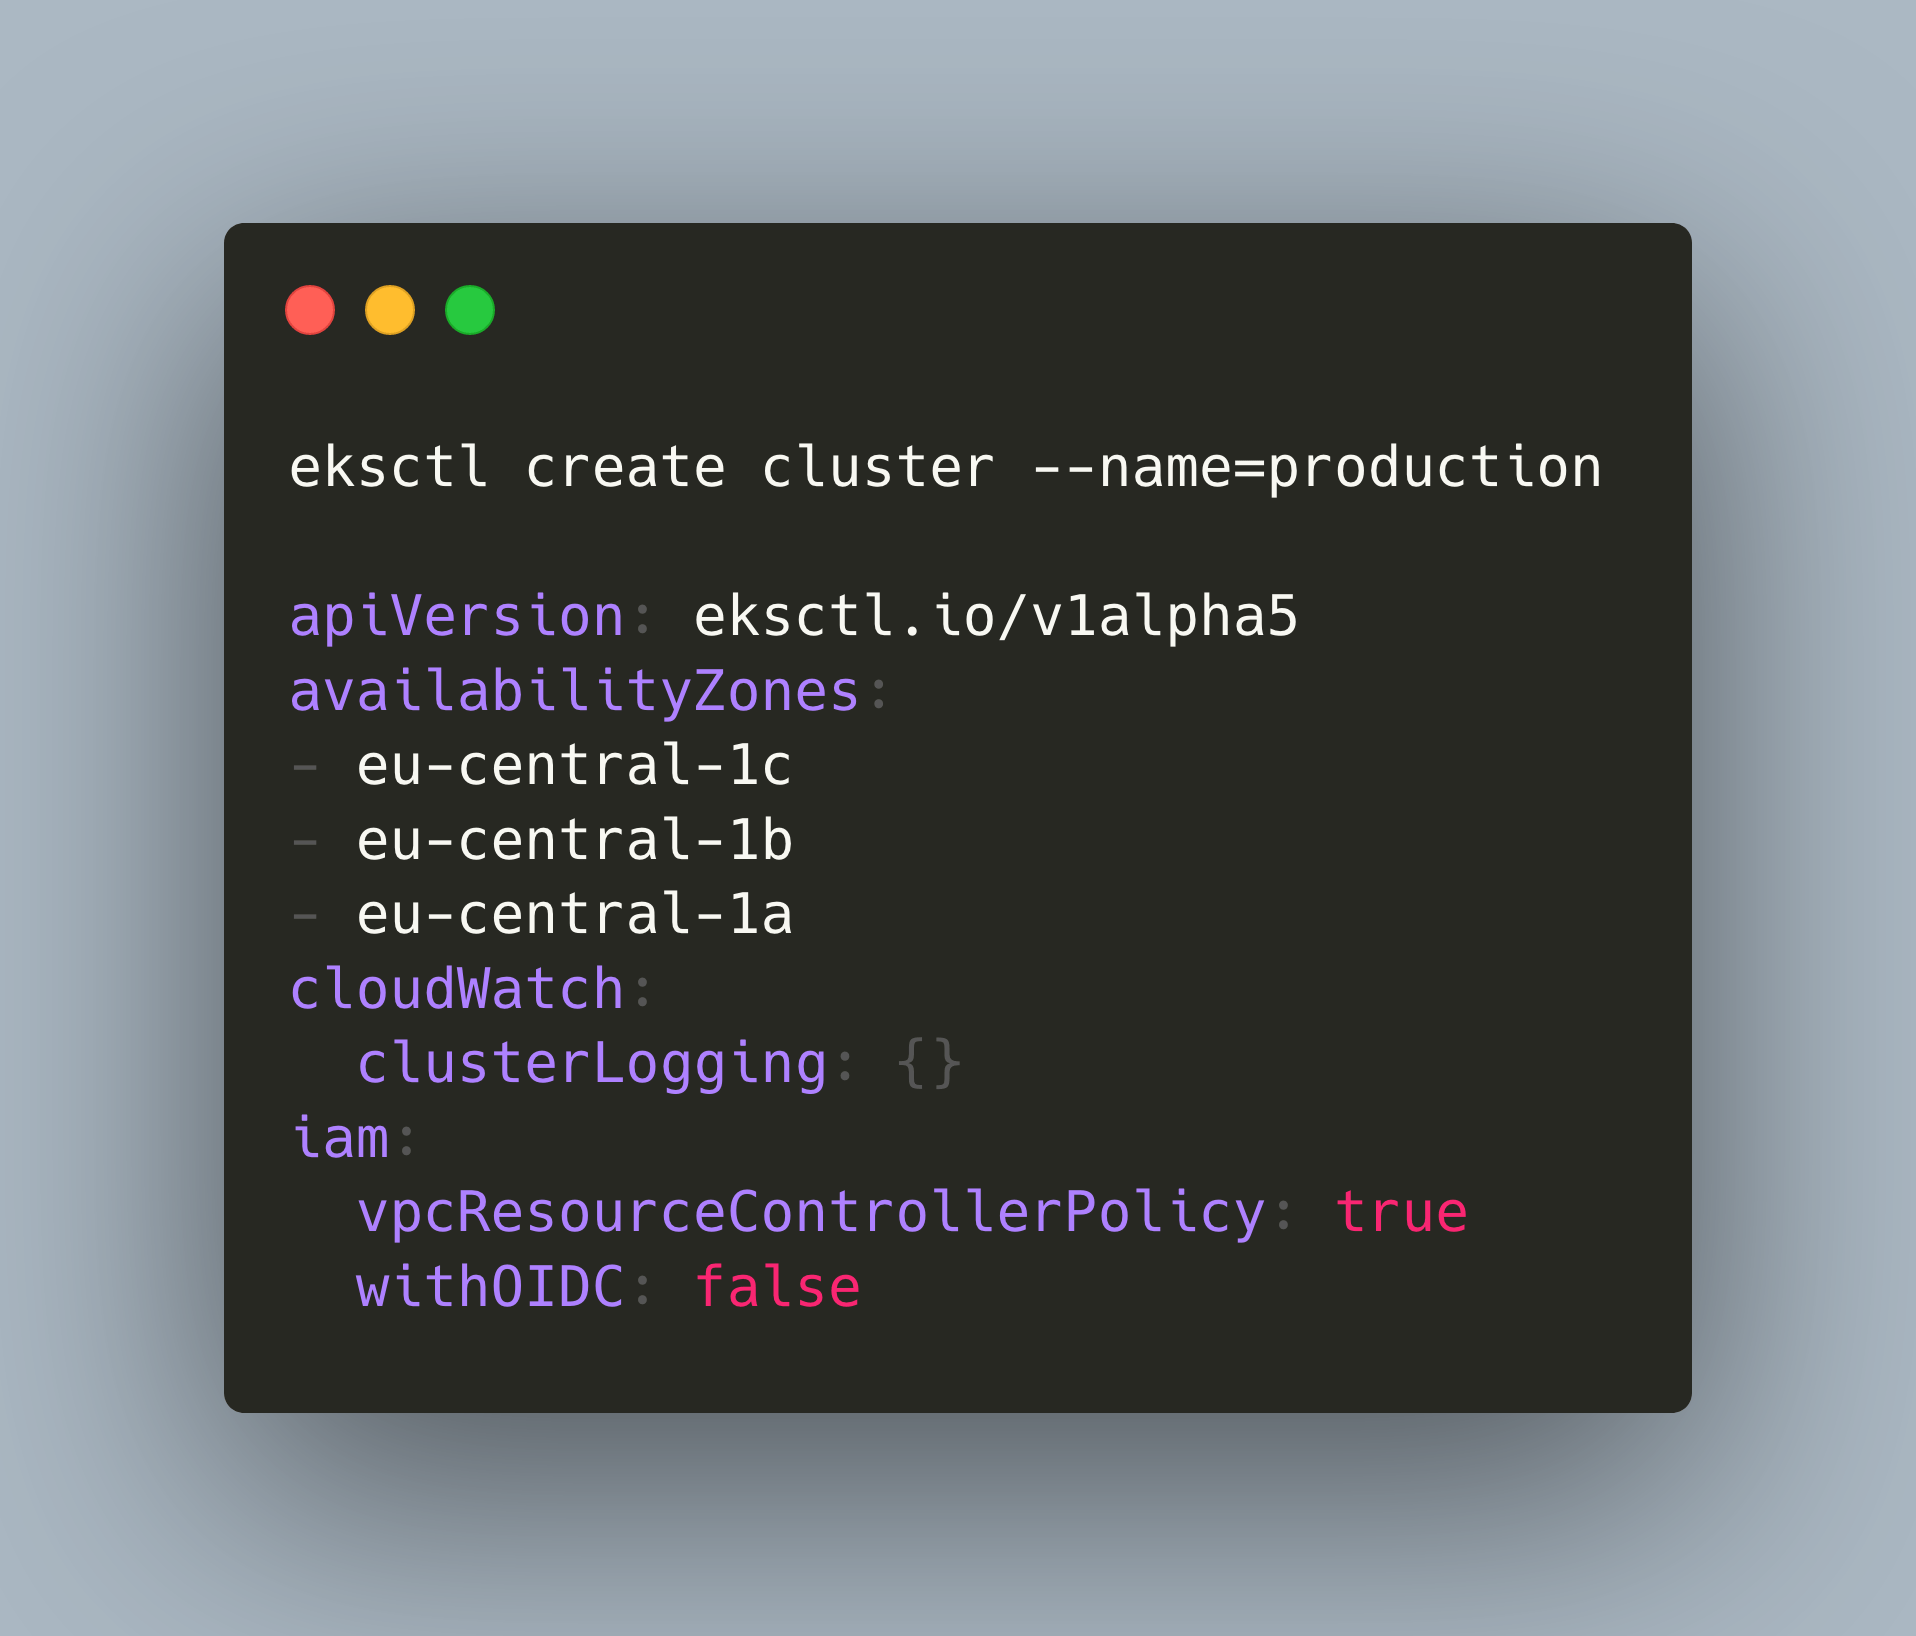
But take care! Running just eksctl create cluster --dry-run creates a very different file then a more customized eksctl create cluster --name=staging --region=eu-central-1 --dry-run. Use the first, bare command. For completions sake, here is the full config file with which the installation was successful.
# eksctl create cluster --name=staging --dry-run

apiVersion: eksctl.io/v1alpha5
availabilityZones:
- eu-central-1c
- eu-central-1b
- eu-central-1a
cloudWatch:
  clusterLogging: {}
iam:
  vpcResourceControllerPolicy: true
  withOIDC: false
kind: ClusterConfig
kubernetesNetworkConfig:
  ipFamily: IPv4
managedNodeGroups:
- amiFamily: AmazonLinux2
  desiredCapacity: 2
  disableIMDSv1: false
  disablePodIMDS: false
  iam:
    withAddonPolicies:
      albIngress: false
      appMesh: false
      appMeshPreview: false
      autoScaler: false
      awsLoadBalancerController: false
      certManager: false
      cloudWatch: false
      ebs: false
      efs: false
      externalDNS: false
      fsx: false
      imageBuilder: false
      xRay: false
  instanceSelector: {}
  labels:
    alpha.eksctl.io/cluster-name: staging
    alpha.eksctl.io/nodegroup-name: ng-c3cdc337
  maxSize: 2
  minSize: 2
  name: ng-c3cdc337
  privateNetworking: false
  releaseVersion: ""
  securityGroups:
    withLocal: null
    withShared: null
  ssh:
    allow: false
    publicKeyPath: ""
  tags:
    alpha.eksctl.io/nodegroup-name: ng-c3cdc337
    alpha.eksctl.io/nodegroup-type: managed
  volumeIOPS: 3000
  volumeSize: 80
  volumeThroughput: 125
  volumeType: gp3
metadata:
  name: staging
  region: eu-central-1
  version: "1.23"
privateCluster:
  enabled: false
  skipEndpointCreation: false
vpc:
  autoAllocateIPv6: false
  cidr: 192.168.0.0/16
  clusterEndpoints:
    privateAccess: false
    publicAccess: true
  manageSharedNodeSecurityGroupRules: true
  nat:
    gateway: Single
In this file, I merely changed the cluster name to eksctl-superb-hedgehog and modified managedNodeGroups.ssh to obtain SSH access to the nodes:
managedNodeGroups:
  - amiFamily: AmazonLinux2
    #...
    ssh:
      allow: true
      publicKeyPath: "~/.ssh/eksctl_rsa.key"
The cluster creation took a long time - searching the internet about eksctl installations hanging, I found this stackoverflow thread: cluster creation can take up to 20 minutes!
And indeed, it took about this time:
2022-11-07 20:08:36 [ℹ]  eksctl version 0.117.0
2022-11-07 20:08:36 [ℹ]  using region eu-central-1
2022-11-07 20:08:36 [ℹ]  subnets for eu-central-1b - public:192.168.0.0/19 private:192.168.96.0/19
2022-11-07 20:08:36 [ℹ]  subnets for eu-central-1a - public:192.168.32.0/19 private:192.168.128.0/19
2022-11-07 20:08:36 [ℹ]  subnets for eu-central-1c - public:192.168.64.0/19 private:192.168.160.0/19
2022-11-07 20:08:36 [ℹ]  nodegroup "ng-9bf41c12" will use "" [AmazonLinux2/1.23]
2022-11-07 20:08:36 [ℹ]  using Kubernetes version 1.23
2022-11-07 20:08:36 [ℹ]  creating EKS cluster "superb-hedgehog-staging" in "eu-central-1" region with managed nodes
2022-11-07 20:08:36 [ℹ]  1 nodegroup (ng-9bf41c12) was included (based on the include/exclude rules)
2022-11-07 20:08:36 [ℹ]  will create a CloudFormation stack for cluster itself and 0 nodegroup stack(s)
2022-11-07 20:08:36 [ℹ]  will create a CloudFormation stack for cluster itself and 1 managed nodegroup stack(s)
# ....
2022-11-07 20:08:37 [ℹ]  deploying stack "eksctl-superb-hedgehog-staging-cluster"
2022-11-07 20:09:07 [ℹ]  waiting for CloudFormation stack "eksctl-superb-hedgehog-staging-cluster"
# ...
2022-11-07 20:26:49 [ℹ]  waiting for CloudFormation stack "eksctl-superb-hedgehog-staging-nodegroup-ng-9bf41c12"
2022-11-07 20:26:49 [ℹ]  waiting for the control plane to become ready
2022-11-07 20:26:51 [✔]  saved kubeconfig as "~.kube/config"
# ...
2022-11-07 20:26:53 [✔]  EKS cluster "superb-hedgehog-staging" in "eu-central-1" region is ready
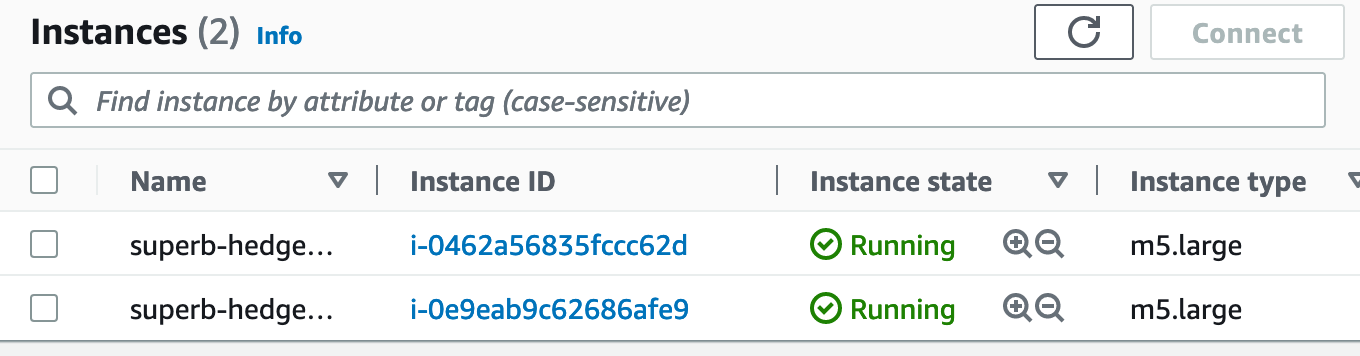
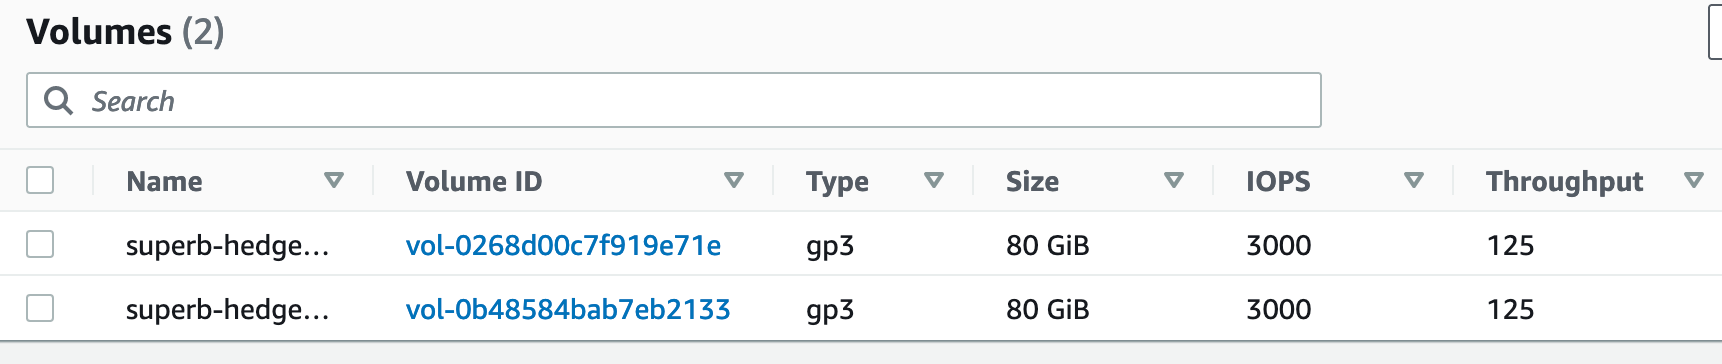
Looking into the AWS management console, I could see the created instances and volumes:
Part 5: Cluster Access and Maintenance
With the installation completed, a custom kubeconfig file is automatically placed at ~/.kube/config. Use it to gain cluster access:
export KUBECONFIG=~/.kube/config

kubectl  get nodes

NAME                                              STATUS   ROLES    AGE   VERSION
ip-192-168-34-211.eu-central-1.compute.internal   Ready    <none>   12m   v1.23.9-eks-ba74326
ip-192-168-73-218.eu-central-1.compute.internal   Ready    <none>   11m   v1.23.9-eks-ba7432
For the SSH access, you need to get the nodes’ public DNS name from the AWS management console, and then connect as the ec2-user.
ssh ec2-user@ec2-3-70-174-13.eu-central-1.compute.amazonaws.com
Last login: Sat Nov  5 02:57:35 2022 from 205.251.233.105

       __|  __|_  )
       _|  (     /   Amazon Linux 2 AMI
      ___|\___|___|

https://aws.amazon.com/amazon-linux-2/
12 package(s) needed for security, out of 18 available
Run "sudo yum update" to apply all updates.

[ec2-user@ip-192-168-69-138 ~]$ kubelet --version
Kubernetes v1.23.9-eks-ba74326
Part 6: Cluster Updates
For checking how cluster updates work, I completely reinstalled a new cluster and used Kubernetes version v1.22.
As before, the cluster creation took some time to complete.
2022-11-09 20:11:11 [ℹ]  eksctl version 0.117.0
2022-11-09 20:11:11 [ℹ]  using region eu-central-1
2022-11-09 20:11:11 [ℹ]  subnets for eu-central-1b - public:192.168.0.0/19 private:192.168.96.0/19
#...
22-11-09 20:28:59 [ℹ]  node "ip-192-168-69-138.eu-central-1.compute.internal" is ready
2022-11-09 20:29:01 [ℹ]  kubectl command should work with "/Users/guenthers/.kube/config", try 'kubectl get nodes'
2022-11-09 20:29:01 [✔]  EKS cluster "staging" in "eu-central-1" region is ready
The upgrade happens gradually. You need to choose the new Kubernetes version, and then pass it to upgrade commands. The upgrade commands targets are: control plane node, kube-proxy, aws-nodes, and finally coredns.
Here are the concrete update commands and their results:
eksctl upgrade cluster --name=staging --version=1.23
2022-11-09 20:47:44 [ℹ]  re-building cluster stack "eksctl-staging-cluster"
2022-11-09 20:47:44 [✔]  all resources in cluster stack "eksctl-staging-cluster" are up-to-date
2022-11-09 20:47:44 [ℹ]  checking security group configuration for all nodegroups
2022-11-09 20:47:44 [ℹ]  all nodegroups have up-to-date cloudformation templates

eksctl utils update-kube-proxy --cluster=staging --approve
2022-11-09 20:48:53 [ℹ]  "kube-proxy" is now up-to-date

eksctl utils update-aws-node --cluster=staging --approve
2022-11-09 20:49:21 [ℹ]  skipped existing "kube-system:ServiceAccount/aws-node"
2022-11-09 20:49:21 [ℹ]  replaced "CustomResourceDefinition.apiextensions.k8s.io/eniconfigs.crd.k8s.amazonaws.com"
2022-11-09 20:49:21 [ℹ]  replaced "ClusterRole.rbac.authorization.k8s.io/aws-node"
2022-11-09 20:49:22 [ℹ]  replaced "ClusterRoleBinding.rbac.authorization.k8s.io/aws-node"
2022-11-09 20:49:22 [ℹ]  replaced "kube-system:DaemonSet.apps/aws-node"
2022-11-09 20:49:22 [ℹ]  "aws-node" is now up-to-date

eksctl utils update-coredns --cluster=staging --approve
2022-11-09 20:49:47 [ℹ]  replaced "kube-system:Service/kube-dns"
2022-11-09 20:49:47 [ℹ]  replaced "kube-system:ServiceAccount/coredns"
2022-11-09 20:49:47 [ℹ]  replaced "kube-system:ConfigMap/coredns"
2022-11-09 20:49:47 [ℹ]  replaced "kube-system:Deployment.apps/coredns"
2022-11-09 20:49:48 [ℹ]  replaced "ClusterRole.rbac.authorization.k8s.io/system:coredns"
2022-11-09 20:49:48 [ℹ]  replaced "ClusterRoleBinding.rbac.authorization.k8s.io/system:coredns"
2022-11-09 20:49:48 [ℹ]  "coredns" is now up-to-date
I encountered no error, all deployments/daemonsets are running. To check the results, I connected via SSH to the nodes took the kubectl version. Also, you can see that image tags of certain deployments or daemonsets reflect the new Kubernetes version:
kubectl describe daemonset kube-proxy -n kube-system
Name:           kube-proxy
#...
  Containers:
   kube-proxy:
    Image:      602401143452.dkr.ecr.eu-central-1.amazonaws.com/eks/kube-proxy:v1.23.13-eksbuild.1
Part 7: EKS Cluster Internals
I was curious to find out which Kubernetes components the cluster uses. Running kubectl get all -A revealed these facts:
- Linux distribution: amazon-eks-ami
- Container runtime: containerd
- Network communication: coredns, kube-proxy, amazon-vpc-cni
- Ingress: aws-load-balancer-controller
Conclusion
Amazon EKS is a managed Kubernetes distribution. In this article, you learned all the essentials to get you started: a) Ensure to have a fully registered AWS account, b) install the required binaries eksctl and kubectl, c) create the cluster by issuing a dry-run installation, then customize the resulting configuration file. Cluster installation can take up to 20 minutes - don’t stop this in the middle, or you will need to manually cleanup several AWS resources. Once completed, you can connect via kubectl and SSH to the nodes. Finally, you also learned the required steps for upgrading the Kubernetes version of the cluster, and saw some cluster internals.