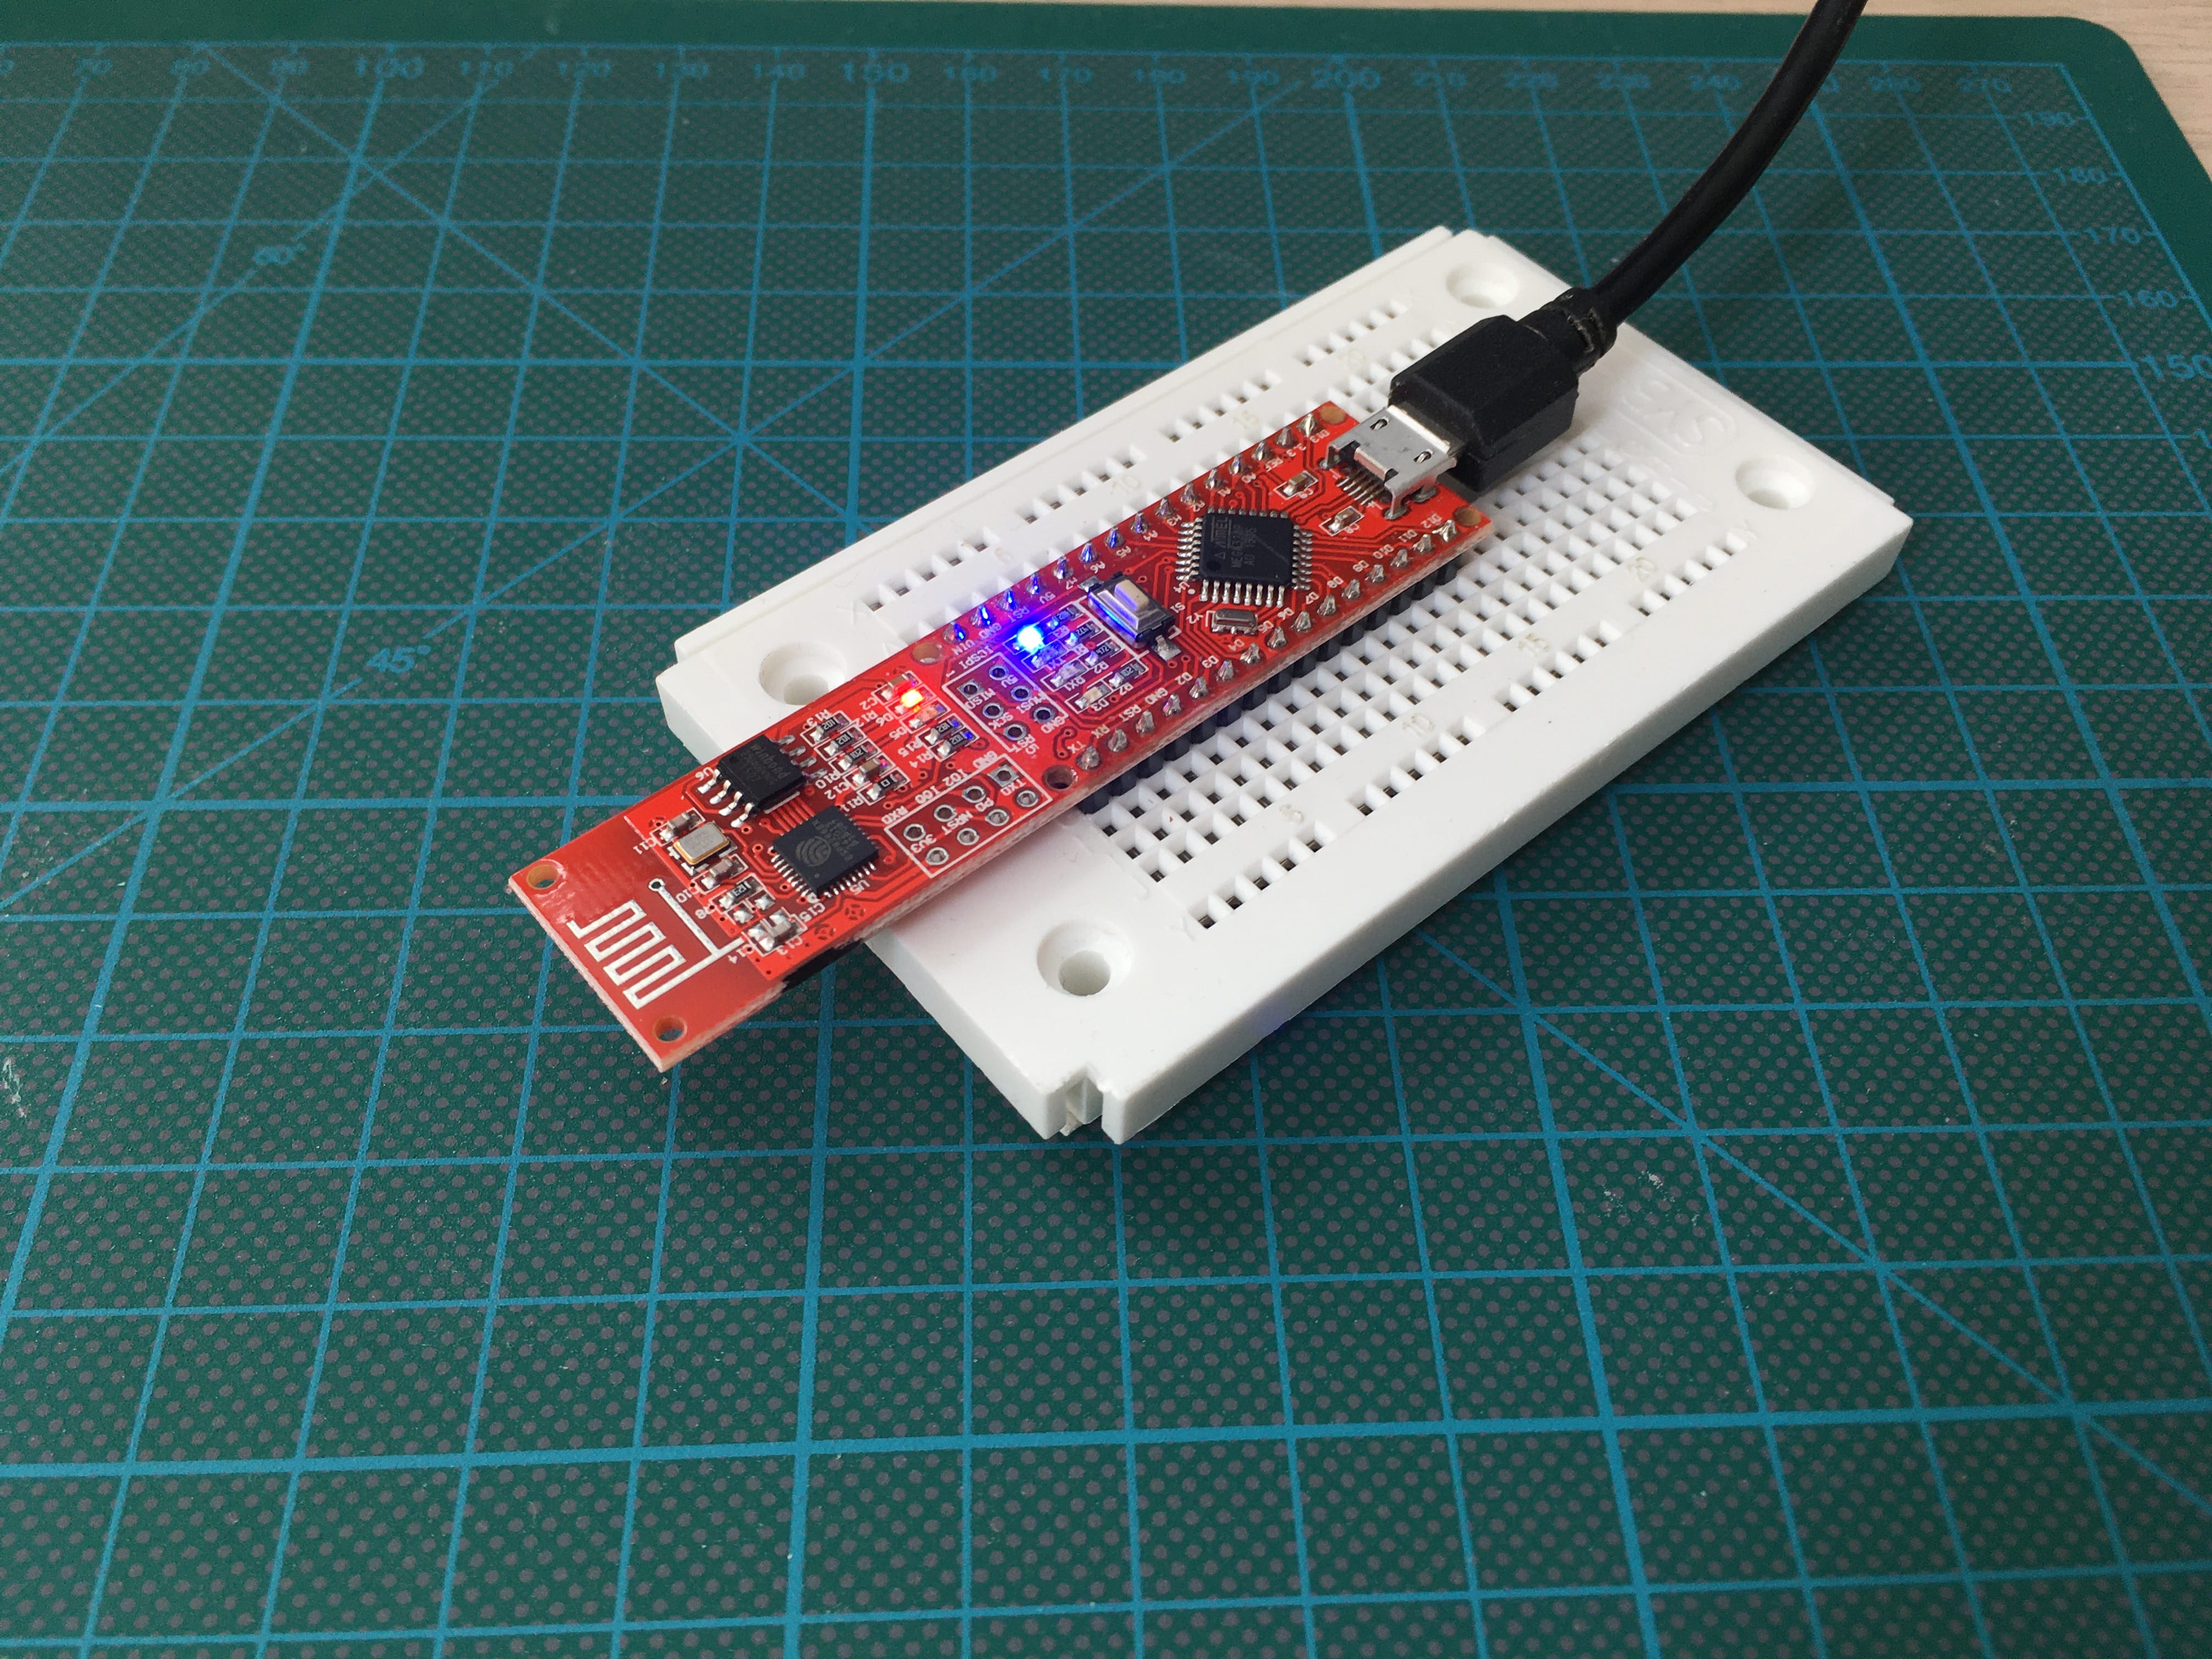
Nano ESP Sensor
███╗   ██╗ █████╗ ███╗   ██╗ ██████╗ ███████╗███████╗██████╗
████╗  ██║██╔══██╗████╗  ██║██╔═══██╗██╔════╝██╔════╝██╔══██╗
██╔██╗ ██║███████║██╔██╗ ██║██║   ██║█████╗  ███████╗██████╔╝
██║╚██╗██║██╔══██║██║╚██╗██║██║   ██║██╔══╝  ╚════██║██╔═══╝
██║ ╚████║██║  ██║██║ ╚████║╚██████╔╝███████╗███████║██║
╚═╝  ╚═══╝╚═╝  ╚═╝╚═╝  ╚═══╝ ╚═════╝ ╚══════╝╚══════╝╚═╝
You have heard about Arduino, right? Small hardware boards on which you upload programs for a wide variety of functions. A friend gave me the NanoESP toolkit: An Arduino board with integrated Wi-Fi, checker board, LEDs, buttons and sensor.
This article is about introduction and setup of the NanoESP board. I will show how to install the Arduino Studio software with which C++ program can be compiled and written to the board. And I will show basic programs including how to start a web server.
First Steps
It took me about 3 hours to get the NanoESP board connected to my Mac, recognized by the Arduino studio, and being able to copy programs to it. The documentation is sparse and scattered. Here are all the necessary steps and links.
- Install Serial-USB Drivers for your platform / Mac OsX Catalina: CH340G v1.5 drivers from Github
- Download and install Arduino Studio IDE
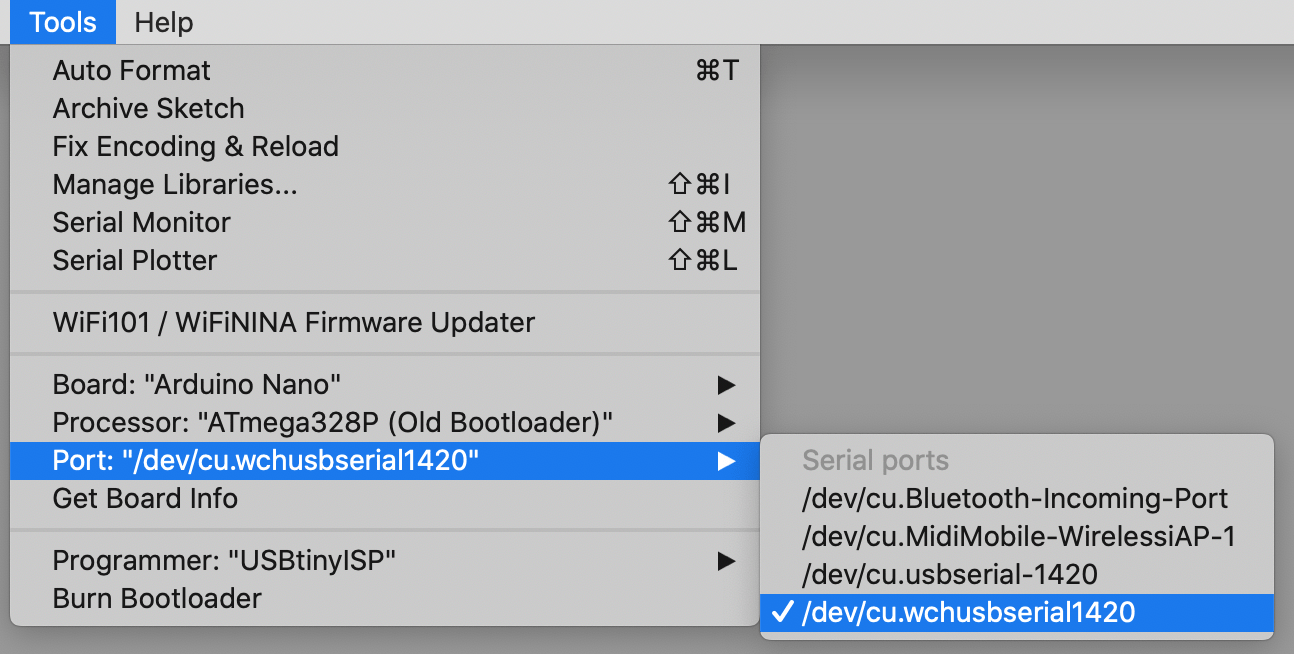
- Connect board, then open Arduino Studio and configure the connection
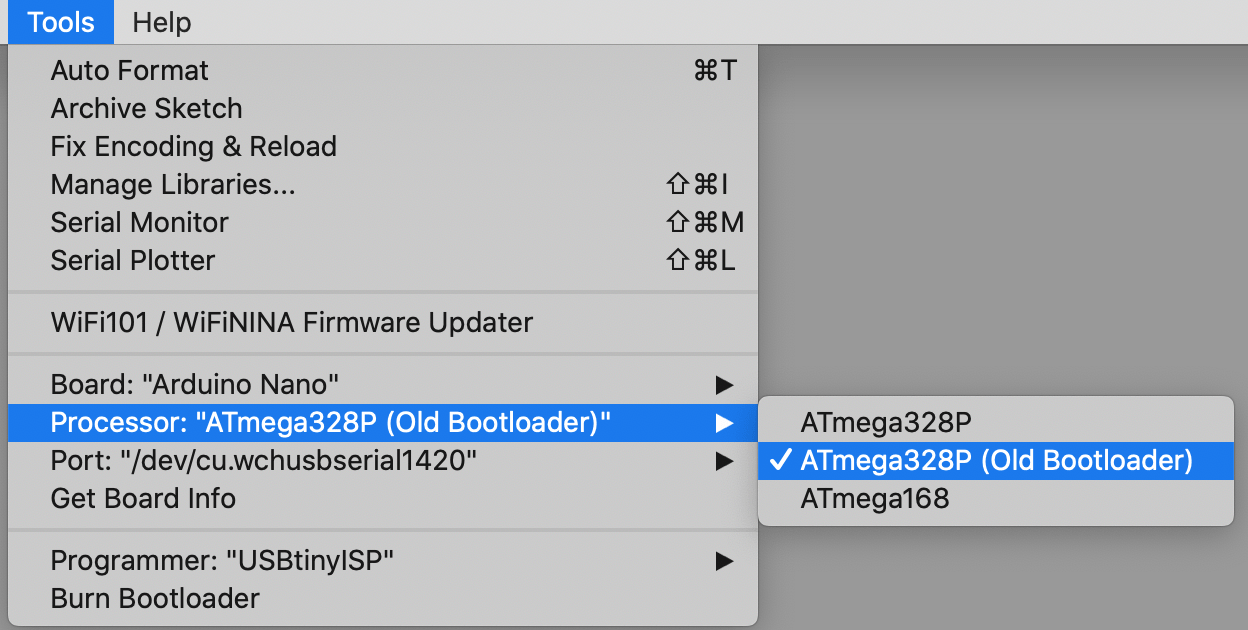
- Set the board type to “Arduino Nano”
- Set the correct port
- Set the correct board
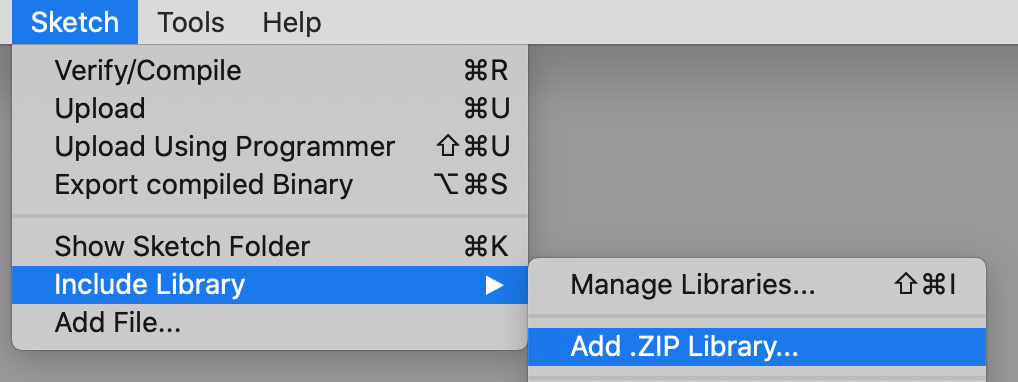
- Optional: Install additional libraries with library manager
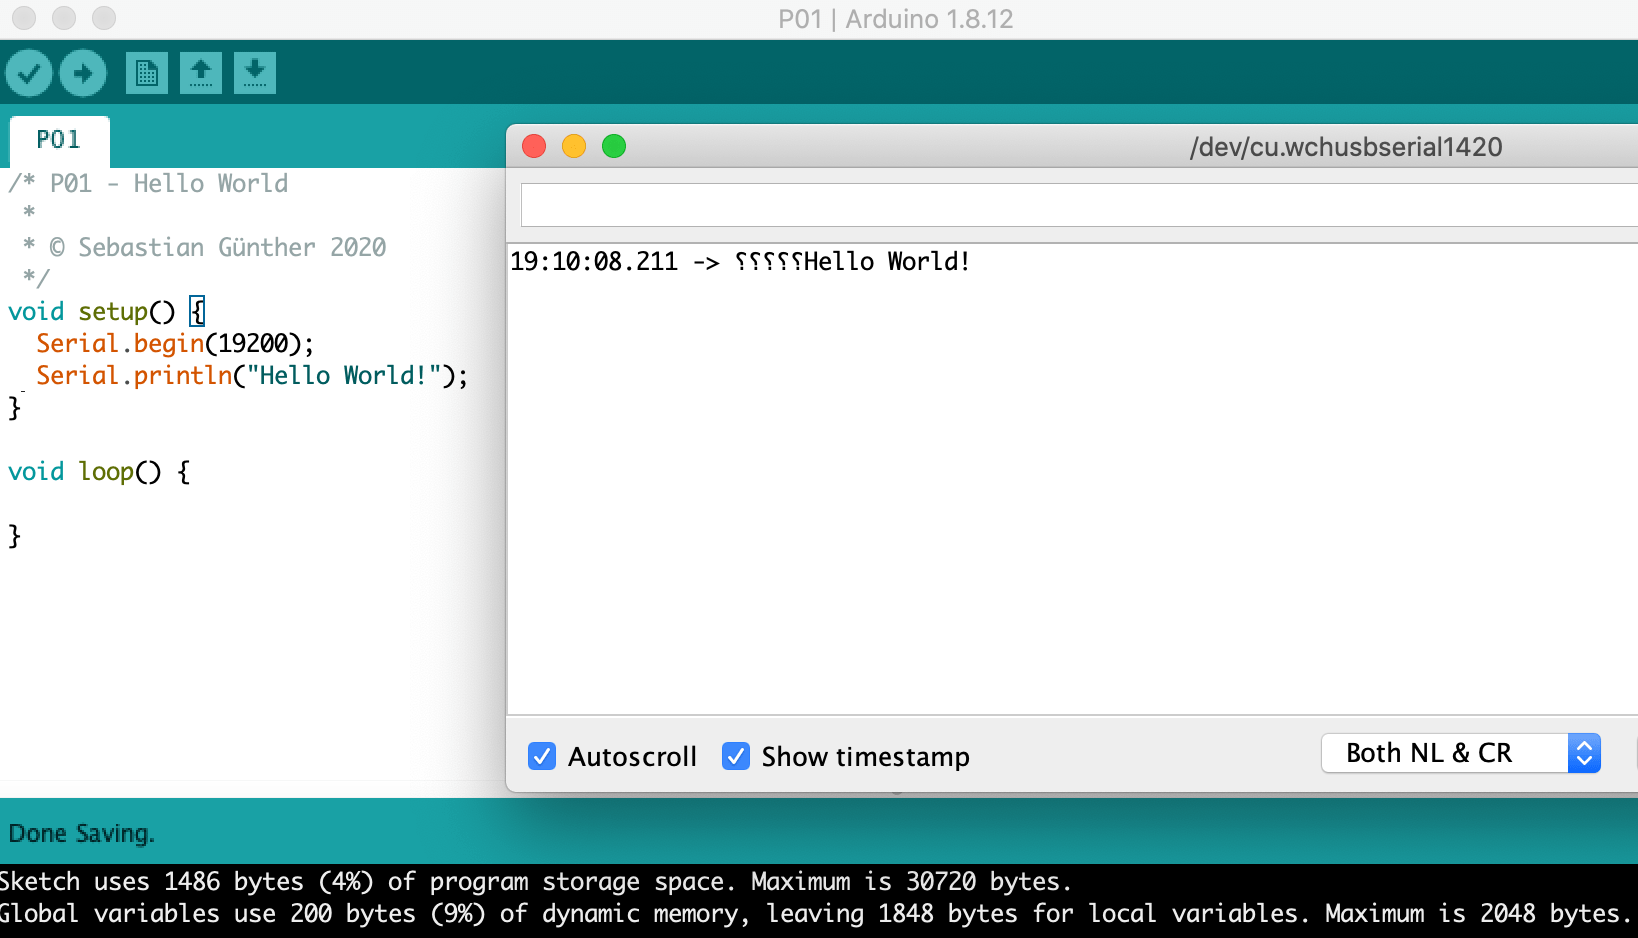
Hello World
Arduino Studio allows you to write small C++ programs and transfer them to the board. We will start with the most basic one of them all - Hello World!
void setup() {
  Serial.begin(19200);
  Serial.println("Hello World!");
}

void loop() {

}
Arduino programs consist of two main functions. In setup(), you define configuration parameter that are required for interacting with the board. Here, I set the baud rate, the number of symbols that will be send to the device. And I also print the Hello World. The second function, loop(), remains empty here. In other programs you would define event listeners here, for example to measure sensor data.
When uploaded and executed, we can see the printed message.
Exploring AT Commands
The NanoESP board has an embedded Eesp266 WLAN module. On this module, you can execute AT commands. First, let upload a program that open a two-way serial connection to the board, allowing us to execute commands.
From a Github tutorial I’m using this code:
#include <NanoESP.h>
#include <SoftwareSerial.h>

NanoESP nanoesp = NanoESP();

void setup() {
  Serial.begin(19200);
  nanoesp.init();

  nanoesp.serialDebug();
}

void loop() {

}
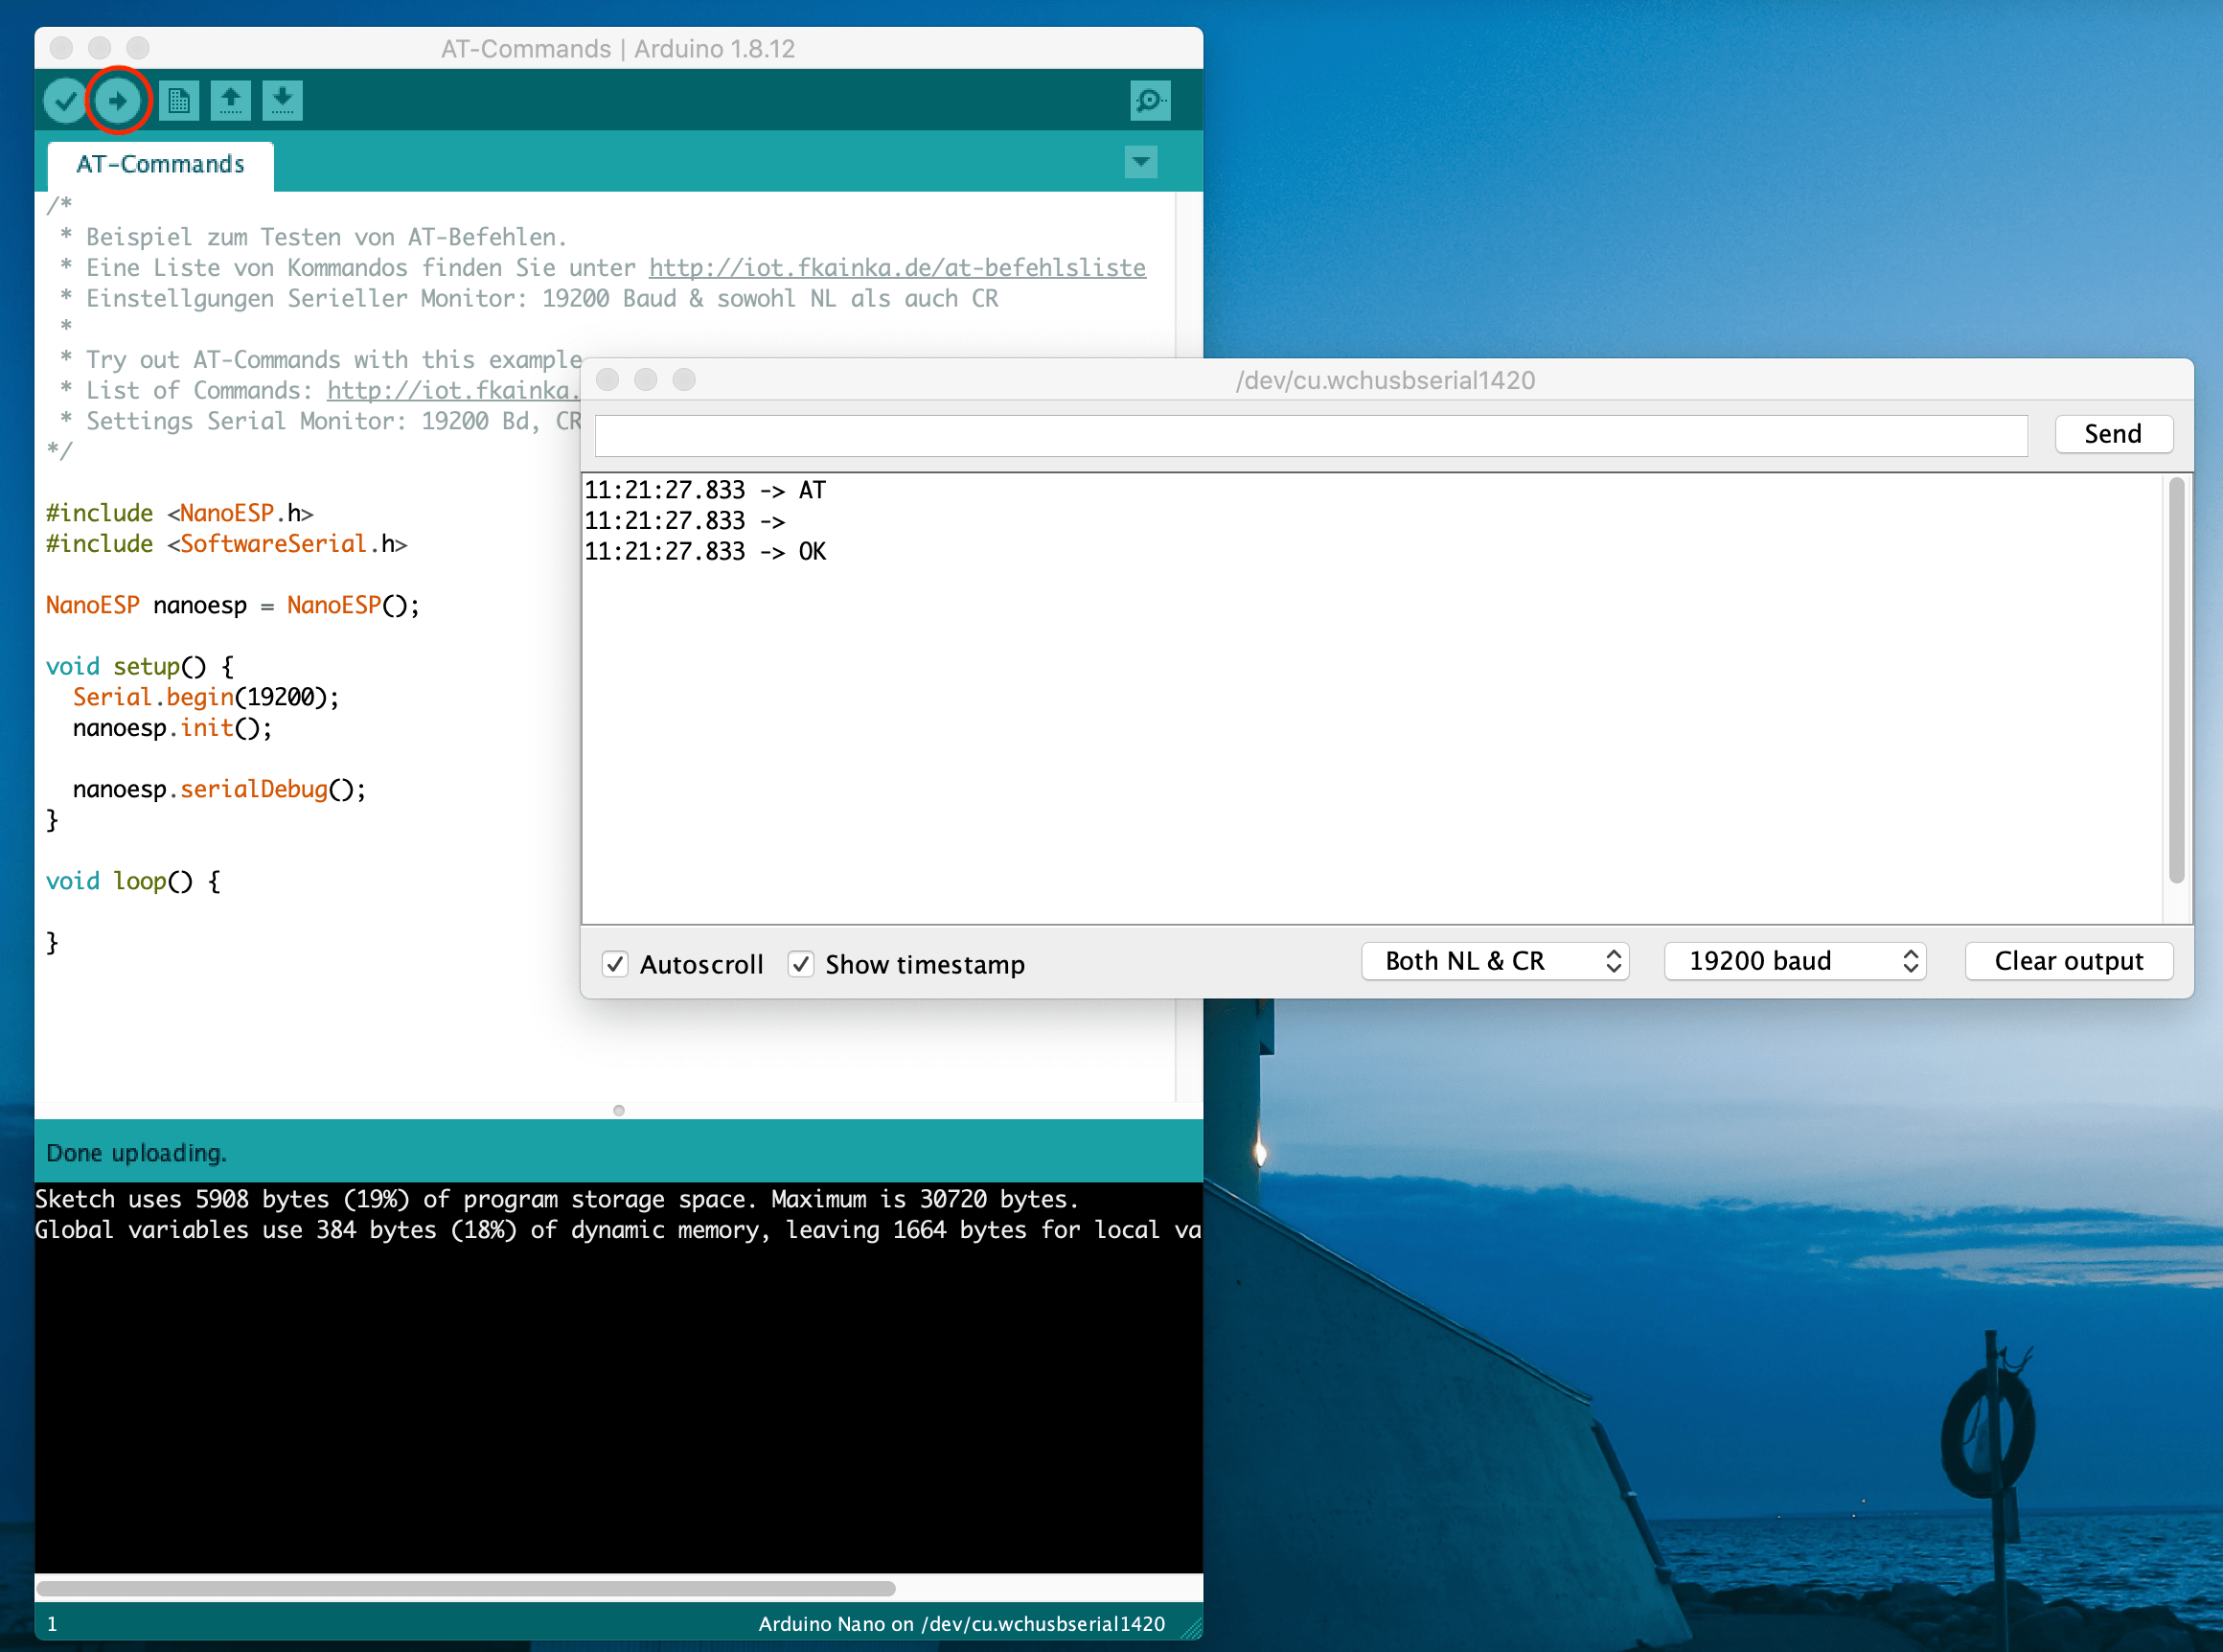
Once uploaded, we can use the serial window to execute AT commands. AT, which stands for ‘attention’, is a programming language from 1980 to operate modems. The language is based on commands and combinations/concatenations. It has the following syntax.
AT- starts a commandAT+COMMAND=?- Test, see the list of command optionsAT+COMMAND?- Query, see the current configurationAT+COMMAND=- Set, define parametersAT+COMMAND- Execute
All known commands for the esp8266 are documented here.
Lets take a look at some. With AT+GMR, we can print kernel information.
11:40:24.985 -> AT+GMR

11:40:24.985 -> AT version:0.22.0.0(Mar 20 2015 10:04:26)
11:40:24.985 -> SDK version:1.0.0
11:40:25.022 -> compile time:Mar 20 2015 11:00:32
11:40:25.022 ->
11:40:25.022 -> OK
With AT+CWLAP we can see the list of WLANs.
11:43:13.284 -> AT+CWLAP

12:43:15.393 -> +CWLAP:(3,"SSID1",-62,"e0:28:6d:7c:95:58",1)
12:43:15.393 -> +CWLAP:(3,"SSID2",-54,"b0:4e:26:66:31:d4",1)
12:43:15.430 -> +CWLAP:(4,"SSID3",-90,"dc:53:7c:4f:3d:ef",1)
12:43:15.467 -> +CWLAP:(3,"SSID4",-89,"a8:d3:f7:da:67:5b",5)
Configure WLAN Access
Let’s connect the NanoESP to the internet. The command we need is CWMODE.
11:50:24.244 -> AT+CWMODE?

11:50:24.244 -> +CWMODE:1
11:50:24.244 ->
11:50:24.244 -> OK
11:50:41.438 -> AT+CWMODE=?

11:50:41.438 -> +CWMODE:(1-3)
11:50:41.438 ->
11:50:41.438 -> OK
As you can see, the NanoESP board operates in mode (1), which means station mode where it connects to a WLAN router. The option 2 is access point, the option 3 is dual mode. With CWJAP we can provide the SSID and password for connection. With CIFSR we see the current configuration.
12:13:01.595 -> AT+CWJAP="SSID","PASSWORD"
12:13:04.654 ->
12:13:04.654 -> OK
12:14:55.202 -> AT+CIFSR
12:14:55.202 -> +CIFSR:STAIP,"192.168.2.108"
12:14:55.237 -> +CIFSR:STAMAC,"18:fe:34:cf:9a:b5"
12:14:55.274 ->
12:14:55.274 -> OK
Cool! The board is connected to the internet. Now we need to put some useful software on it.
Simple TCP Server
The following program creates a simple TCP server that accepts and prints the connection details.
/* P03 - TCP Server
 *
 * See https://github.com/FKainka/NanoESP/blob/master/examples/BASICS/TCP-Server/TCP-Server.ino
*/

#include <NanoESP.h>
#include <SoftwareSerial.h>

#define SSID ""
#define PASSWORD ""

NanoESP nanoesp = NanoESP();

void setup() {
  Serial.begin(19200);
  nanoesp.init();

  //Connects with your WiFi
  if (nanoesp.configWifi(STATION, SSID, PASSWORD)) {  //AP Mode: Module creates WiFi
    Serial.println("Wifi ready");
  }
  else {
    Serial.println("Wifi not ready");
  }

  //Print IP in Terminal
  Serial.println(nanoesp.getIp());

  //Starts TCP-Server on Port 80
  if (nanoesp.startTcpServer(80)) {
    Serial.println("TCP Server ready");
  }
  else {
    Serial.println("TCP Server not ready");
  }
}

void loop() {
  nanoesp.serialDebug();
}
Now we can connect to the board, and see some data about the connected webserver that is printed out.
13:47:20.167 -> 0,CONNECT
13:47:20.167 ->
13:47:20.167 -> +IPD,0,346:GET / HTTP/1.1
13:47:20.205 -> Host: 192.168.2.108
13:47:20.205 -> User-Agent: Mozilla/5.0 (Macintosh; Intel Mac OS X 10.15; rv:74.0) Gecko/20100101 Firefox/74.0
13:47:20.276 -> Accept: text/html,application/xhtml+xml,application/xml;q=0.9,image/webp,*/*;q=0.8
13:47:20.311 -> Accept-Language: en-US,en;q=0.5
13:47:20.311 -> Accept-Encoding: gzip, deflate
13:47:20.348 -> DNT: 1
13:47:20.348 -> Connection: keep-alive
13:47:20.348 -> Upgrade-Insecure-Requests: 1
Conclusion
This article showed how to get the Arduino NanoESP board running. First, you download and install necessary drivers and the Arduino Studio IDE. Second, you connect the board to the computer and configure Arduino Studio to have working interface. Third, you write programs, upload and execute them on the board.