Turning the Raspberry Pi Zero into a Hacking Gadget
—

Single Board Computers with the ability to run a full-fledged Linux distribution can be used as portable devices for a wide variety of use cases. To my surprise, one of them is computer hacking. I was astonished about the creativity and ease-of-use how a Raspberry Pi, Raspberry Pi Zero or Pico can be used for potentially nefarious activities. And after a long deliberation, I decided to start writing blog posts about this subject.
The article completely covers the installation, setup, and configuration to convert a Raspberry Pi Zero into a portable hacking device. Once powered, the device will start a custom WiFi endpoint and can be connected to via SSH or HTTP. It offers a CLI and a full-fledged GUI to configure the device behavior when connected to USB. And it can run shell or a custom JavaScript compatible language to initiate keyboard stokes, move the mouse, and access files of the device it is connected too. You will also learn how to combine triggers, startup templates, and HID script for an entry level exploit: When connected via USB to a host system, a text editor will be opened and a message written into it.
This article is for educational purposes only. Only use computers and devices that you own, and be mindful that they can be damaged.
The initial idea for this topic was sparked by an excellent article in the German computer magazine CT 2023/27 titled "Bad USB: Raspi Zero". The articles itself cannot be accessed, but only its link collection is available on the public internet.
Writing about Hacking?
For a long time, I have been thinking about the aspect of writing about hacking. My specific concern is about how knowledge in this area, the concrete concepts and processes, can be used for nefarious activities. On the other hand, knowledge gathered by first-hand experience, and transparent communication about it, can raise the awareness about essential dangers. Ultimately, this is tied to the question of knowledge itself: For which purpose do you use it?
Physical hacking is the process of connecting an external device to a target computer and starting an exploit. The goals of hacking are manifold, starting from recording interactions that happen at the computer, reading and copying computer files or the computer memory, running user interactions like keystrokes or mouse movements, executing scripts to modify the system or install new applications. An exploit is the concrete process to achieve a goal, and it can be a combination of intended computer behavior (e.g. registering a USB device) with known or new vulnerabilities in a computer system.
I'm no security consultant, but working in IT, I'm exposed to security topics on a daily basis. Bridging the gap from theoretical knowledge to hands-on experiences while further exploring the amazing Raspberry Pi use cases provided the final nudge to start this blog series. And with this realization, I also feel the need to formulate a disclaimer: This blog content is presented as-is for educational purposes. Only use them on computer systems that you own, and be aware that you can damage the systems.
Finally, bear in mind that explored concepts in this article are written from a beginner’s mind.
Hardware Requirements and Assembly
The required hardware for this article is as follows:
- Raspberry Pi Zero W (specifically not a Pi Zero W)
- USB Dongle (for example the EP-0097)
The USB dongle needs to be assembled to turn the Zero into a USB hacking device. The particular dongle that I acquired did not include a construction manual, but its components seemed manageable.
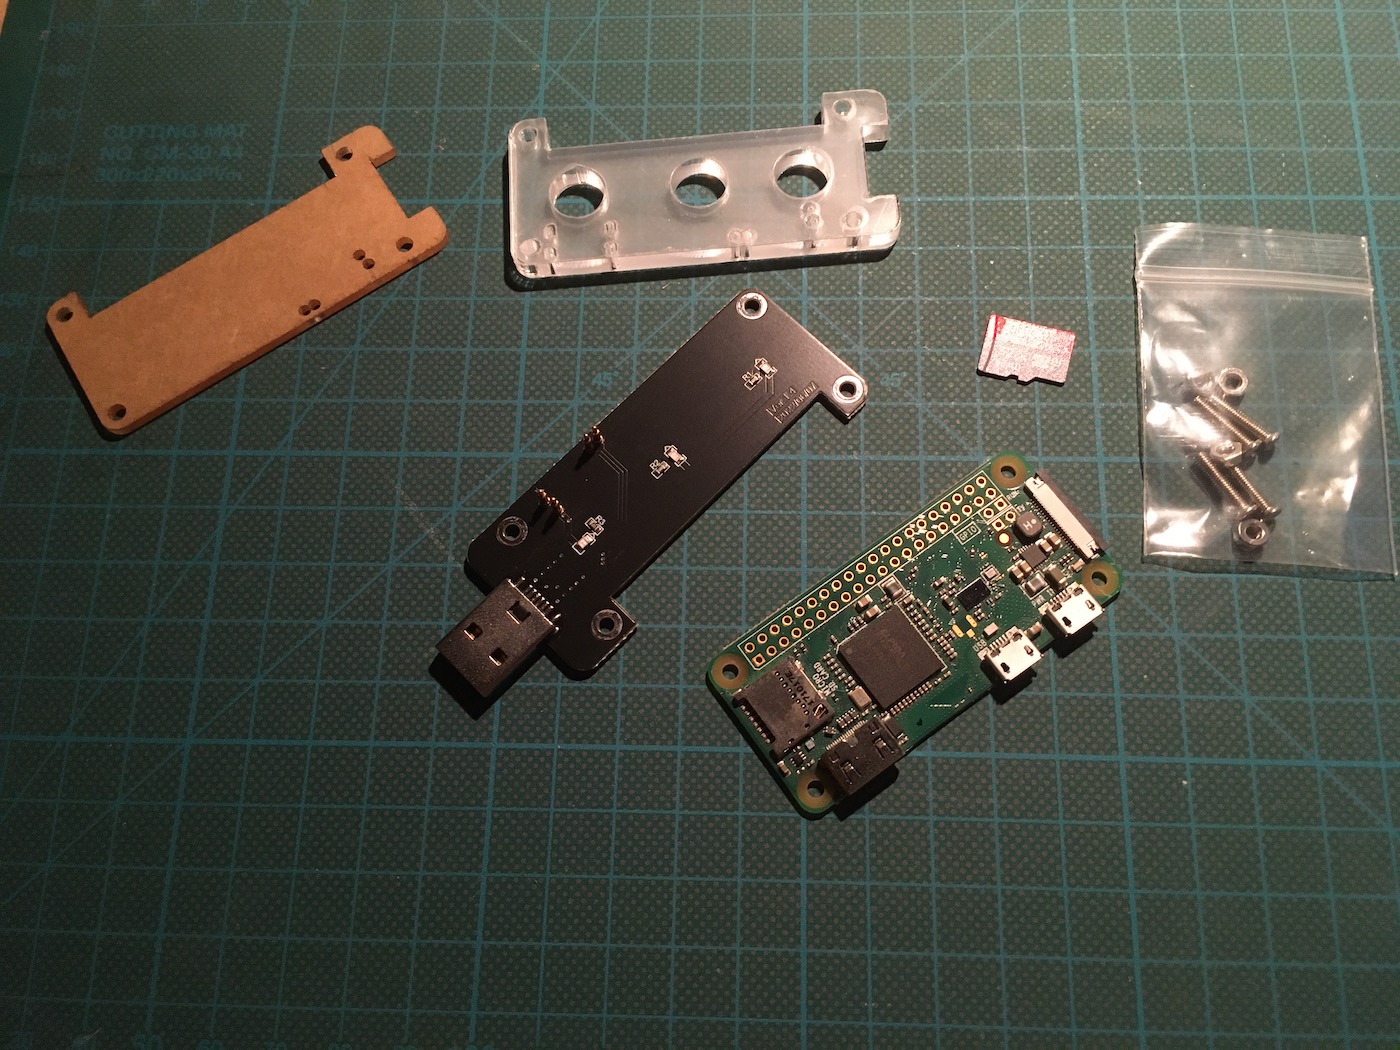
However, trying to assemble it manually surfaced an embarrassing knowledge gap. Specifically, I thought that the connection pins of the USB dongle need to be connected to the Zeros GPI pins. But no, right next to the Zeros USB ports, external circuit "touchpoints" are exposed - the dongle pins merely need to touch them too.
To assemble the USB dongle correctly, follow these steps:
- Remove the protection layer from the acryl board
- Put the thinner acryl board to the bottom
- Put the dongle board on top so that the backside of the extruding pins aligns
- Put the thicker acryl board on top, aligning with the pins outward facing direction
- Put the RPI Zero with the bottom side down and align the connector pins with the touchpoints
- Carefully tighten the screws
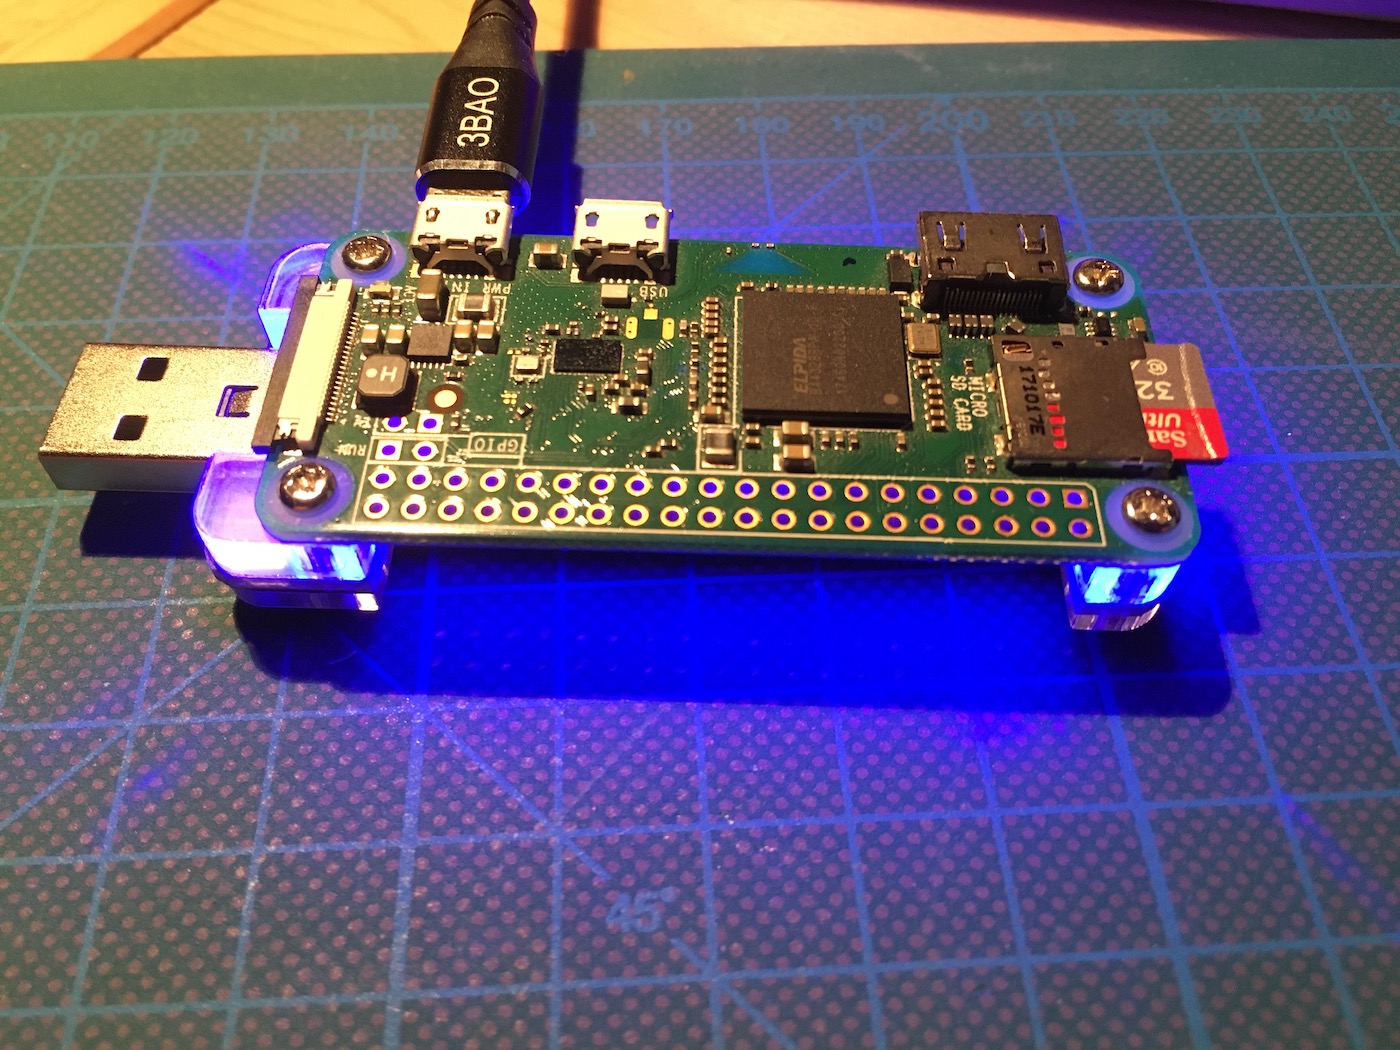
The resulting device should look like this:
Software Installation & First Boot
To turn the RPI Zero into a hacking device, the Linux Distribution P4wnP1 ALOA - called PPA from here - will be used. This is a custom Linux distribution, build on top of Kali Linux and specifically modified to run on the RPI Zero. As any other OS, the installation encompasses downloading the image, flashing it onto a SD Card, and booting the device.
The specific steps in detail:
- Go to the P4wnP1 ALOA release page and download the latest version (Note: Don't be discouraged by the release date of February 2020 - the project works very well!)
- Open an image software of your choice, then flash the image (my recommendation is Balena Etcher)
After this, put the SD Card into the device, and power it via the USB mini port.
Shortly after booting, PPA creates a custom WiFi with an awkward, UTF8 icon encoded named: "💥 🖥️ 💥". Connect to it with the password MaMe82-P4wnP1, and once the connection is established, you start exploring the many configuration options.
Tool Overview
PPA is a special Linux distribution with flexible and run-time configurable hardware features of the Raspberry Pi Zero. It provides access to this configuration both via the Web GUI and a CLI. After reading the projects extensive documentation and using the tool for some time, the Web GUI provides more features and will be used exclusively in the remainder of this article.
With an active connection to the hotspot, open http://172.24.0.1:8000 in a browser to access the configuration screen:
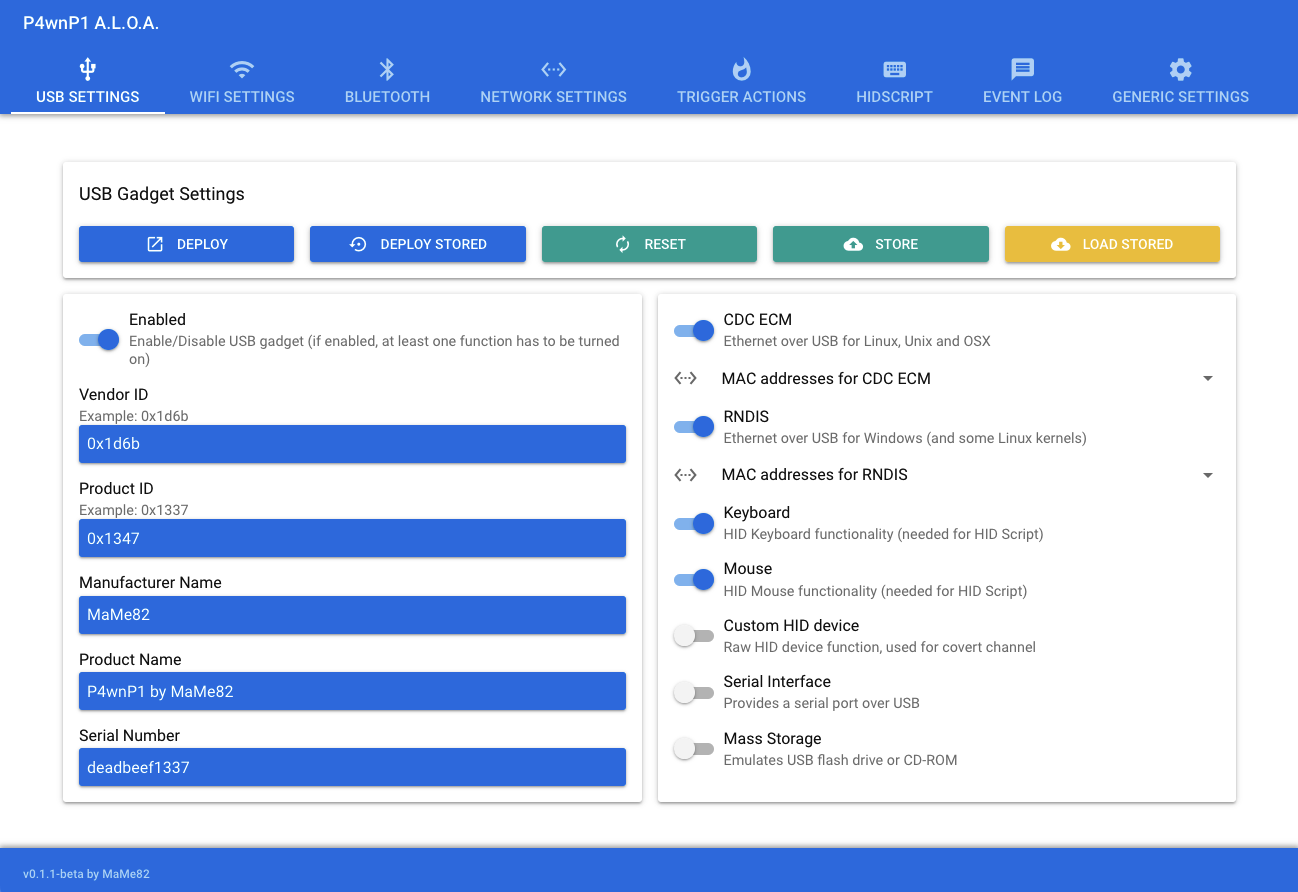
Each section in this GUI is a configurable building block of the complete functionality. By learning one section at a time, the overall number of available features becomes clearer.
Hardware Settings
Most sections in the tool menu directly modify the hardware features.
- USB: In this section, you define the USB properties when the Zero is connected to the targets. Available options start with the ID, serial number and vendor name, and continue with which USB functions the device offers. It can serve as an ethernet adapter, an HID device (keyboard, mouse, custom HID like pointer), as a serial interface, and as USB storage.
- WiFi: You can enable or disable the WiFi, change its SSID and PSK, and define its channel and visibility.
- Bluetooth: The Bluetooth stack provides several configuration options. The basic ones: availability, discoverability, and connectivity. Furthermore, you can configure if other devices are pairable with/without a key. BLE and Blue Toot High Speed are also supported. Lastly, different Bluetooth network encapsulation protocol services are provided: Network Access Point, Portable Area Network, and Group Ad-hoc network.
- Network: In this category, you can configure the concrete network interface settings for the
bteth,usbethandwlan0. For an DHCP server, the IPv4 gateway address, client addresses and netmask, and static hosts. Alternatively, you can also configure interfaces with just static addresses or as clients.
Behavior Programming
To create and manage scripts that are executed when the USB stick is connected to a host, you can use the following:
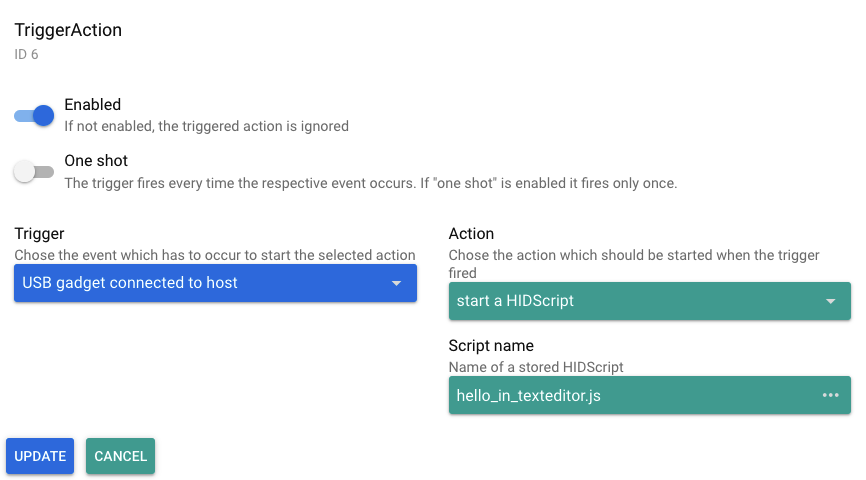
- Trigger Actions: A combination of an event and a concrete action. For an event, several options exist: system checkpoints during startup (Wifi AP, core services), when an USB gadget connects or disconnects, when an external WiFi AP is joined, values on group channel, and even when a GPIO input is detection. The actions can be to write a log entry, send a value to a group channel, set an output to a GPIO, as well as starting a HID script or bash script. Each trigger action can be set to run only and exactly once, or continuously every time it occurs.
- HID Script: The heart of exploitation scripting. PPA provides a JavaScript compatible language to program complex behavior that runs on the target machines. As provided in the documentation, special attention was given to robust and OS-agnostic keyboard interactions, including keyboard layout, timing of keystrokes, and waiting for keyboard input. Also, the mouse cursor can be controlled, and combining it with the concrete physical dimensions of the target screen, pixel perfect controls can be achieved. Finally, all JavaScript concepts can be used, giving access to functions, loops, complex conditions and much more.
Log and Settings
Two more sections complete the configurability of the PPA device.
- Event Log: Shows all on-device stored log messages that PPA created during its usage. Messages are retained and persisted between boots, giving a complete picture how and when it was used.
- Generic Settings: The very last menu item appears a bit misleadingly named - it does not control the overall GUI, but the concrete run- and boot time behavior of PPA. Essentially, the Master Template Editor allows you to select and combine any defined USB, WiFi, Bluetooth, and Network setting, as well as the Trigger actions. With this, you specify the concrete behavior of the PPA, essentially arming the device for its intend purpose. The other options are to restart or shutdown the system, and to create or restore a backup of all user-define settings and modifications.
Writing and activating an HID Exploit
The feature of PPA is extensive, and for a beginner exploring the device features, it might seem daunting to find a good start point. Following the project documentation closely, let’s start with a script that opens a text editor on the host and writes a message. The target OS is Linux Ubuntu.
In the GUI, open the HID Script tab. The editor features syntax highlighting and remote execution for testing purposes. Paste the following code into the editor:
layout('de');   // US keyboard layout
typingSpeed(100,150) // Wait 100ms between key strokes + an additional random value between 0ms and 150ms (natural)

//waitLED(ANY_OR_NONE);  // Wait till NUM LED of target changes frequently multiple times (doesn't work on OSX)

delay(5000);
press("CTRL ALT t");
delay(1000);
type("gedit\n")
delay(1000);
type("Hello from Raspberry Pi Zero");
As you see, the commands relate directly to executing keystrokes on the target machines, enriched by meta-arguments to influence the typing process. The function layout sets the target keyboard, and the delay function defines a random time range for each keystroke, making interactions more natural. With waitForLed, a specific trigger can be added, deferring the script execution until keyboard interaction is detected. This prevents executing the script when e.g. the screen is still locked by the user.
Now, to run this script, two options exist. If you connected the Raspberry Zero directly to a host system, you could click on "Run". The other option is to actually program this script to be executed when the Raspberry Zero is connected to a computer. For this:
- Click on "Store" and define a suitable name for the script.
- Select the tab "Trigger Action" and click on "Add one"
- In the dialog, activate the "Enabled" slider, then fill out the trigger "USB gadget connected to host", and in the action field the option "start a HID script" as well as the given script name file (also see the next picture)
The final step is to store and activate this trigger definition:
- Still on the "Trigger Action" tab, click on "Store" to save all active triggers as a configuration
- Go to on "Generic Settings", and in the "Master Template Editor", select the Trigger Action template that you just stored
That’s it. Now you can connect the stick to a Linux host computer and see the script happening.
Where to Continue
Exploring the depth of HID script to write advanced exploits is not the focus of this article. However, I explored some ideas and give my summary here:
- P4wnP1: The ancestor project. It includes links to videos and presentations showing particular exploits.
- pwnhyve: Naming itself as a sibling project, it focuses on bad USB capabilities and the injection of shellcode into target computers.
- pi_zero2w Another developer forked the project and created a version that runs on a Raspberry Pi Zero 2 W, but it with fewer Kali Linux tools and no Bluetooth support
- Explore HID Script language: Unfortunately, there is no written document of the language, and digging into the project source code did not reveal an approachable form to me. Considering related rubber duck scripts, the general attack vector is to use HID commands to deploy a base64 decoded scripts for the shell language of the target system (PowerShell for Windows, Bash for Linux), which is then executed to install additional malware or a backdoor.
- HID Script collection: This repository is the only other source of examples. It contains script that target Windows Systems to steal credentials and password and provides examples both in HID and in Rubber Duck script.
Conclusion
Small form-size single board computer can be used as hacking gadgets. This article showed how to turn a Raspberry Pi Zero into a bad USB device, a specific form of physical hacking in which an inserted USB stick executes command on the host. You only need a Raspberry Pi Zero, an USB dongle to expose the Zeros USB ports, and the PPA Linux Image. Once the initial setup is completed, the Zero turns into a WiFi and SSH accessible device with complex configuration options for all hardware features. To write a bad USB exploit, the HID language, based on JavaScript, can be used to instruct a sequence of keystrokes. This article showed only a simple exploit: Opening the systems text editor to write a message. Yet the potential for serious exploits becomes visible: By executing shell scripts on the targets, access to the system can be achieved, stealing credentials or installing malware and backdoors.