Raspberry Pico Badger: Custom App Development for MQTT Message Display and Graph Visualization
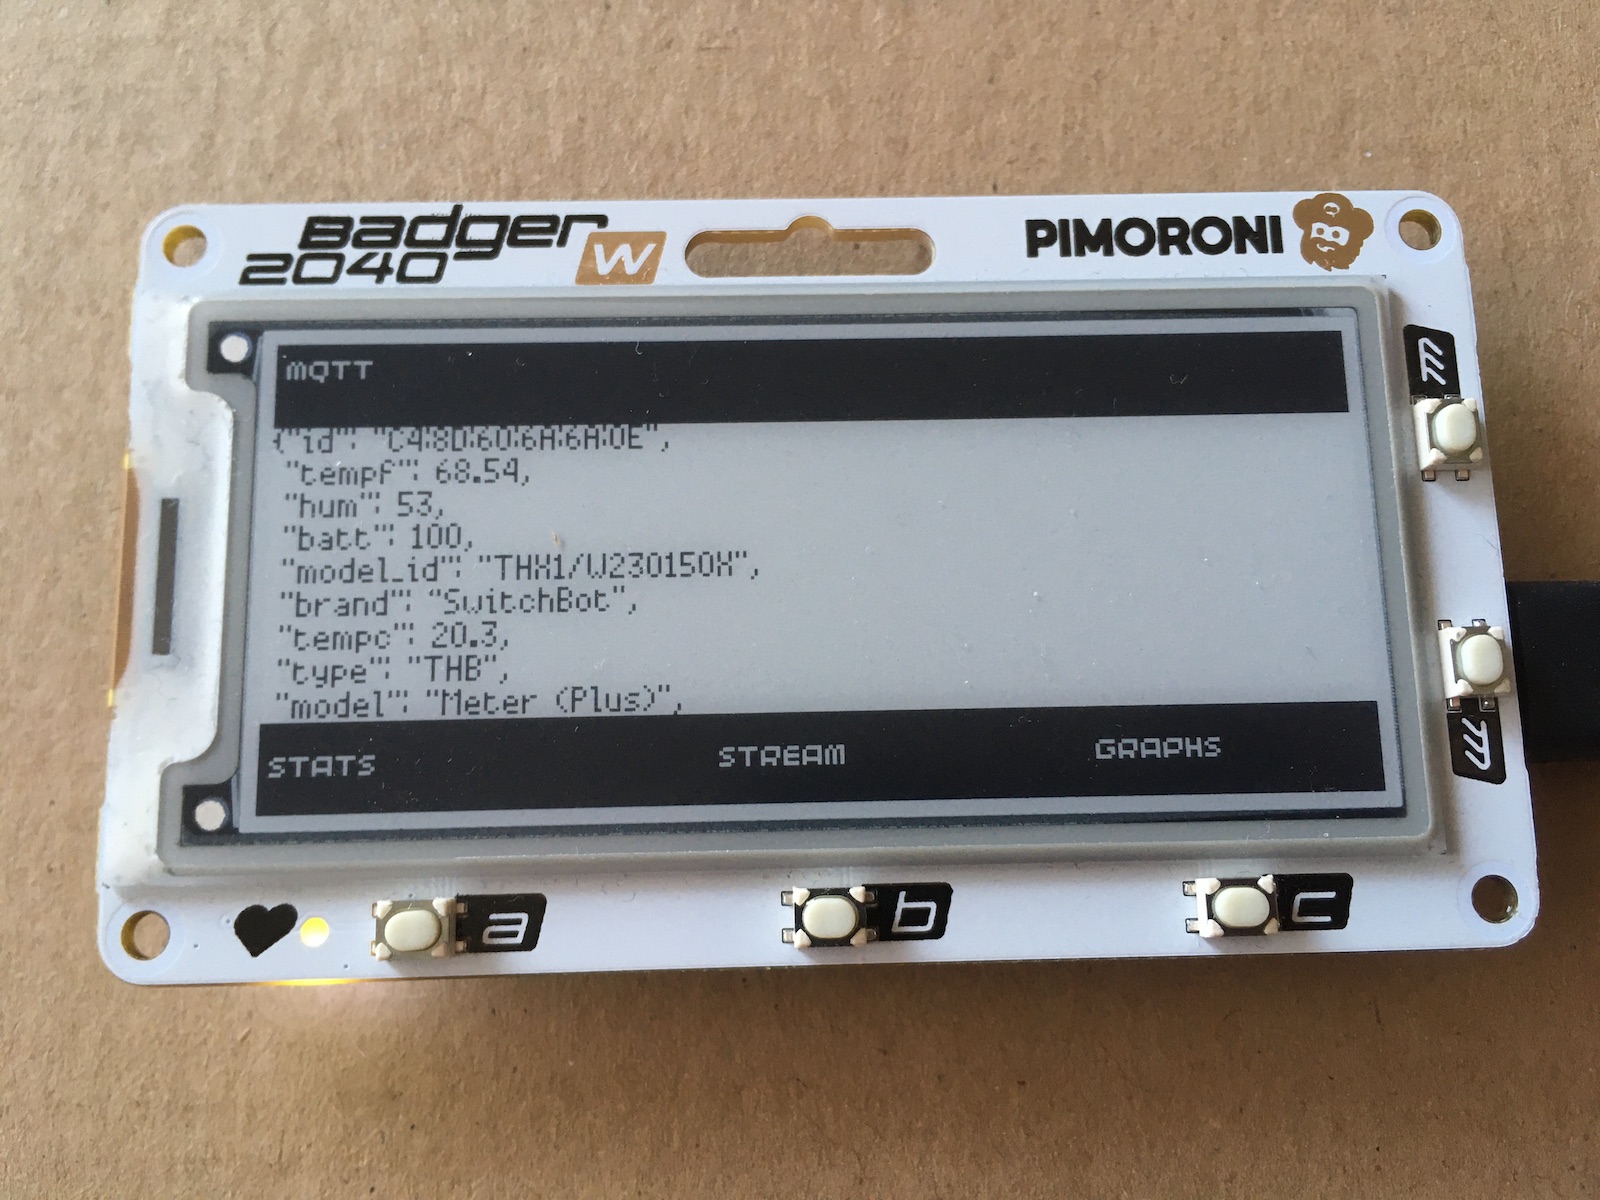
The Raspberry Pico Badger is a consumer product by the Raspberry Pi company Pimoroni. Advertised as a portable badge with a 2.9 inch e-ink display and a Pico W, it’s a portable, programmable, network connected microcomputer.
Following the introduction in the last article, this post explores how to program a new app for the Badger. The app should connect to a local MQTT broker, subscribe to a topic of interest, fetch and show its data. The consumed data are temperature and humidity numerical values, for which the app also draws a graph.
The technical context of this article is MicroPython v1.21 and Badger OS v0.04. All examples should work with newer releases too.
Required Hardware
To follow along, you just need a Raspberry Pico Badger W, which you can find at pimoroni.com or another reseller. You also need an USB cable to connect the Badger to your computer.
MQTT App Requirements
The concrete app that I want to design should be integrated into Badger OS. Its usage should fulfill the following requirements:
- The app is represented by a dedicated icon in addition to the other apps
- Once opened, it will show three different screens:
- stats: connectivity information, received message count, time
- stream: show the content of the last received message
- graph: shows the value changes of temperature and humidity
- When closed, the messages stats should be stored, but the MQTT connection is disabled to save memory for other apps
To enable these features, following technical features need to be implemented:
- Connect to a local MQTT browser
- Subscribe to a specific topic
- Record message statistics for the subscribed topic (number of messages, individual values for temperature and humidity)
Library Research
When starting this project, there was no structured documentation about app development for the Badger OS. Therefore, a combination of research, documentation reading, and source code studying was required.
My first step was to examine relevant MicroPython libraries that might be necessary. I found the following ones:
- network: Networking layer that abstracts establishing connections and routing. Subclasses for ethernet and Wi-Fi exist.
- socket: Build-in library for creating network sockets. No specific protocol support is mentioned in the documentation.
- json: Library for serializing JSON data.
Next was to check the existing RSS feed reader app of the Badger OS to see which concrete libraries are used as well as understanding how the XML messages are parsed. Opening the example file revealed this:
from urllib import urequest
import gc
import qrcode
import badger_os

def parse_xml_stream(s, accept_tags, group_by, max_items=3):
    tag = []
    ...


def get_rss(url):
    try:
        stream = urequest.urlopen(url)
        output = list(parse_xml_stream(stream, [b"title", b"description", b"guid", b"pubDate"], b"item"))
We can see this:
- The libary
urllibis used to open a web address - This returns a byte stream which is forwared to
parse_xml_stream() - This method consumes the byte stream one char at a time
Ok, so we have a working library for handling HTTP requests. And the responses can be converted to a byte stream and then to text.
Next step was to further dig into the documentation for the Badger W. The most relevant are these:
Right at the start of the Badger2040 documentation, the library umqtt.simple is mentioned, which is already included in the Badger OS UF file. This library is also published as micropython-umqtt.simple. A first look at the API examples gives the impression of a well-documented, up-to-date library. With this, the core functional requirements can be covered.
Understanding UI Drawing and Interactions
By studying the official documentation and the other example apps of the Badger OS, I learned about the essential methods for drawing on the screen.
- Color: Set different shades of grey with
display.pen(0), with0being black and15being white - Shapes: You can draw a
line,triangle,circle,rectangleandpolygon. Also, a free form drawing of individual pixels is possible too - Text: Using
display.text()to draw on designated x-y coordinates, using one of the built-in fonts
Using these basic capabilities, I developed some helper methods to set the layout of the app page: A header, a component space, and a footer. As a bonus, only the component space display needs to be refreshed, optimizing page refreshes.
The methods are:
def draw_header(update=False):
    display.set_font("bitmap6")
    display.set_pen(0)
    display.rectangle(0, 0, WIDTH, 20)
    display.set_pen(15)
    display.text("MQTT", 3, 4)

def draw_footer(update=False):
    display.set_font("bitmap6")
    display.set_pen(0)
    display.rectangle(0, HEIGHT-25, WIDTH, 20)
    display.set_pen(15)
    display.text("stats", 3, HEIGHT-25, 1)
    display.text("stream", 120, HEIGHT-25, 1)
    display.text("graphs", 220, HEIGHT-25, 1)

def draw_page():
    clear_page()
    draw_header()
    draw_footer()
    display.update()
    draw_component()
And the helper for clearing the component space:
def clear_page():
    display.set_pen(15)
    display.clear()
    display.set_pen(0)

def clear_component_space():
    display.set_pen(0)
    display.partial_update(0, 24, WIDTH, HEIGHT - 48)
    display.set_pen(15)

def show_component_space():
    display.partial_update(0, 24, WIDTH, HEIGHT - 48)
Next I looked again into the RSS reader app to learn about button handling. This part is straight forward: The initial declarations define buttons by reading the state of pre-defined pins, and then a continuous while() loop checks the pressed buttons to trigger application behavior.
The relevant source code parts are these:
# ...

# Display Setup
display = badger2040.Badger2040()
display.led(128)
display.set_update_speed(2)

# ...

# Setup buttons
button_a = machine.Pin(badger2040.BUTTON_A, machine.Pin.IN, machine.Pin.PULL_DOWN)
button_b = machine.Pin(badger2040.BUTTON_B, machine.Pin.IN, machine.Pin.PULL_DOWN)
button_c = machine.Pin(badger2040.BUTTON_C, machine.Pin.IN, machine.Pin.PULL_DOWN)
button_down = machine.Pin(badger2040.BUTTON_DOWN, machine.Pin.IN, machine.Pin.PULL_DOWN)
button_up = machine.Pin(badger2040.BUTTON_UP, machine.Pin.IN, machine.Pin.PULL_DOWN)

# ...
while True:

    if button_down.value():
        if state["current_page"] < 2:
            state["current_page"] += 1
            changed = True

    if button_up.value():
        if state["current_page"] > 0:
            state["current_page"] -= 1
            changed = True

    if button_a.value():
        state["feed"] = 0
        state["current_page"] = 0
        # ...
I can work with this code as-is.
This finishes the preliminary research. Lets start the app development, beginning with creating a MQTT connection.
MQTT Message Handling Essentials
To get started with the APP development, I copied the news.py file, and only kept the imports, global declarations, and everything after display.connect() which establishes the Wi-Fi connection and def draw_page() to show the app.
Right after the display.connect() method, the following code defines an mqtt object, connects to my local MQTT broker, and sends a message.
mqtt = None

try:
    mqtt = MQTTClient(  "", MQTT_BROKER, port = 1883, keepalive = 10000)
    mqtt.connect()

    msg = '{"message":"hello badger")'
    res = mqtt.publish( topic = MQTT_TOPIC, msg = msg, qos = 0 )
    print(mqtt)
    print("res: " + str(res))
except Exception as e:
    print(e)
Following the log output, I could see this:
MPY: soft reboot
<MQTTClient object at 200164d0>
res: 0
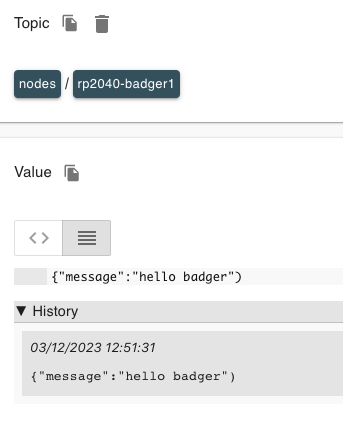
And yes, the connection is successful, and the message is sent to the broker:
Next, I added a topic subscription and callback method.
def mqtt_msg_received(topic, msg):
    print("Received:", msg, "Topic:", topic)
    draw_mqtt_msg_stream_component(msg)

mqtt = None

try:
    mqtt = MQTTClient(  "", MQTT_BROKER, port = 1883, keepalive = 10000)
    mqtt.connect()

    # ...
    mqtt.set_callback(mqtt_msg_received)
    mqtt.subscribe(MQTT_SUBSCRIBE_TOPIC)
    # ...
Running this code shows:
MPY: soft reboot
<MQTTClient object at 200138e0>

Received: b'{"id":"C4:8D:60:6A:6A:0E","rssi":-67,"brand":"SwitchBot","model":"Meter (Plus)","model_id":"THX1/W230150X","type":"THB","tempc":23.6,"tempf":74.48,"hum":55,"batt":100}' Topic: b'openmqtt/ble-c3/BTtoMQTT/C48D606A6A0E'
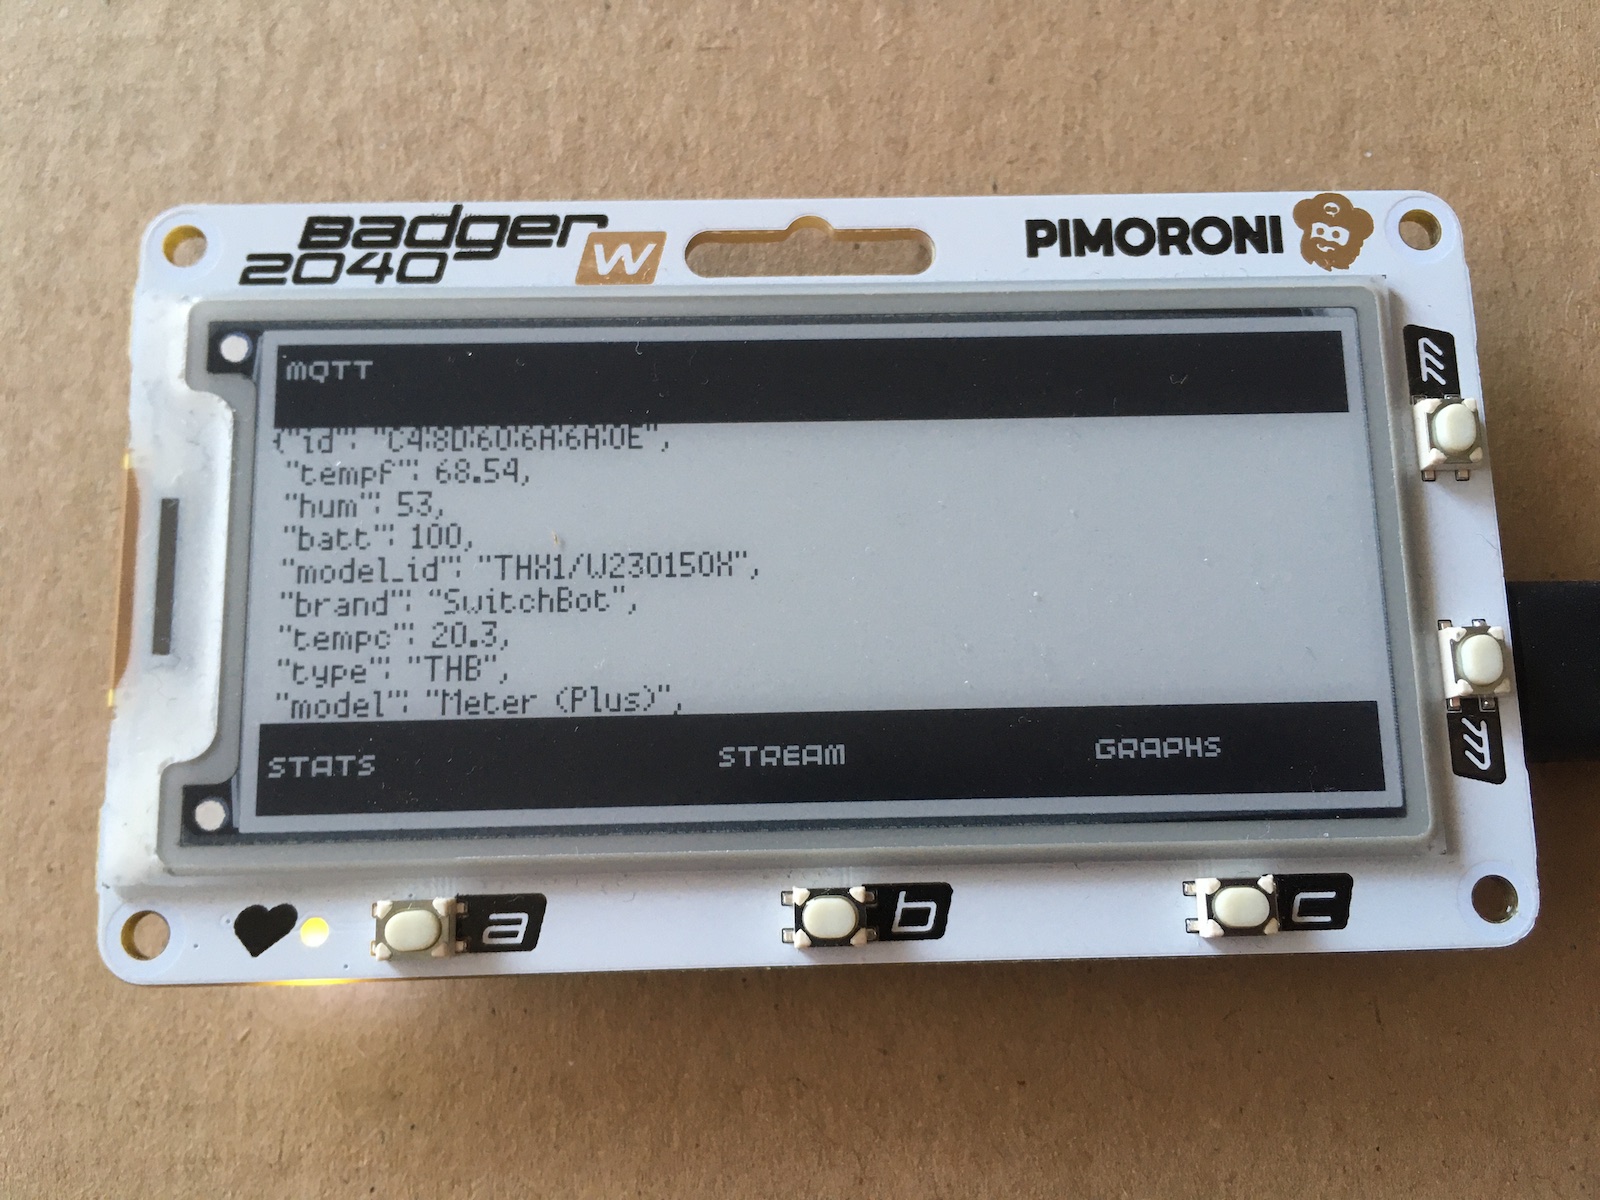
To finish this push-through the functions, I added a method to print the MQTT message verbatim on the screen:
def draw_mqtt_msg_stream_component(msg):
    clear_component_space()

    display.set_font("bitmap8")
    display.set_pen(0)
    display.text(msg, 0 , 24, wordwrap=WIDTH, scale=1)
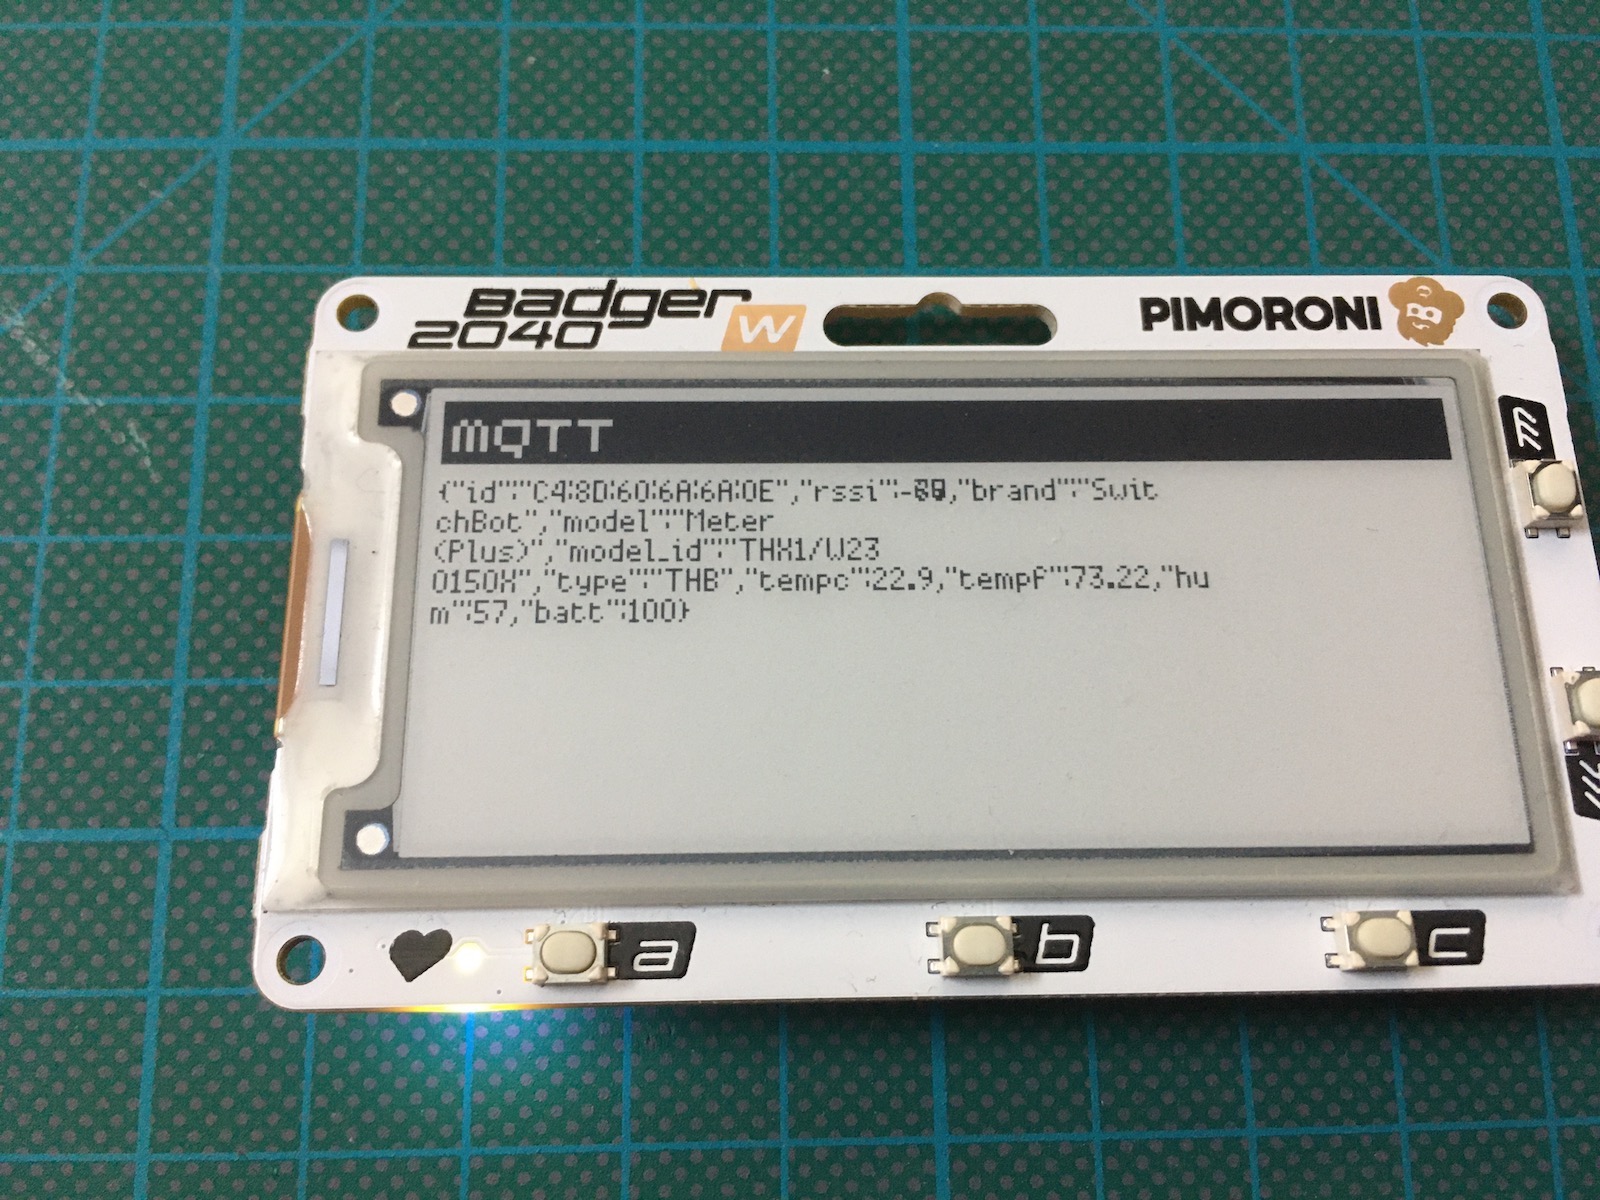
This example worked too. Overall, the functional features are fulfilled, and we can start the development feature by feature.
Component MQTT Stats
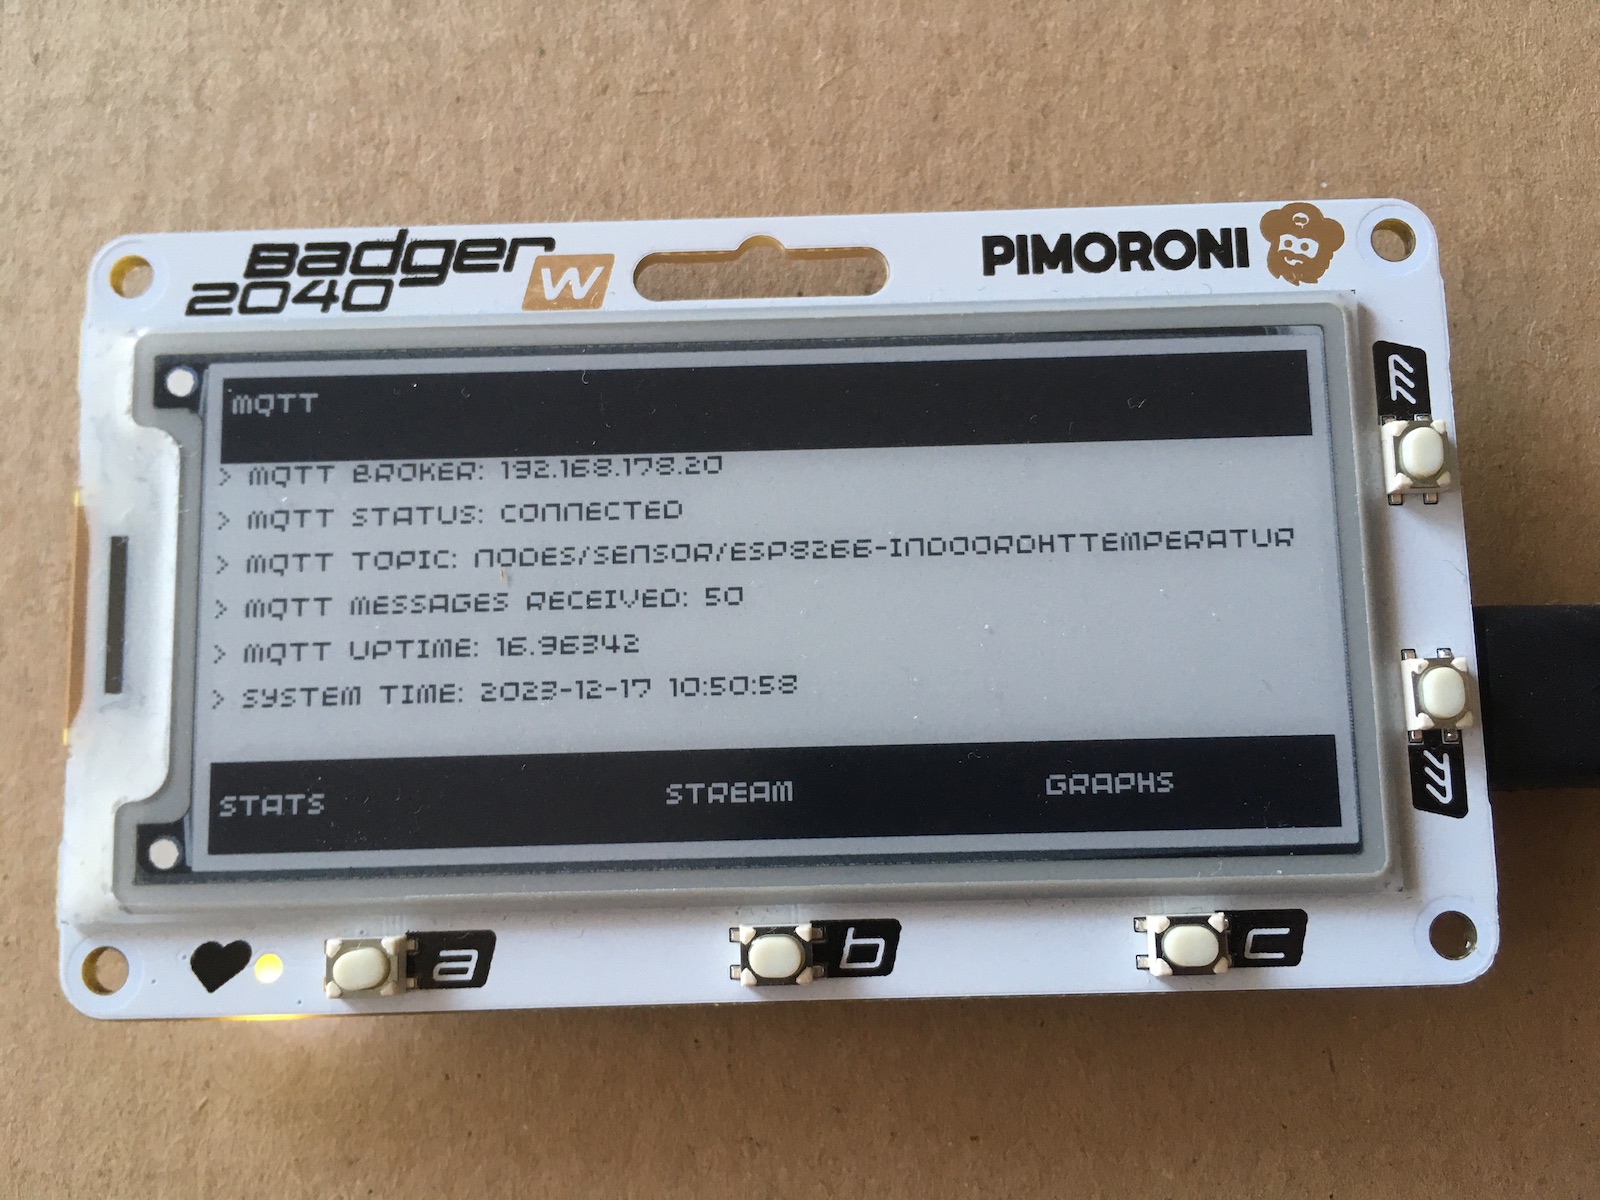
When the MQTT app opens, the first screen shows general information about the MQTT connection: The broker address, subscribed topic, connection status, message count on this topic, and timing information.
To keep all this information in a state object that is kept even when a new app is loaded, a Python dict object is used:
mqtt_state = {
    "broker": MQTT_BROKER,
    "connection_state": "disconnected",
    "uptime": 0,
    "msgs_received": 0,
    "topic": MQTT_SUBSCRIBE_TOPIC,
    "local_time": "2023-12-01 00:00:00",
    "msg": ""
}
This state object is updated every time a new message arrives: message content and count, as well as time information are calculated anew.
def update_mqtt_state(msg):
    mqtt_state["msg"] = msg
    mqtt_state["msgs_received"] = mqtt_state["msgs_received"] + 1
    mqtt_state["uptime"] = time.ticks_ms()/1000/60

    lt = list(machine.RTC().datetime())
    mqtt_state["local_time"] = "{}-{}-{} {}:{}:{}".format(lt[0],lt[1],lt[2],lt[4],lt[5],lt[6])
The component rendering shows each information at a separate line of text:
def draw_mqtt_stats_component():
    display.set_font("bitmap6")
    clear_component_space()
    display.set_pen(0)

    LINE_HEIGHT = 12
    y = 2 * LINE_HEIGHT

    display.text("> MQTT Broker: {}".format(mqtt_state["broker"]), 0 , y, wordwrap=WIDTH, scale=1)
    y += LINE_HEIGHT

    display.text("> MQTT Status: {}".format(mqtt_state["connection_state"]), 0 , y, wordwrap=WIDTH, scale=1)
    y += LINE_HEIGHT

   # ...

    show_component_space()
It looks like this:
Component Message Streaming
The second screen of the app shows the last received message text. Its rendering method is rather simple:
def draw_mqtt_msg_stream_component():
    clear_component_space()

    display.set_font("bitmap8")
    display.set_pen(0)
    display.text(mqtt_state["msg"], 0 , 24, wordwrap=WIDTH, scale=1)

    show_component_space()
A greater challenge was to pretty-print the message. With the built-in draw library, you can specify a work-wrap pixel width. But the next line printed all remaining chars of the text, so virtually printing of screen. Therefore, I added manual line breaks after each comma.
def pretty_print(msg):
    return re.sub(",", ",\n", msg)
A remaining challenge is now total lines - there is no scrolling down larger texts.
Component Temperature Graph
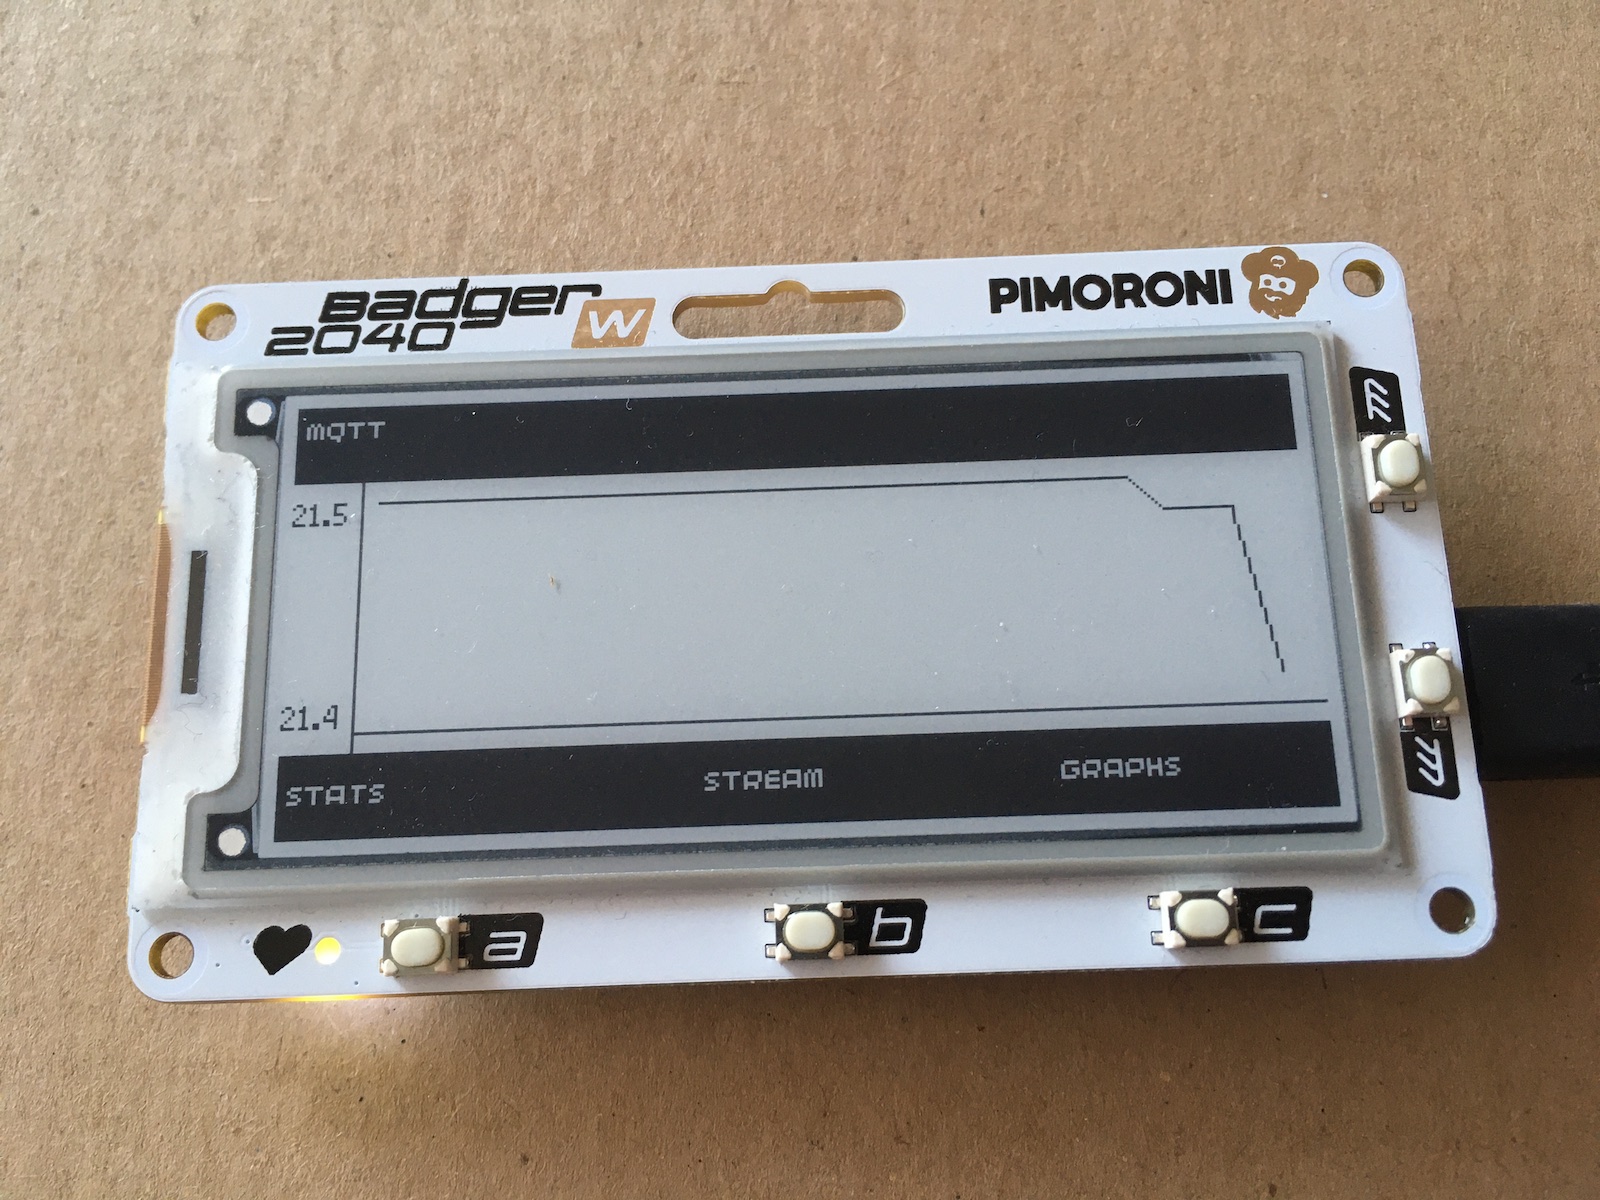
The final component was the trickiest, because I could not learn from a built-in app about these kinds of functions. Instead, I looked into the graphics lib and started with small examples to draw the coordinate system, and then to add lines for individual points of the collected temperature data.
Lets start with the coordinate system:
def draw_mqtt_graph_component():
    x = 20
    y = 20
    display.set_pen(0)
    display.set_font("bitmap8")
    display.line(x, y, x, HEIGHT)
    display.line(x, HEIGHT-30, WIDTH, HEIGHT-30)
The drawing of the temperature graph was challenging, I needed several hours to devise an algorithm that automatically scaled the temperature data into the available pixel grid. Its individual steps are:
- Determine the maximum number of points to be drawn (screen width minus offsets for coordinate systems, then increases of 10px for each point)
- Determine the max and min temperature values
- Iterate the list of temperature measurements, scaling each temperature value to the grid
The complete algorithm is as follows:
def temp_to_point(value, max, offset):
    return min((max - value)*100, 80) + offset

def draw_mqtt_graph_component():
    # ///
    num_values = max(len(mqtt_state["graph"]["temp"]), len(mqtt_state["graph"]["hum"]))
    y_steps = 10
    max_values = int((WIDTH - 20)/y_steps)

    temp_list = mqtt_state["graph"]["temp"][:max_values-1]
    max_temp = max(temp_list)
    min_temp = min(temp_list)

    display.text(str(max_temp), 0, 30, scale=1)
    display.text(str(min_temp), 0, 90, scale=1)

    x_offset = 30
    i = 1

    p1_x = temp_to_point(mqtt_state["graph"]["temp"][0], max_temp, x_offset)
    p1_y = 25
    for temp in temp_list:
        p2_x = temp_to_point(temp, max_temp, x_offset)
        p2_y = p1_y + y_steps

        display.line(int(p1_y), int(p1_x), int(p2_y), int(p2_x))

        p1_x = p2_x
        p1_y = p2_y
        i += 1

    print("Points drawn")
To give you an example how temprature data is converted to pixels, here is some log output:
# Draw 21.50
p1_x=30.00 p1_y=235.00 p2_x=30.00 p2_y=245.00
# Draw 21.40
p1_x=40.00 p1_y=265.00 p2_x=40.00 p2_y=275.00
# Draw 20.90
p1_x=40.00 p1_y=275.00 p2_x=90.00 p2_y=285.00
And the graph looks as this:
UI Interactions
Buttons only switch between the app components. A helper method is used to update the state object and re-draw the component only when a change was detected.
def switch_active_component(new_component):
    app_state["component"] is not new_component:
            app_state["component"] = "stats"
            badger_os.state_save("mqtt", app_state)
            draw_component()

while True:
    mqtt.check_msg()

    if button_down.value():
        pass

    if button_up.value():
        pass

    if button_a.value():
        switch_active_component("stats")

    if button_b.value():
        switch_active_component("stream")

    if button_c.value():
        switch_active_component("graphs")
To handle different UI interactions on each screen, the button presses conditions need to also factor in the current app state.
App Integration
The last part to finish was the first on the requirements list. The apps that are drawn by the Badger OS is handled by this method:
examples = [x[:-3] for x in os.listdir("/examples") if x.endswith(".py")]

def render():
    #...

    max_icons = min(3, len(examples[(state["page"] * 3):]))

    for i in range(max_icons):
        x = centers[i]
        label = examples[i + (state["page"] * 3)]
        icon_label = label.replace("_", "-")
        icon = f"{APP_DIR}/icon-{icon_label}.jpg"
        label = label.replace("_", " ")
        jpeg.open_file(icon)
        jpeg.decode(x - 26, 30)
        display.set_pen(0)
        w = display.measure_text(label, FONT_SIZE)
        display.text(label, int(x - (w / 2)), 16 + 80, WIDTH, FONT_SIZE)
As you see, it scans the examples folder for Python files, and then uses determines and draws the icons to be drawn. Therefore, I only needed to add an icon and the app file.
Conclusion
The Badger Pico W comes with a 2.9 inch e-ink display, 5 buttons and Wi-Fi connectivity. Its built-in Badger OS is a showcase of different applications, including image rendering, e-book reader, and RSS feed reader. In this article, you learned how to program a new app for the badger. This app periodically connects to an MQTT broker, fetches data, and shows a textual representation as well as drawing a graph from the received data. You also learned how to implement higher-order abstractions for drawing the header, footer and component space as well.