OpenMQTT Gateway is an all-in-one solution to grab consumer product sensor information via radio frequency, Bluetooth BLE, infrared, Lora or even GSM. It does only require a compatible device that is flashed with a gateway software stack, and a Wi-Fi connection and MQTT broker to send sensor data via MQTT. Once setup, it will continuously publish sensor data from a wide range of supported end consumer production. Additionally, it also provides options for sending commands to the devices.
In the last article, a radio frequency sensor in the 433MHz frequency range was setup. This article continues with a BLE gateway. Different to the last time, this article shows how to flash a compatible ESP32 board with prebuild binaries and bootloader via the CLI.
The technical context of this article is OpenMQTT Gateway v1.7.0, and for the hardware you need an ESP32 board. The examples should work with newer software versions too.
Required Hardware
OpenMQTT Gateway primarily supports end-consumer products that are based on an embedded ESP8266 or ESP32. However, I became also aware about the instructions for self-assembling a compatible board, which feels immediately more familiar when you come from an ESP Home background in which you typically solder and wire boards and sensors together.
For a BLE gateway, the hardware requirements for custom builds are minimal: Every ESP32 board is viable, because they all have Bluetooth support enabled. If you are as curious as me and wonder about the abundance of models, two type of differences can be made out: First, product features like addressable pins (26, 30, 40), onboard buttons, and additional hardware (LiPo charger, OLED display, antenna, SDCARD). Second, chipset versions that differ in CPU speed, amount of flash and PSRAM, and support for Wi-Fi and Bluetooth protocol standards. For a full comparison, check the ESP32 Wikipedia article.
ESP32 Camera Board Preparation
In my case, I had a spare ESP32 Camera module. This board has the following specification:
- 160MHz clock speed
- 32Mbit SPI Flash
- 520 KB RAM, 4MB PSRAM
- Bluetooth 4.2, BLE
- 802.11b/g/n/e/i Wi-Fi
- 9 GPIO pins (the rest are internally reserved for the OV2640 camera)
- build-in TF card reader
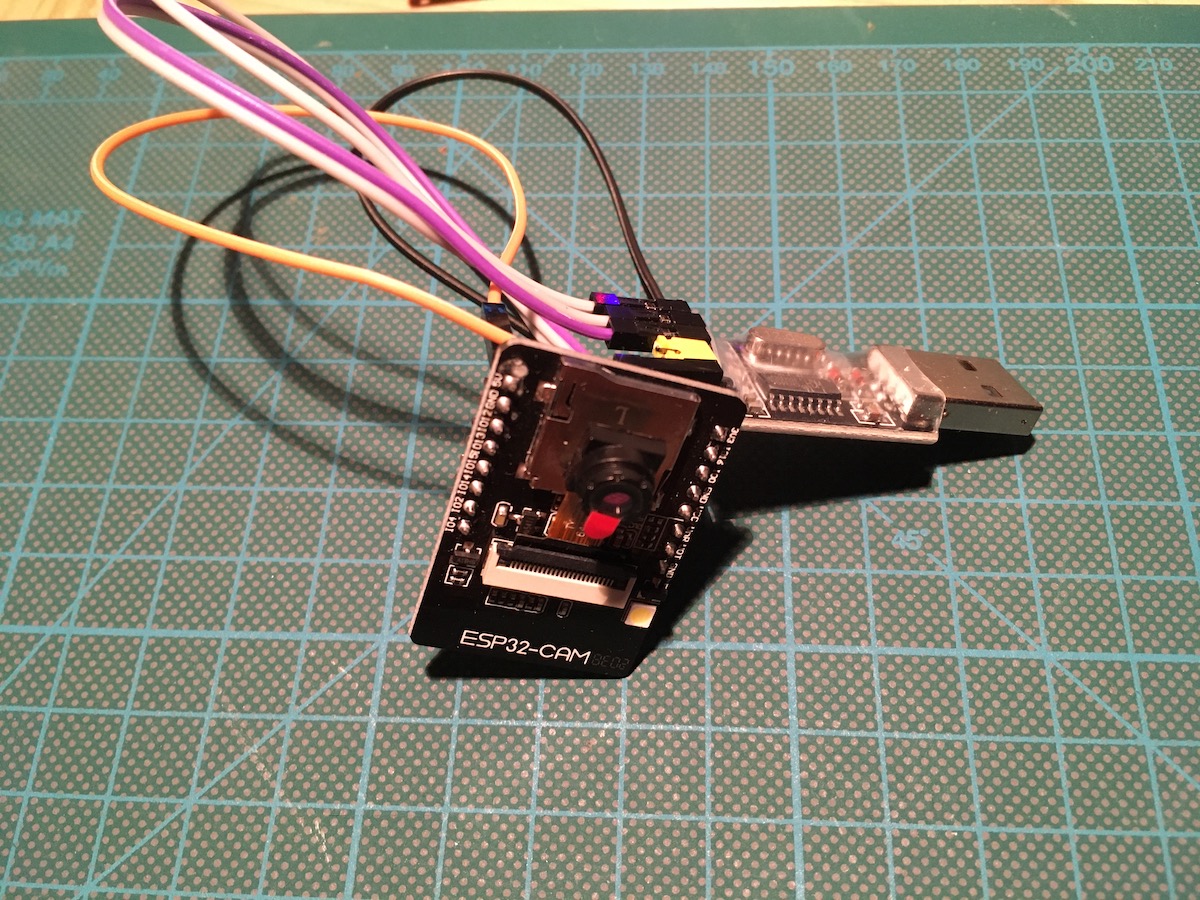
The ESP32-CAM module has no micro USB board. You can either get a suitable adapter, or use an USB FTL adapter. With this adapter, a simple 4-wire connection is made:
- TTL 5V => ESP32 VCC
- TTL GND => ESP32 GND
- TTL TXD => ESP32 RX (GPIO03)
- TTL RXD => ESP32 TX (GPIO01)
Connecting the TTL adapter to the board looks like this:

Flashing OpenMQTT Gateway
OpenMQTT Gateway can be flashed to devices in two ways. First, via using the Chrome Browser with a USB-connected board to flash directly from the browser, and second to use CLI tools with a set of downloaded files. Since my FTL adapter did not work for the browser-based flashing method, I decided for the 2nd option.
The concrete steps for Linux and OsX are:
- Download the flashing tool: You need the Python library esptool, installable with
pip install esptool. This provides access to the same named CLI that starts the flashing process. - Download generic files: The required generic files are board-specific bootloaders. Download them from here:
- Download board-specific files: There are no specific files for the ESP32-CAM board, but the generic
esp32dev-bleis suitable. Another two files are needed again. To use the most recent version, browse to the GitHub repository of the OpenMQTT Gateway project, and head over to the releases page. Open the latest release, and take a look at the “Asset” section. Here, you will find the required files for your board. In my case, for OpenMQTT Gateway v1.6, these are: - Prepare the flashing command: The command is quite complex, and you need to customize the path to the connected USB board as well as the path to the just downloaded binaries. To help getting this right, I actually invoked the
esptoolbinary and this shell script:
./esptool \
  --port /dev/cu.wchusbserial1410 \
  --chip esp32 \
  --baud 921600 \
  --before default_reset \
  --after hard_reset write_flash -z
  --flash_mode dout \
  --flash_size detect 0xe000 boot_app0.bin 0x1000 bootloader_dio_80m.bin 0x8000 esp32dev-ble-partitions.bin 0x10000 esp32dev-ble-firmware.bin
- Flash the device: The flashing process can be monitored via the FTL adapters serial messages. If no errors messages show up, the board is ready to be used.
Initial Configuration
From here, applying the basic configuration for a new OpenMQTT Gateway always follows the same steps:
- Open the WebGUI: The device creates a local Wi-Fi hotspot with a name similar to the board type, in my case that is
dev-ble-esp32. Connect to this hotspot e.g. via your mobile phone, and the WebGUI loads. - Enter Wi-Fi and MQTT Broker configuration: Click on
Configure Wifito load a new page in which both the Wi-Fi credentials and MQTT broker are configured. Click on “Save”, then “Exit” on the main screen
The board reboots again, and after a short time, you should see the first messages in your configured MQTT broker.
Receiving MQTT Messages
In my MQTT explorer broker, the BLE gateway showed up like this:

Similar to the RF gateway, the BLE version also provides a MQTT topic that broadcasts its configuration:
// esp32-bleOMG_ESP32_BLE/SYStoMQTT
{
  "uptime": 169930,
  "version": "v1.6.0",
  "discovery": false,
  "ohdiscovery": false,
  "env": "esp32dev-ble",
  "freemem": 97176,
  "mqttport": "1883",
  "mqttsecure": true,
  "minfreemem": 71008,
  "tempc": 57.22222,
  "freestack": 5132,
  "rssi": -65,
  "SSID": "secret",
  "BSSID": "98:48:27:DB:6A:08",
  "ip": "secret",
  "mac": "secret",
  "lowpowermode": -1,
  "interval": 100,
  "intervalcnct": 3600000,
  "scnct": 135512,
  "modules": [
    "WebUI",
    "BT"
  ]
}
And two more topics show internal information as well:
//esp32-bleOMG_ESP32_BLE/WebUItoMQTT
{
  "displayMetric": true,
  "webUISecure": true,
  "displayQueue": 1
}
Receiving BLE Messages
I have a smart watch that shows up as this:
///esp32-bleOMG_ESP32_BLE/BTtoMQTT/E22C0E85B5DF
{
  "id": "E2:2C:0E:85:B5:DF",
  "rssi": -89,
  "brand": "Tile",
  "model": "Smart Tracker",
  "model_id": "TILE",
  "type": "TRACK",
  "device": "Tile Tracker"
}
It does not show much information except its identification. But whether there is a configuration option via via OpenMQTT or on the device itself to expose more information can be investigated another time.
Conclusion
OpenMQTT Gateway is an essential tool for getting sensor data from consumer products. This article showed how to setup a Bluetooth to MQTT gateway using a generic ESP32 board. The first step is to flash the device. In this article, the board was flashed by using an external FTL adapter and the CLI esptool. Then, both generic bootloader files as well as board specific files need to be downloaded and used with a flashing command. Upon reboot, the board create a local Wi-Fi hotspot. Connect to this, enter Wi-Fi and MQTT broker credentials, then reboot again. And from then on, any Bluetooth BLE messages in your vicinity will be processed and turned into MQTT messages.