Through the combination of ESPHome and Home Assistant, a myriad of sensors can be added, managed, and their data visualized and stored. Over the previous articles, I added sensors that generally detect the presence of movements and sounds. Another signal that I want to create is a simple “I’m home” electronic message. For near-field communication, several protocols exist: RFID, NFC, LoRa, Bluetooth. This article investigates how to add RFID tag reading support to Home Assistant.
ESPHome is the platform that manages my IOT devices. Studying the supported sensors list, it became appeared that three different chipsets are supported: RC522 from NXP, PN532 from Philips, and RDM6300 from Handson Technology. Looking into a Arduino starter sensor box I purchased earlier, I found that I already have an RC522 sensor.
This article summarizes all required steps to get an RFID/NFC sensors working with ESPHome and Home Assistant.
The technical context of this article is Home Assistant v2024.10.4 and ESPHome v2024.10.3, but it should work with newer versions as well.
Hardware Overview
Following hardware is required build an RFID sensor:
- ESP8266 board
- RC522 sensor
- Dupont cables
My esp8266 board of choice is the D1 Wemos mini, and for the RC522, I just plundered an Arduino starter sensor box, but there are also plenty offers from online stores.
Wiring
The D1 mini pin layout is as follows:
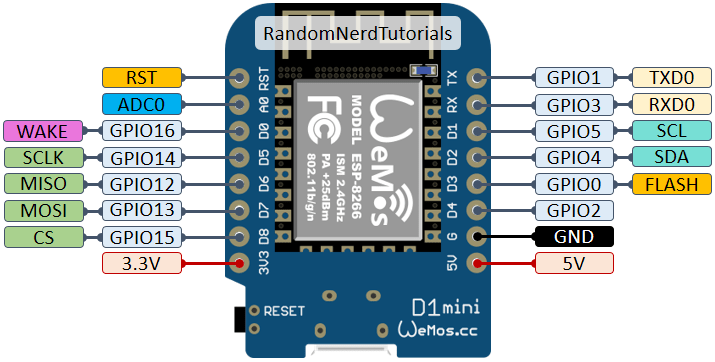
Source: https://randomnerdtutorials.com
Connection between the RC522 and the D1 mini board uses the SPI protocol. This is a bus level protocol allowing several devices to connect. This connection alone requires 4 wires, plus VCC, GND and a wire for analog readings as well. The concrete wiring is this:
ESP8266 3.3V => RC522 VCC
ESP8266 Ground => RC522 GND
ESP8266 GPIO-12/D6 MISO => RC522 Miso
ESP8266 GPIO-13/D7 MOSI => RC522 MOSI
ESP8266 GPIO-14/D5 SCLK => RC522 SCK
ESP8266 GPIO-15/D8 CS => RC522 SDA
ESP8266 GPIO-04/D0 => RC522 RST
And the pins used for the communication protocols:
spi:
  miso_pin: GPIO12
  mosi_pin: GPIO13
  clk_pin: GPIO14

rc522_spi:
  cs_pin: GPIO15
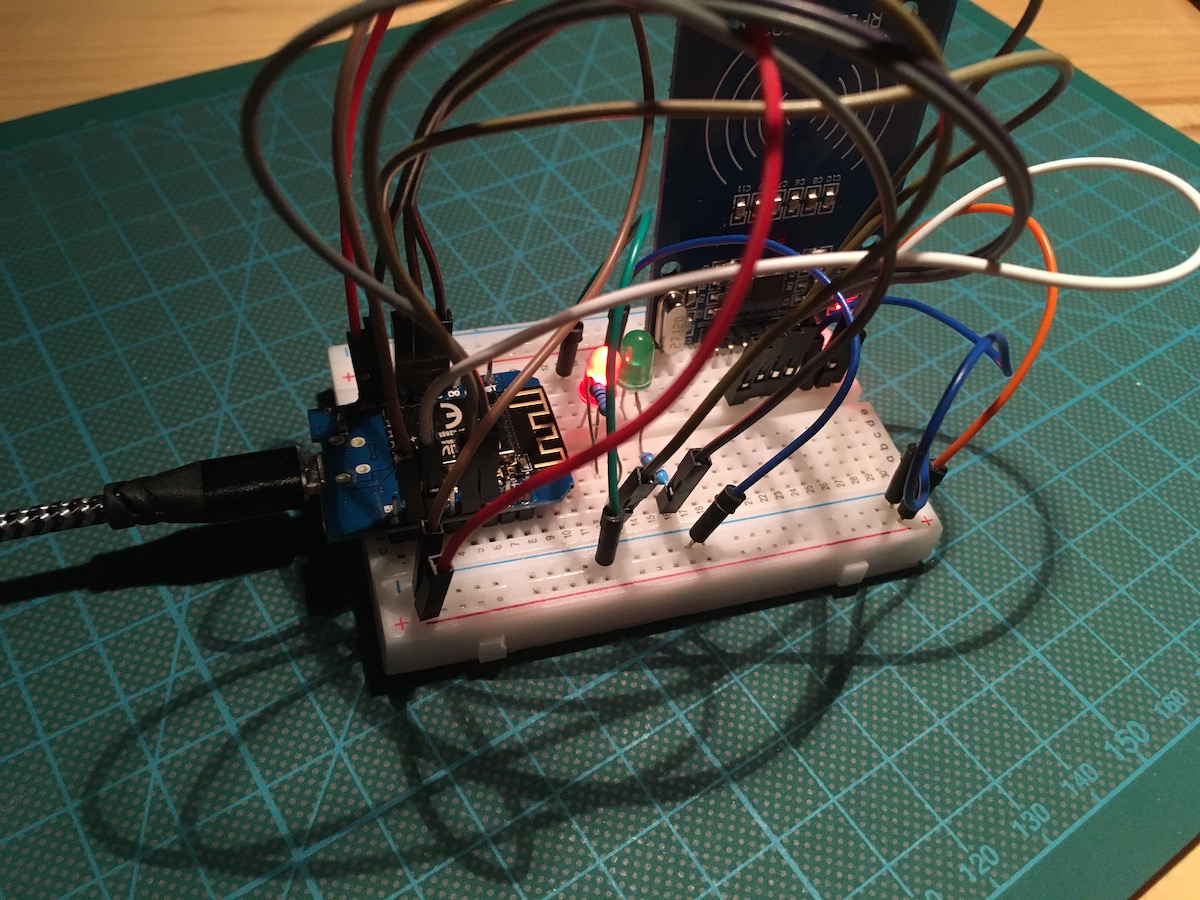
Also, I connected a green LED to D1 and a red led to d2 - they should provide an additional visual clue about reading and identifying an RFID card.
Having it all wired up, the board looks as follows:
ESPHome Configuration & Flashing
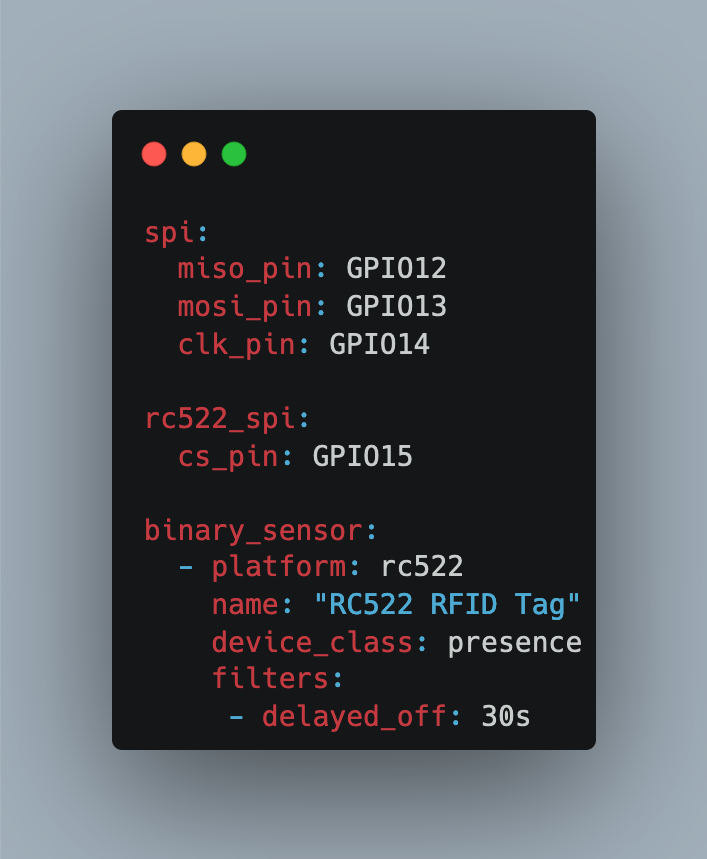
To get an ESP8266 working with the RC522 over SPI, the device configuration needs to have both a SPI block in the board section and the sensor section. The following configuration stanza fulfills all requirements:
# Source: ESPHome, RC522 NFC/RFID, https://esphome.io/components/binary_sensor/rc522#over-spi
spi:
  miso_pin: GPIO12
  mosi_pin: GPIO13
  clk_pin: GPIO14

rc522_spi:
  cs_pin: GPIO15

binary_sensor:
  - platform: rc522
    name: "RC522 RFID Tag"
    device_class: presence
    filters:
     - delayed_off: 30s
The RC522 sensor stanza actually requires you to specify a concrete RFID tag that it listens for. However, you can go with any pseudo tag, and once its operational, take a look into the logfiles to see the tag id that you are using.
The red and green LEDs are defined as binary sensor too:
# Source: ESPHome, Binary Light, https://esphome.io/components/light/binary.html
  - platform: binary
    name: green
    output: green_output

  - platform: binary
    name: red
    output: light_output

output:
  - id: red_output
    platform: gpio
    pin: GPIO05

  - id: red_output
    platform: gpio
    pin: GPIO04
Let’s compile …
INFO Reading configuration /config/esp8266-rfid.yaml...
WARNING The selected Arduino framework version is not the recommended one. If there are connectivity or build issues please remove the manual version.
WARNING The selected Arduino framework version is not the recommended one. If there are connectivity or build issues please remove the manual version.
INFO Generating C++ source...
INFO Core config or version changed, cleaning build files...
INFO Compiling app...
Processing esp8266-rfid (board: d1_mini; framework: arduino; platform: platformio/espressif8266 @ 2.6.3)
--------------------------------------------------------------------------------
Library Manager: Installing ottowinter/AsyncMqttClient-esphome @ 0.8.6
Library Manager: ArduinoJson@6.18.5 has been installed!
INFO ArduinoJson@6.18.5 has been installed!
HARDWARE: ESP8266 80MHz, 80KB RAM, 4MB Flash
LDF: Library Dependency Finder -> https://bit.ly/configure-pio-ldf
Dependency Graph
|-- ESP8266WiFi @ 1.0
|-- ESP8266mDNS @ 1.2
|-- AsyncMqttClient-esphome @ 0.8.6
|   |-- ESPAsyncTCP-esphome @ 1.2.3
|-- noise-c @ 0.1.4
|   |-- libsodium @ 1.10018.1
|-- SPI @ 1.0
|-- ArduinoJson @ 6.18.5
Compiling .pioenvs/esp8266-rfid/src/esphome/components/api/api_connection.cpp.o
…
```bash

… and flssh this configuration:

```bash
Using '/dev/cu.usbserial-1410' as serial port.
Connecting....
Detecting chip type... ESP8266
Connecting....

Chip Info:
 - Chip Family: ESP8266
 - Chip Model: ESP8266EX
 - Chip ID: 000DD072
 - MAC Address: 44:17:93:0D:D0:72
Uploading stub...
Running stub...
Stub running...
Changing baud rate to 460800
Changed.
 - Flash Size: 4MB
 - Flash Mode: dout
 - Flash Frequency: 40MHz
Erasing flash (this may take a while)...
Chip erase completed successfully in 2.8s
Compressed 527856 bytes to 364833...
Writing at 0x0001c000... (34 %)
After a reboot, you see the ESPHome log files. The SPI Bus configuration is printed as follows:
[18:09:15][C][spi:101]: SPI bus:
[18:09:15][C][spi:102]:   CLK Pin: GPIO14
[18:09:15][C][spi:103]:   MISO Pin: GPIO12
[18:09:15][C][spi:104]:   MOSI Pin: GPIO13
[18:09:15][C][spi:106]:   Using HW SPI: YES
[18:09:15][C][rc522:099]: RC522:
[18:09:15][E][rc522:104]: Reset command failed!
[18:09:15][C][rc522:110]:   Update Interval: 1.0s
[18:09:15][C][rc522:113]:   Tag 'RC522 RFID Tag'
[18:09:15][C][rc522:113]:     Device Class: 'presence'
[18:09:15][C][rc522_spi:021]:   CS Pin: GPIO15
And the following messages show that the PN522 works (if you do not see those messages, re-check the wiring).
[rc522:359]: PCD TRANSCEIVE: RX: 26
[19:21:39][V][rc522:431]: received 2 bytes: 04-00
[19:21:39][V][rc522:152]: finished communication status: 0, state: 3
[19:21:39][V][rc522:178]: STATE_READ_SERIAL (2)
If you put an RFID tag close to it, its tag will be printed – use this tag, and change it in your Home Assistant configuration
[19:21:39][V][rc522:359]: PCD TRANSCEIVE: RX: 93-20
[19:21:39][V][rc522:431]: received 5 bytes: CA-41-90-81-9A
[19:21:39][V][rc522:152]: finished communication status: 0, state: 5
[19:21:39][V][rc522:152]: finished communication status: 0, state: 6
[19:21:39][V][rc522:359]: PCD TRANSCEIVE: RX: 93-70-CA-41-90-81-9A-F1-F3
[19:21:39][V][rc522:431]: received 3 bytes: 08-B6-DD
[19:21:39][V][rc522:152]: finished communication status: 0, state: 7
[19:21:39][D][rc522:263]: Found new tag 'CA-41-90-81'
[19:21:40][V][rc522:359]: PCD TRANSCEIVE: RX: 26
[19:21:40][V][rc522:431]: received 2 bytes: 04-00
[19:21:40][V][rc522:152]: finished communication status: 0, state: 3
[19:21:40][V][rc522:178]: STATE_READ_SERIAL (2)
[19:21:40][V][rc522:359]: PCD TRANSCEIVE: RX: 93-20
[19:21:40][V][rc522:431]: received 5 bytes: CA-41-90-81-9A
[19:21:40][V][rc522:152]: finished communication status: 0, state: 5
[19:21:40][V][rc522:152]: finished communication status: 0, state: 6
The light configuration also show up:
[18:09:15][C][gpio.output:010]: GPIO Binary Output:
[18:09:15][C][gpio.output:011]:   Pin: GPIO5
[18:09:15][C][gpio.output:010]: GPIO Binary Output:
[18:09:15][C][gpio.output:011]:   Pin: GPIO4
[18:09:15][C][light:104]: Light 'RC522 RFID Green Light'
[18:09:15][C][light:104]: Light 'RC522 RFID Red Light'
Home Assistant Integration
Once the sensor is flashed, it can be added to Home Assistant in the usual way: “Settings” => “Devices & Services”, then click the button “Add Integration” and enter the device IP and configured password. The configured board shows the following sensors:
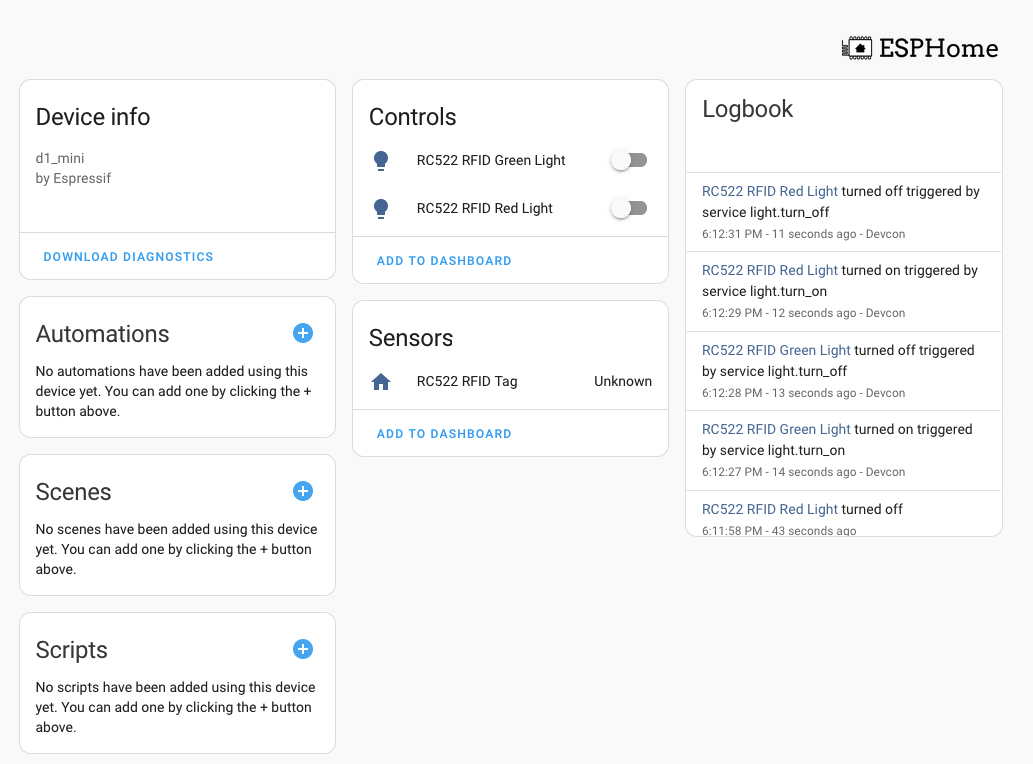
Using RFID in home assistant comes in two different flavors. The first approach is shown above in the ESPHome configuration - a simple binary sensor that reports if the RFID tag has been scanned. The sensor triggers every time when the configured RFID tag is recognized. This information is continuedly accumulated and shown in a history diagram as follows:

The second approach is to manage RFID tags outside of ESPHome via the Home Assistant tag manager. This opens several new uses cases: Tags are entities inside Home Assistant, enabling all kinds of automation. And furthermore, with the Home Assistant App, you can even write data to RFID/NFC cards. See the official Home Assistant Tags for more information.
Simple Presence Automation
With this presence detection, I added a simple automation that lights the green led when the tag is present, and otherwise shows the red led when not. It’s interesting to consider additional options of using this presence detection, e.g. for authorization or login.
Here is the automation to detect absence:
alias: RFID Absence
description: 'Through the combination of ESPHome and Home Assistant, a myriad of sensors can be added, managed, and their data visualized and stored. Over the previous articles, I added sensors that generally detect the presence of movements and sounds. Another signal that I want to create is a simple "I''m home" electronic message. For near-field communication, several protocols exist: RFID, NFC, LoRa, Bluetooth. This article investigates how to add RFID tag reading support to Home Assistant.'
trigger:
  - type: not_present
    platform: device
    device_id: 047ca6ccac276e9b6deadfccf43e20a5
    entity_id: binary_sensor.rc522_rfid_tag
    domain: binary_sensor
condition: []
action:
  - service: light.turn_on
    data: {}
    target:
      entity_id: light.rc522_rfid_red_light
  - service: light.turn_off
    data: {}
    target:
      entity_id: light.rc522_rfid_green_light
mode: single
And its counterpart:
alias: RFID Presence
description: 'Through the combination of ESPHome and Home Assistant, a myriad of sensors can be added, managed, and their data visualized and stored. Over the previous articles, I added sensors that generally detect the presence of movements and sounds. Another signal that I want to create is a simple "I''m home" electronic message. For near-field communication, several protocols exist: RFID, NFC, LoRa, Bluetooth. This article investigates how to add RFID tag reading support to Home Assistant.'
trigger:
  - type: present
    platform: device
    device_id: 047ca6ccac276e9b6deadfccf43e20a5
    entity_id: binary_sensor.rc522_rfid_tag
    domain: binary_sensor
condition: []
action:
  - service: light.turn_off
    data: {}
    target:
      entity_id: light.rc522_rfid_red_light
  - service: light.turn_on
    data: {}
    target:
      entity_id: light.rc522_rfid_green_light
mode: single
Conclusion
Adding an RFID Tag to Home Assistant for present detection involves only four steps: a) build a combination of an esp8266/esp32 board with a RC522 RFID reader, b) define the EspHome configuration stanza, c) Flash the device and make it operational, d) add the board and its sensor to your Home Assistant. The RFID tag act like a binary sensor: Its either present or not. Overall, RFID integration into Home Assistant opens the way for several new automation. To demonstrate a simple presence detection triggered by the RFID sensor, I added a simple automation that triggers a led when the configured RFID tag is detected, and shows another led when not.