The Raspberry Pi is a single board computer with an impressive array of supported connections: A 3.3V compatible 40 pin header, integrated camera module and SPDIF sound, Wi-Fi and Bluetooth, ethernet, USB and HDMI. In addition to these hardware features, it also support a variety of operating systems specialized for certain domains, and several programming language for projects, including C and Python. This makes the Raspberry Pi a great platform for many IOT projects.
So far, I have used the Raspberry Pi mainly as a headless computer running docker container and as a controller for robotic projects. But with my recent interest into long-range communicaiton and wireless technologies like RFID, NFC, and radio frequencies, as well as the fact that the Raspberry Pi 5 is shortly coming to stores, my interest into this platform for IOT projects is sparked again.
This article details how to connect an RFID reader to the Raspberry Pi. You will learn how to wire an RFID reader module to the Pi, which Python library to use, and see examples for reading and writing RFID tags.
The technical context of this article is Raspberry Pi OS 2024-10-22, mfrc-python v0.0.5 and an old fashioned Raspberry Pi. All code should work with newer versions and newer Raspberry Pi models as well.
Hardware Overview
Following hardware is required build an RFID sensor:
- Raspberry Pi
- RC522 sensor
- Dupont cables
For the RFC522 sensor, several versions exist, I picked on that came with an Arduino sensor starter kit.
Wiring
The Raspberry Pi Pin Layout is shown here:
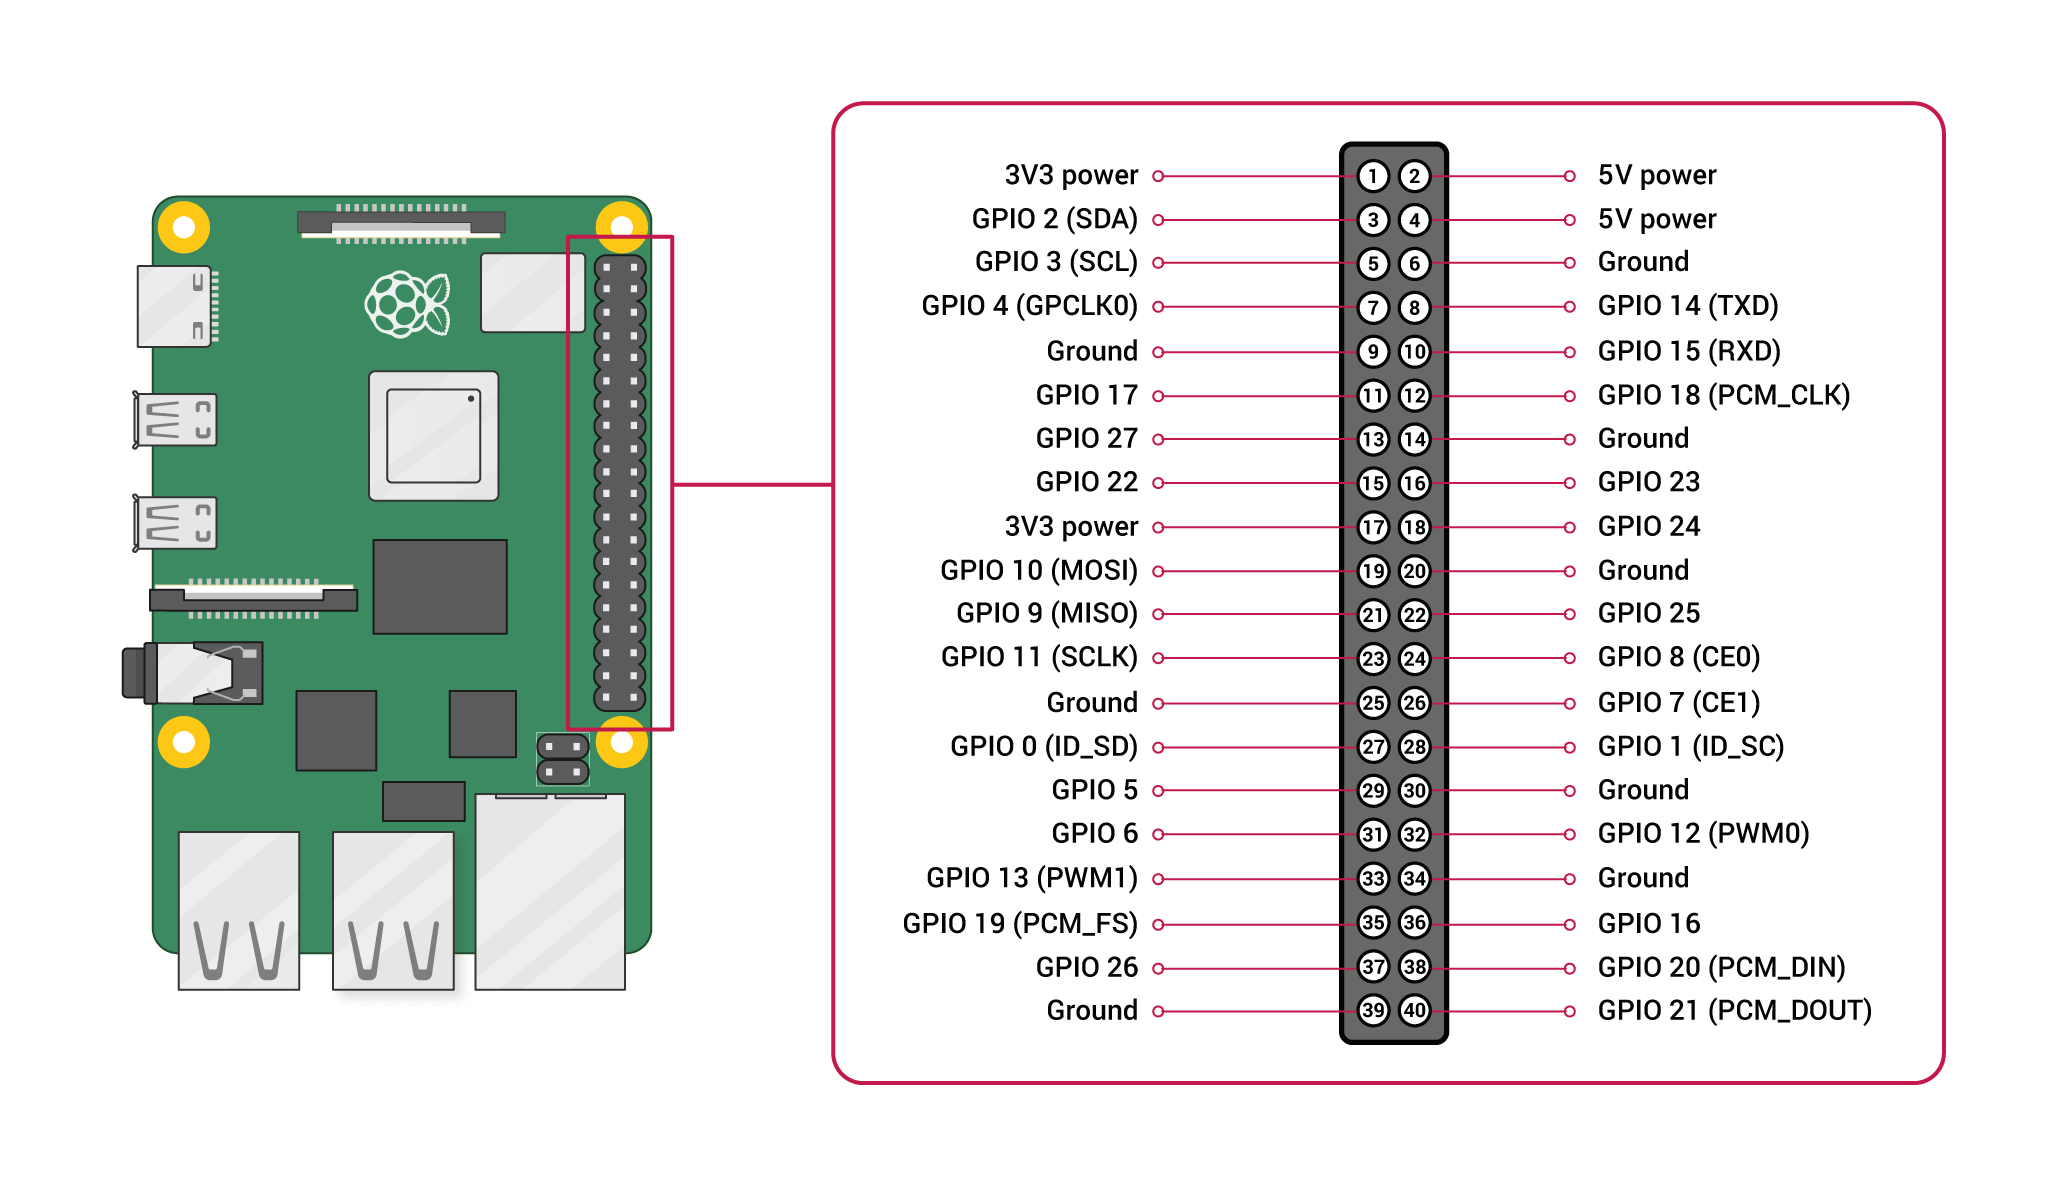
Source: https://raspberrypi.com
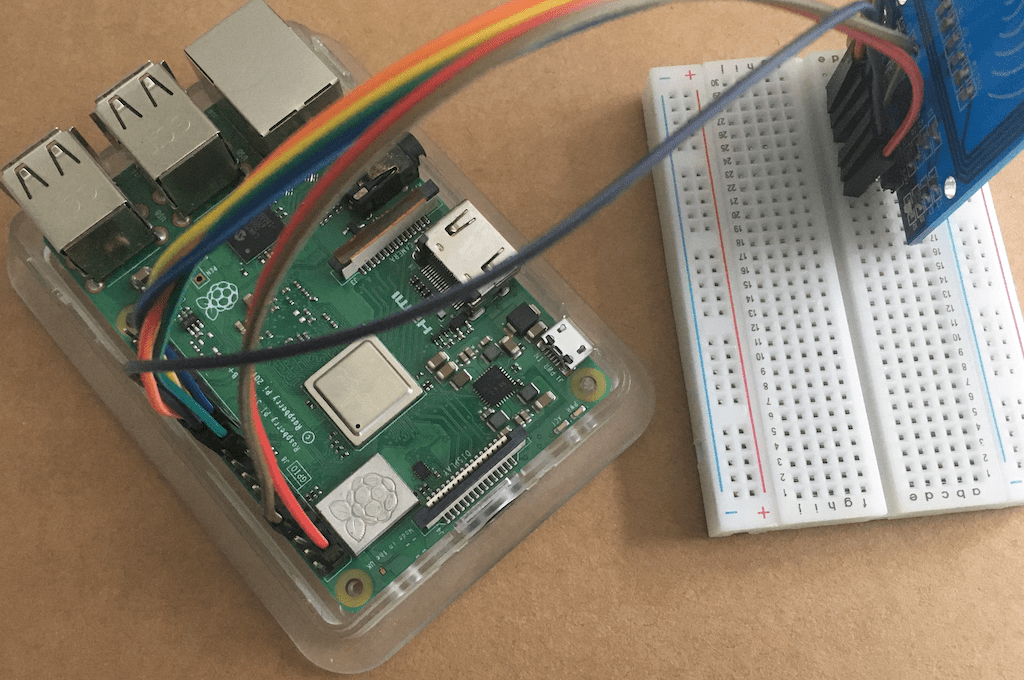
Connection between the RC522 and the Raspberry Pi uses the SPI protocol. This is a bus level protocol allowing several devices to connect. This connection alone requires 5 wires, plus VCC, GND and a wire for analog readings as well. The concrete wiring is this:
Pin 24 / GPIO8 <=>SDA
Pin 23 / GPIO11 <=> SCK
Pin 19 / GPIO10 <=> MOSI
Pin 21 / GPIO9 <=> MISO
Pin 22 / GPIO25 <=> RST
For the VCC and GND, choose which ones you like on the Raspberry Pi. The concrete wiring looks as shown:
Raspberry Pi Setup
The SPI interface must be enabled. Open a terminal, then run sudo raspi-config. In the menu, select “3 Interface Options”, then “I4 SPI”. Enable, then leave the menu with “Finish”. Then reboot the Raspberry Pi required.
To check that this configuration is active, list the Linux device files with ls /dev/spi*. You should see a either /dev/spidev0.0 or /dev/spidev0.1.
RFID Library
To my surprise, several RFID libraries exist that even have the same name MFRC522-python. Depending on which other article about RFID and Raspberry Pi you study, you will see one of the following libs, and usually its required to download them and execute a setup program manually:
- https://github.com/mab5vot9us9a/MFRC522-python (2016)
- https://github.com/mxgxw/MFRC522-python (2018)
- https://github.com/pimylifeup/MFRC522-python (2021)
Two libraries are releases as Python pip packages:
- https://pypi.org/project/mfrc522/ (2019) / packaged from pimylifeup/MFRC522-python
- https://pypi.org/project/mfrc522-python/ (2023)
I decided to use the newest published version, but only later, after finishing the article, found out that its source code is very identical to the 2019 release.
To install the Python library by running python3 -m pip install mfrc522-python.
Before starting to code, lets investigate the RFID protocol and how data is stored.
RFID Standard
Sources: Wikipedia, Radio Frequency-Identification, https://en.wikipedia.org/wiki/Radio-frequency_identification | PyPi, MFRC522-python project description, https://pypi.org/project/mfrc522-python
RFID is a standard that provides contactless information exchange of digital data. An RFID card consists of a small microchip that stores non-volatile information, and an antenna that receives and transmits data. RFID cards can be passive, which means the data is only send when a scanner provides a magnetic field that actives the cards’ magnetic coil. or active, meaning they are battery-driven and can send their data over greater ranges.
There are several frequencies in which RFID operates, the most common on is the 13.56 MHz RF, used in personal tags. The memory layout of an RFID tag consist of 16 sectors with 4 sectors each, and each sector holds 16 bytes. The first sector contains meta information about the card manufacturer, and the remaining 15 sectors can be filled with application data. The last block in each sector is the trailer block, it contains a checksum for the other blocks of the sector. If the trailer block is being written too, the whole sector becomes corrupted and cannot be used.
To read the content of an RFID card, the following steps are required:
- Wait for an active communication between reader and card
- If multiple cards should be detected, perform an anti-collision detection, and select only one card
- To read data from any sector, first read its trailer block and perform an authentication, then read the other blocks
- Stop the authentication and communication
Let’s see this now in action.
Reading RFID Data
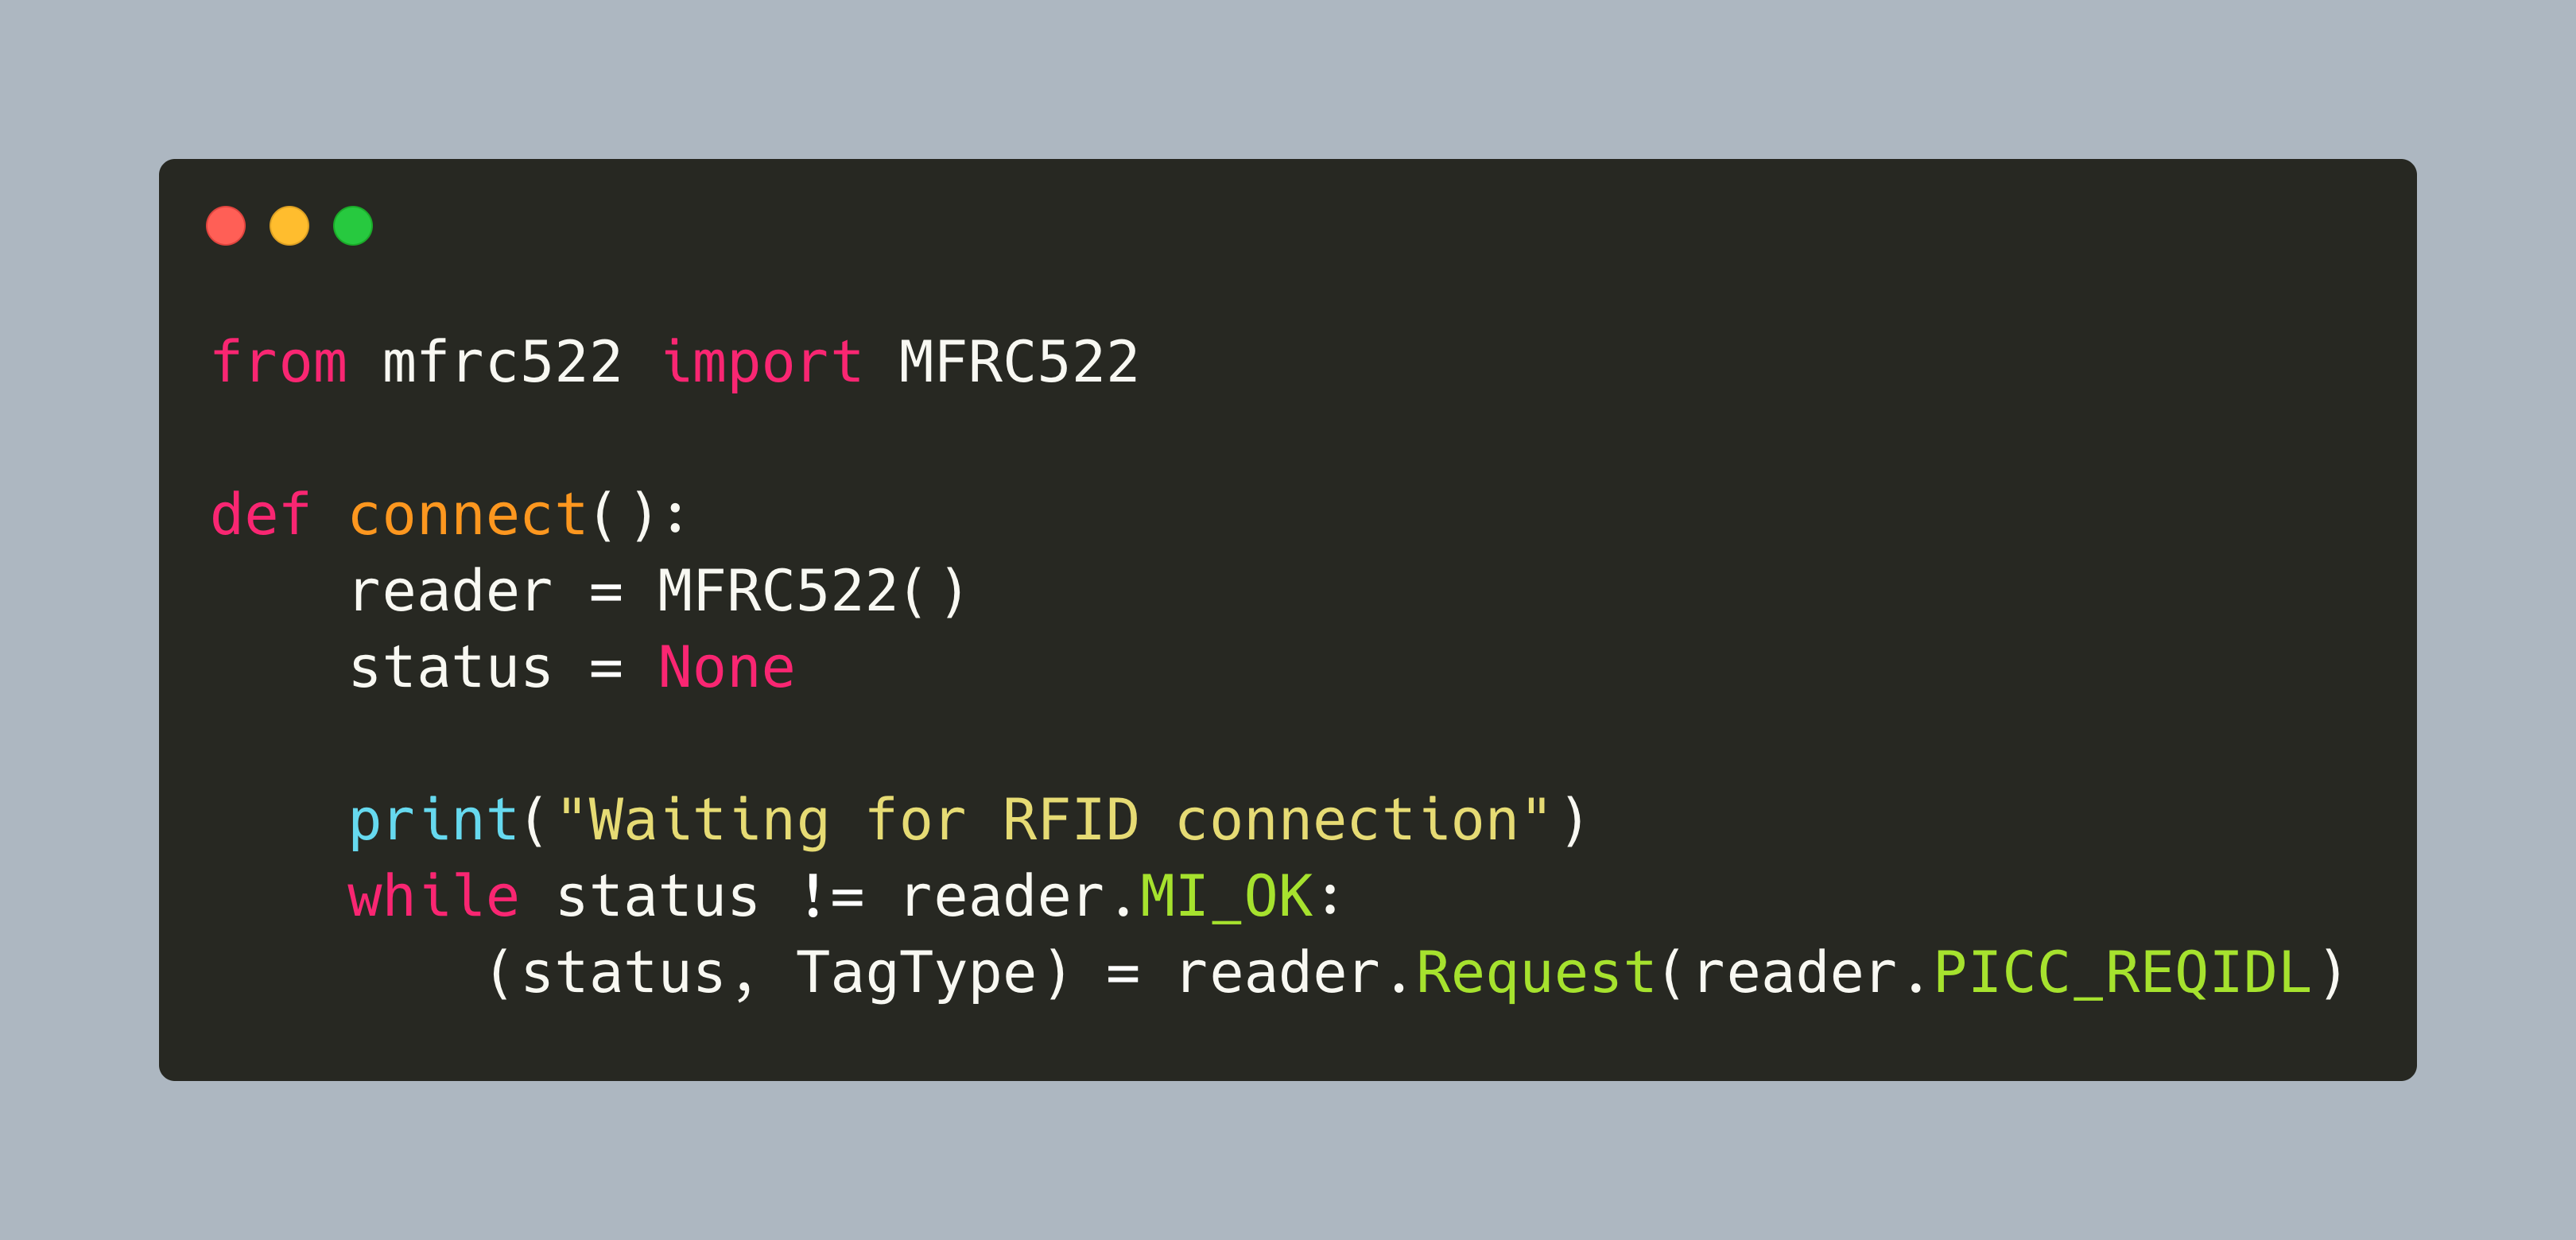
To use the library in a consistent way, and to ensure that a reader instances detaches from the RFID card after any operation, I created two methods. First, connect() establishes an active connection between the reader and the card, ensuring that only one card is paired. This method also returns the concrete UID of the paired card and an reader object for downstream tasks. Second, read_sector() consumes the reader object, the uid, and reads data from the specified blocks. You also need to pass the trailer block number that contains the auth information to read the block data.
from mfrc522 import MFRC522

def connect():
    reader = MFRC522()
    status = None

    print("Waiting for RFID connection")
    while status != reader.MI_OK:
        (status, TagType) = reader.Request(reader.PICC_REQIDL)

    (status, uid) = reader.Anticoll()
    if status != reader.MI_OK:
        return

    reader.SelectTag(uid)
    print("MFRC522 connected.")
    print(f"Status: {status} | UID: {uid}")

    return(reader, uid)

def read_sector(reader, uid, trailer_block, blocks):
    print(f"Try reading {blocks}")

    key = [0xFF, 0xFF, 0xFF, 0xFF, 0xFF, 0xFF]

    status = reader.Authenticate(
        reader.PICC_AUTHENT1A, trailer_block , key, uid)

    if status == reader.MI_OK:

    try:
        raw = []
        for b in blocks:
            data = reader.ReadTag(b)
            if data:
                raw += data
        return raw, ''.join(chr(i) for i in raw)

    except Exception as e:
        print(e)
    finally:
        reader.StopAuth()
I grabbed an RFID card from an Arduino sensor starter kit, and read the content of the first sector.
(reader, uid) = connect();
if reader:
    raw, data = read_sector(reader, uid, 3, range(0,3))

    print(f"raw: {raw}")
    print(f"Data: {data}")
Output:
Waiting for RFID connection
MFRC522 connected.
Status: 0 | UID: [202, 65, 144, 129, 154]
Try reading range(0, 3)

[202, 65, 144, 129, 154, 8, 4, 0, 98, 99, 100, 101, 102, 103, 104, 105, 0, 0, 0, 0, 0, 0, 0, 0, 0, 0, 0, 0, 0, 0, 0, 0, 0, 0, 0, 0, 0, 0, 0, 0, 0, 0, 0, 0, 0, 0, 0, 0]
Data: ÊAbcdefghi
Ok - it looks like I did write some data to this tag in the past.
Writing RFID Tags
The library also allows to write any data to a tag. Extra caution must be taken into which block data is written: The very first block should not be overwritten because it contains the manufacturer information. And in any sector, the trailer block cannot be written too, or it would corrupt the complete sector.
The following write_sector method takes care of these concerns.
def write_to_rfid(reader,data, blocks):
    print(f"Try to write data '{data}' to blocks {blocks}")

    if len(data) > len(blocks)*16:
        print("Error: not enough blocks for storing the data")
        return

    for b in blocks:
        if b in range(3,64,3):
            print("Error: Block {b} is a trailer block")
            return

    payload = bytearray(data.ljust(len(blocks) * 16).encode())

    try:
        for i, block_num in enumerate(blocks):
            reader.WriteTag(block_num, data[(i*16):(i+1)*16])

        print("Writing successful")
    except Exception as e:
        print(e)
    finally:
        reader.StopAuth()
You can write any byte data to an RFID tag. Here is an example to store a public SSH key, 44bytes, in sector 16 the RFID card. After writing, the content is read again to verify the operation.
try:
    (reader, uid) = connect();
    if reader:
        blocks = range(60,63)
        data = "3tdohq4Jg/ng6KhXPpEbmm5IxxSgbLSBOINqeWCdVb4"
        write_to_rfid(reader, data, blocks)

        raw, data = read_sector(reader, uid, 63, blocks)
        print(f"raw: {raw}")
        print(f"Data: {data}")
except Exception as e:
    print(e)
Let’s see the log output:
Try to write data '3tdohq4Jg/ng6KhXPpEbmm5IxxSgbLSBOINqeWCdVb4' to blocks range(60, 63)
bytearray(b'3tdohq4Jg/ng6KhXPpEbmm5IxxSgbLSBOINqeWCdVb4     ')
Writing successful

Try reading range(60, 63)
Data:  3tdohq4Jg/ng6KhXPpEbmm5IxxSgbLSBOINqeWCdVb4
Cool! Now that you control which data is contained on an RFID card, you can read the information and use it e.g. as an authentication mechanism.
Conclusion
RFID cards are ubiquitous devices that store data used for authentication. This article introduced you to the NRF522 RFID card reader connected and used with a Raspberry Pi. You learned how to connect the reader via an SPI interface, learned which libraries are available, and saw a Python library for reading from and writing to an RFID data. With this code, you can write custom data to your RFID cards, and then use this information for e.g. system authentication.