Building an IOT sensor with the ESP8266 and ESP32 boards can be done in two ways. Either you are starting with a basic sketch that accesses your sensor, and then add the IOT integration (WIFI, MQTT, InfluxDB message). Or you use an integrated System such as ESPHome or Home Assistant with which integration boils down to defining the correct configuration. After an initial sketch for a DHT11 sensor that I programmed completely with Arduino code, the next sensor should be integrated directly into ESPHome and Home Assistant. Following this approach, I want to see how different the approaches are, and in general how much work needs to be done.
So, on one weekend I started to add a BM680 Sensor. And after only 2 hours, including soldering the BME680 sensor, the Home Assistant dashboard showed barometric pressure, humidity, and temperature! This experience was the turning point for my IOT project: No more Arduino from scratch but using the rich ecosystem and available integrations as best as possible. So far, the only downside I see that you should check the compatibility of your sensor and boards before buying them, and that not everything will work with Home Assistant. But if it’s listed in the official documentation, it will work and it will work well.
This article summarizes all steps necessary to connect a BME680 sensor with an ESP8266 board, add the necessary code to read and send the sensor data, and integration with the home Assistant dashboard.
The technical context of this article is Home Assistant v2024.10.4 and ESPHome v2024.10.3, but it should work with newer versions as well.
Hardware Overview
For this project, you need the following hardware:
- ESP8266 board
- BME680 sensor
- Dupont cables
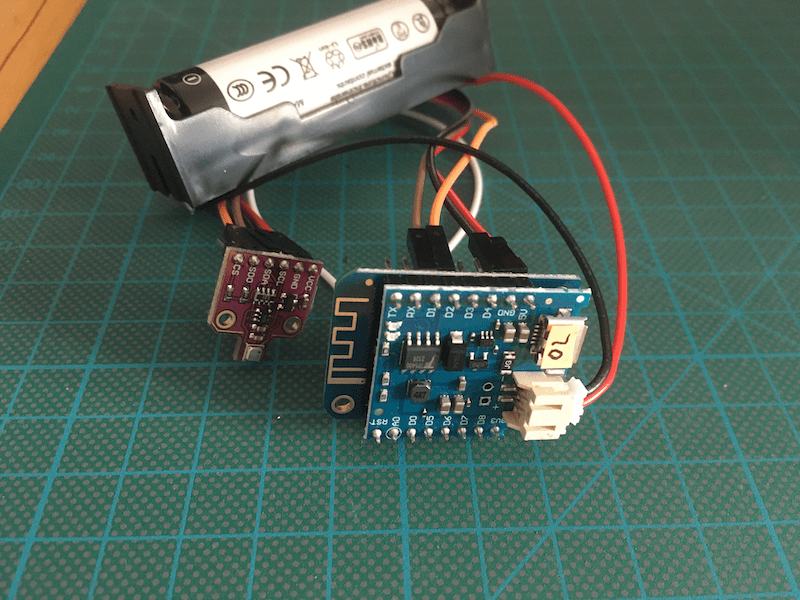
The concrete hardware for me: Wemos D1 Mini board, and the best price/performance/User review BME680 sensor I could find on Amazon. In the following pictures, the D1 board is shown with a battery shield on top, see my previous article.
Wiring
The BME680 chip supports both SPI and I2C connections. Since the official ESPHome documentation uses an I2C connection as well, I tried this. Wiring was a bit tricky for me because I accidentally looked up the wiring for SPI. For i2C, its quite easy:
- ESP8266 5V => BME680 Vin
- ESP8266 Ground => BME680 Ground
- ESP8266 GPIO 05 / D1 => BME680 SCL
- ESP8266 GPIO 04 / D2 => BME680 SDA
Please also refer to the following diagram:

Source: https://randomnerdtutorials.com
After completing these connections, the sensor looks as follows:

ESPHome Setup
To get the board running, head over the ESPHome Dashboard to create a new device. A usual, insert the default sections for the board, your WIFI, MQTT as needed, etc.
To get the BME680 to work, you need to choose between the old bme680 and the new bme680_bsec version. The difference: The new version will also give you values about the CO2 concentration and the Air Quality Index. Better use this one.
Then, make the following changes:
- Configure the
I2Csetup for your board, providing the pin numbers for SDA and SCL, and which I2C bus you want to use. - Add the
bme680_bsecsection, configure the I2Caddress, and other configuration options, including thesample_ratewhich is eitherulp(5min) orlp(3 seconds) - Add a new entry to the
sensorsection that lists all the measurements you want to capture - Finally, add also a
text_sensorto obtain a value explaining the validity of the IAQ measurement
Here is my complete configuration:
# Chip Info:
# - Chip Family: ESP8266
# - Chip Model: ESP8266EX

esphome:
  name: esp8266-02
  platform: ESP8266
  board: d1_mini

# ...

i2c:
  sda: 4
  scl: 5
  scan: true
  id: bus_a

bme680_bsec:
  address: 0x77
  temperature_offset: 0
  iaq_mode: static
  sample_rate: ulp
  state_save_interval: 6h

sensor:
  - platform: bme680_bsec
    temperature:
      name: "BME680 Temperature"
    pressure:
      name: "BME680 Pressure"
    humidity:
      name: "BME680 Humidity"
    iaq:
      name: "BME680 IAQ"
    co2_equivalent:
      name: "BME680 CO2 Equivalent"
    breath_voc_equivalent:
      name: "BME680 Breath VOC Equivalent"

text_sensor:
  - platform: bme680_bsec
    iaq_accuracy:
      name: "BME680 IAQ Accuracy"
Flashing the ESP8266
For the initial flashing of a new device, ESPHome offers these options: Connect the device directly to the computer running ESPHome, or download the binary to your computer and use an external flash tool.
This time, I tried the latter method. To flash it, I used the project esphome-flasher, a Python based program that checks connected USB devices and allows a serial connection. Its installed with python3 -m pip install esphomeflasher., and then started with esphomeflasher from the command line.

In the UI, I selected the device ``, then opened the ESPHome provided binary, and started the flashing process. The output was pleasantly similar to using the Arduino IDE.
$ esphomeflasher

Using '/dev/cu.usbserial-1420' as serial port.
Connecting....
Detecting chip type... ESP8266
Connecting....

Chip Info:
 - Chip Family: ESP8266
 - Chip Model: ESP8266EX
 - Chip ID: 0010625F
 - MAC Address: 94:B9:7E:10:62:5F
Uploading stub...
Running stub...
Stub running...
Changing baud rate to 460800
Changed.
 - Flash Size: 4MB
 - Flash Mode: dout
 - Flash Frequency: 40MHz
Erasing flash (this may take a while)...
Chip erase completed successfully in 15.2s
Compressed 350272 bytes to 248755...
Writing at 0x0003c000... (100 %)Wrote 350272 bytes (248755 compressed) at 0x00000000 in 6.2 seconds (effective 450.6 kbit/s)...
Hash of data verified.

Leaving...
Hard Resetting...
Done! Flashing is complete!

Showing logs:
[14:14:05]bcn 0
[14:14:05]del if1
[14:14:05]usl
[14:14:05]mode : null
[14:14:05]mode : sta(94:b9:7e:10:62:5f)
[14:14:05]add if0
[14:14:05]sleep disable
[14:14:11]scandone
[14:14:11]scandone
[14:14:12]state: 0 -> 2 (b0)
[14:14:12]state: 2 -> 3 (0)
[14:14:12]state: 3 -> 5 (10)
[14:14:12]add 0
[14:14:12]aid 3
[14:14:12]cnt
[14:14:13]
[14:14:13]connected with WIFI, channel 6
[14:14:13]dhcp client start...
[14:14:14]ip:192.168.2.107,mask:255.255.254.0,gw:192.168.2.1
[14:14:22]pm open,type:0 0
The boot up logs in Home Assistant also showed no error:
[19:41:47][C][template.sensor:022]: Template Sensor 'esp8266-02.battery_acc'
[19:41:47][C][template.sensor:022]:   State Class: ''
[19:41:47][C][template.sensor:022]:   Unit of Measurement: '%'
[19:41:47][C][template.sensor:022]:   Accuracy Decimals: 1
[19:41:47][C][template.sensor:023]:   Update Interval: 60.0s
[19:41:47][C][logger:193]: Logger:
[19:41:47][C][logger:194]:   Level: DEBUG
[19:41:47][C][logger:195]:   Log Baud Rate: 115200
[19:41:47][C][logger:196]:   Hardware UART: UART0
[19:41:47][C][bme680_bsec.sensor:124]: BME680 via BSEC:
[19:41:47][C][bme680_bsec.sensor:129]:   BSEC Version: 1.4.8.0
[19:41:47][C][bme680_bsec.sensor:131]:   Address: 0x77
[19:41:47][C][bme680_bsec.sensor:138]:   Temperature Offset: 0.00
[19:41:47][C][bme680_bsec.sensor:139]:   IAQ Mode: Static
[19:41:47][C][bme680_bsec.sensor:140]:   Sample Rate: ULP
[19:41:47][C][bme680_bsec.sensor:141]:   State Save Interval: 86400000ms
[19:41:47][C][bme680_bsec.sensor:143]:   Temperature 'BME680 Temperature'
[19:41:47][C][bme680_bsec.sensor:143]:     Device Class: 'temperature'
[19:41:47][C][bme680_bsec.sensor:143]:     State Class: 'measurement'
[19:41:47][C][bme680_bsec.sensor:143]:     Unit of Measurement: '°C'
[19:41:47][C][bme680_bsec.sensor:143]:     Accuracy Decimals: 1
[19:41:47][C][bme680_bsec.sensor:143]:     Icon: 'mdi:thermometer'
Waiting a short time, the new board showed up in ESP Home, and I could see the first measurements in the log file:
[19:48:29][D][sensor:121]: 'BME680 IAQ': Sending state 25.00000 IAQ with 0 decimals of accuracy
[19:48:29][D][sensor:121]: 'BME680 CO2 Equivalent': Sending state 500.00000 ppm with 1 decimals of accuracy
[19:48:29][D][sensor:121]: 'BME680 Breath VOC Equivalent': Sending state 0.50000 ppm with 1 decimals of accuracy
[19:48:29][D][sensor:121]: 'BME680 Pressure': Sending state 1024.05005 hPa with 1 decimals of accuracy
[19:48:29][D][sensor:121]: 'BME680 Gas Resistance': Sending state 10971.00000 Ω with 0 decimals of accuracy
[19:48:29][D][sensor:121]: 'BME680 Temperature': Sending state 4.96941 °C with 1 decimals of accuracy
[19:48:29][D][sensor:121]: 'BME680 Humidity': Sending state 67.82278 % with 1 decimals of accuracy
Troubleshooting
If the sensor does not work, try this:
- Reconnect all wires between the board and the BME 680 sensor
- When you are flashing the device, but operate it in a deep sleep mode, be sure to remove the wire between D0 and RST
- Read the log messages - the BME680 runs either on
0X77or0X76, be sure to use the correct one - Reset the device
Home Assistant Configuration
The final part is very easy - I just love how simple Home Assistant is. In the dashboard, click on New Card, then use the By Entity tab, and you should see a card preview with all the BME680 readings. Click on it, and then you have this data also on your dashboard:

Conclusion
This article showed how to add a BM680 Air Quality sensor to ESPHome and Home Assistant. First, we learned how to wire the sensor to an ESP8266 board using an I2C connection. Second, we saw how to configure ESPHome to work with an BME680 chip by adding separate I2C and bme680_bsec section, and then two entries to sensor and text_sensor. Third, after flashing, the board reports data, and can finally be integrated into Home Assistant.